A World War I Airplane Christmas Ornament
As an advent gift to the readers of my blog, I will be posting Christmas decorations every day for the next 25 days. I hope these Christmas decorations will brighten your day and bring joy to your home.
Today's decoration is a World War I airplane Christmas Ornament. I have named the airplane, North Pole Express and I placed Snoopy in the cockpit. My granddaughter loves Snoopy and I thought she would enjoy seeing him flying the airplane like the Red Baron.
Here is the PDF file. I used 65 lb foil cardstock. Four mini fasteners or brads are needed to make the snowman's arms and boots move.
Here is the .Studio file.
Here is the SVG.

Bend the hanger in half, insert it into the hole near the engine(center of photo), splay the tabs and glue to the underside of the fuselage.

Splay the tabs of the tail upward and glue the undersides (nonmetallic side) together. Set this piece aside

Splay the crossbeams of the top wing upward at a right angle. Insert the outer crossbeams into the bottom wings slots. Make sure the wing is facing the correct direction before gluing down the tabs of the crossbeam. The two center crossbeams will be attached to the fuselage later.

I like to use tweezers to make sure that the glued tabs adhere correctly.

Splay the wheel beams on the bottom wing at a right angle. Glue the tires together.

Glue all four tires to the wheels.

Apply glue to the bottom wing and attach the wing with the wheels.

Glue the name of the airplane on the top of the wing.

Glue the wing on top of the wing assembly.

Glue the propeller together.

Crease the fuselage as shown.
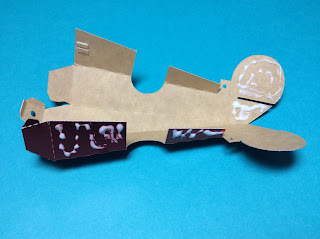
Apply glue as shown and adhere to make the airplane shape.

I used two tweezer to adhere the glue.

Slide the tail onto the back of the plane. Apply glue to the tabs and adhere with tweezers.

Bend the center engine piece backwards and glue the four sides of the engine compartment, one at a time. Use tweezers and let the glue dry before continuing with the next engine tab.

Assemble the Snoopy dog as shown above. Both side are identical.

Cut the prongs of a mini brad.The one on the left is the original size. The one on the right is the correct size which will fit in the engine compartment.

Attach the mini brad to the engine compartment by threading it through the propeller and engine compartment.

Apply glue to the bottom of the splayed tabs on Snoopy.

Apply glue to the bottom of the fuselage and glue it to the wing

Attach the wings by sliding it over the fuselage and gluing it underneath the fuselage as shown.

Attach the crossbeam inside of the wing. I used a Glue Dot because glue did not adhere properly.

Thread a string through the two holes on the top of the airplane so that Snoopy can be hung from your Christmas tree.

Snoopy is now ready to fly to the North Pole.
Merry Christmas!
This would look so cute on my Peanuts tree!!!
ReplyDelete