
The Bethlehem Star
The Bethlehem Star is the same construction as the Moravian star. It is a 26 point star. The difference is that the Bethlehem star has pyramids of varying size. I have done all the work for you on constructing the pyramids. I have added at the end of this post instructions on how to construct pyramids using the Silhouette software if you would like to learn how to make pyramids.
This Bethlehem Star is a 26 point star. It has 1 extra large square pyramid, 1 large square pyramid, 12 medium square pyramids, and 4 small square pyramids. It also has 8 triangular pyramids. It is built on a base which is a rhombicuboctahedron. A rhombicuboctahedron is an Archimedean solid with eight triangular faces and eighteen square faces.
This Bethlehem Star is a 26 point star. It has 1 extra large square pyramid, 1 large square pyramid, 12 medium square pyramids, and 4 small square pyramids. It also has 8 triangular pyramids. It is built on a base which is a rhombicuboctahedron. A rhombicuboctahedron is an Archimedean solid with eight triangular faces and eighteen square faces.
Here is the PDF file. I used 65 lb. cardstock.
https://drive.google.com/file/d/1sN1hp8WYtXhZQ6LHzFtFO_UEFSExPWLf/view?usp=sharing
Here is the .Studio file.
https://drive.google.com/file/d/1Nhicqqnc6AhuM4R0n3sr0ZXRMR3c0xBc/view?usp=sharing
https://drive.google.com/file/d/1sN1hp8WYtXhZQ6LHzFtFO_UEFSExPWLf/view?usp=sharing
Here is the .Studio file.
https://drive.google.com/file/d/1Nhicqqnc6AhuM4R0n3sr0ZXRMR3c0xBc/view?usp=sharing
Here is the SVG. Zoom out to see the entire file.
https://drive.google.com/file/d/1noeEDKBJ38o35MRkJsT9-ojlHltKYrXg/view?usp=sharing


The two flaps will be bent under the small rhombicuboctahedron. Notice in the above photo, the tabs are attached inside the small rhombicuboctahedron. Repeat until all of the medium sized square pyramids are attached.


Layout all of the pieces to make the Bethlehem Star

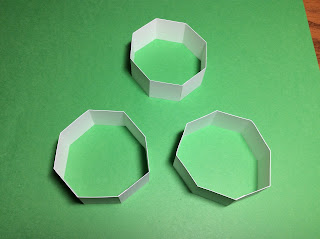
Fold the three strips of paper

Glue them into an octagon.

Apply glue on the two opposite squares of one octagonal strip. Slip the other octagonal strip over the glued area to form a structure as shown in the photo above.

Apply glue on the four middle squares as shown above.

Slide the third octagonal strip over the glued areas. This structure is now called a small rhombicuboctahedron

Fold the perforations of the triangular pyramid. Apply glue on the left side which looks like a triangle.

Completed triangular pyramid. Repeat for the remaining seven triangular pyramids. Set these aside. These pyramids will be the last to be glued to the model.

Bend the square pyramid and apply glue as shown.

Square pyramid.

If you want to hang up your Bethlehem star, tape a string in the center of the large square pyramid. The large square pyramid is the second largest pyramid size.

Glue the large square pyramid closed and allow the string to protrude from the center apex of the pyramid. Glue all the remaining pyramids together and sort them according to size.

The large pyramid is glued to the top. and the extra large pyramid is glued to the bottom.

The four small square pyramids are glued in the middle squares as shown above.

Notice the placement of the triangles and squares. The squares are where the medium square pyramids are glued. At this time, you have twelve medium sized square pyramids. They will be glued to each of the squares.

Using the medium square pyramid, bend two of the tabs inward and the opposite tabs outward. Apply glue to the tabs as shown above.

The two flaps will be bent under the small rhombicuboctahedron. Notice in the above photo, the tabs are attached inside the small rhombicuboctahedron. Repeat until all of the medium sized square pyramids are attached.

The last thing to do is to glue in the triangular pyramids. Apply glue to the triangular pyramid and insert into the triangle. Repeat for the remaining triangular pyramids.

Completed Bethlehem Star - Notice how big it is based on my ruler. It's huge!
Instructions on how to make pyramids using the Silhouette software:
In making this Bethlehem Star, I had to make each pyramid separately as the pyramid can not be resized to have the same base length. The base length in this case is one inch. I had to make a pyramid with a base of one inch and then a height that I perceived would look good on the star.

Here is how to make a pyramid using the Silhouette software. Using the Draw Polygon symbol shown in the top left corner of the picture above. (Turn on your grid so that you see that the triangle is drawn correctly.)

Make a triangle that has a base of one inch. You can do so by using the Transform Scale window and changing the width to one inch.

In Pointing editing mode, break the path of all of the three points. The points will turn from black to red when they are broken. In the Object menu, release the compound path. Change one of the sides to a dotted line, as shown above.

Measure the angle of the triangle by using the flexishape arc tool. the arc tool is the first shape.

Trace over the three points of the triangle using the flexishape tool. I moved the flexishape so that you can see what was created. At the top of the flexishape, the measurement of the top angle is 32 degrees. This measurement is needed to rotate the triangle to form the pyramid. You can delete the flexishape as this is no longer needed.

In the advanced replicate window, I rotated the shape 32 degrees. Keep rotating the shape as many times as you need to create your pyramid.

Here is the figure with the excess interior lines removed.

Duplicate the right hand dotted line.

Change the dotted line to a solid line. In point editing mode, create a point and attach this solid line to the figure. Your pyramid is now complete. You can use these same instructions for a pyramid with as many sides that you want.
I was thinking of making this for my church but can I just enlarge this so that it is about twice the size in order to be quite visible from the back of the church.
ReplyDeleteFirst I would suggest that you change the 2nd page of the pdf so that there's 2 copies of the triangle pyramid pattern and 3 copies of the medium square pyramid pattern (I doubt that it will all fit on one page but it would only then be a total of 3 pages). If you make these changes then a person could print 1 copy of the first page and 4 copies of the second and third pages.
ReplyDeleteThanks for your suggestions. I try to limit the number of pages that I post as there is a limit to my free file storage. I do not charge for my files and I would like to post my free designs as long as possible. If I run out of storage, I will be at a crossroads which I do not want to face anytime soon.😊
DeleteThis Bethlehem star is large as shown in the picture with the ruler. I think it would be visible from the back of the church. If you want it bigger, enlarge all of the pieces. The limiting factor would be the size of the card stock that you would need to purchase.
ReplyDeletei would like to use this as a christmas tree topper and i'm going to put lights in of the star while i'm putting the points on
ReplyDeleteI would think that putting lights inside the paper structure would be a fire hazard. I would not recommend it.
Deletecan i use this star as a tree topper
ReplyDeleteYes. I think you can use this model as a tree topper. Make the Bethlehem star as described. Cut the bottommost tip off. This will be where you can slide it onto the topmost branch of the tree.
Deletecan you assemble the star withoutthe base structure
ReplyDeleteI haven’t tried it but I think the pieces would have to be attached to the outside of the star.
Deletedid you there a song on the star by the oakbridge boys
ReplyDeletePretty song...thanks for mentioning it. https://www.youtube.com/watch?v=ZQCoh1PJjOk
DeleteThank you for your generosity in sharing these wonderful templates & concise directions.
ReplyDeleteI made the Bethlehem this past weekend and it was tedious to glue the flaps but ended up as a beautiful star for our tree this year.
ReplyDeletei made the Bethlehem star model and it's amazing i also used it as a tree topper on top of my four foot pine tree. it's electrified with microdot string lights.
ReplyDeleteHello Elaine - what is the length in inches of the triangular pieces and the three strips from which the star is made for the Moravian Star model?
ReplyDeleteThe largest triangle is 7 1/2 inches. The smaller triangle is 5 inches. The three strips are 8 inches long not including the tab.
DeleteFYI...you can create this star using the following program and make it any size you want...https://papercraftetc.blogspot.com/2022/12/a-stem-project-creating-small-moravian.html
I'm so incredibly grateful to have found your designs! Thank you for posting them. Would you be able to post an SVG file for this design?
ReplyDeleteI just updated the posting to include a SVG file.
DeleteThank you so much!!!
Delete