Thursday, December 20, 2018

Reindeer Box for a Little Special Treat


This reindeer box is very easy to make as a last minute gift or as a table decoration. The box dimensions are very small at one inch square. The design can be enlarged if you want to make a bigger box.  It holds two pieces of Santa candy. I bought the Santa candy from Aldi and Lidl and my husband says that Aldi's Santa tastes better. The Lidl's Santa is taller and is sized better for the box.

The shiny nose and the snowflake are sequins that I purchased at the Dollar store.  I did include a snowflake design if you want to cut one out of a shiny white vinyl.  I used card stock to make this design.

Here is the PDF.
https://drive.google.com/file/d/1e0yJvcjieLGfaY6BF_YZIV9r-7Bocq8P/view?usp=sharing

Here is the .Studio file.
https://drive.google.com/file/d/1XBVRdeGKj3PH9Ypvx-VuMZOatQq1OO3z/view?usp=sharing

 The Reindeer has a white tail.

Two pieces of candy can be placed inside the box.

Wednesday, December 12, 2018

Dump Truck Paper Model


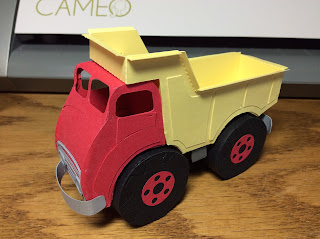
I made this model for Juanita who said she couldn't find a nice model of a dump truck. This truck takes about three hours to construct. Cut out all of the pieces and plan how you are going to construct the dump truck by looking at the photos. I recommend gluing on all of the veneer pieces before constructing the truck. Also bend all of the tabs before trying to glue any of the pieces together. The yellow truck bed should be glued from the top edge first, a few tabs at a time until you get to the bottom of the first corner. Align the rest of the tabs and corners. After all of the corners and edges are aligned, then glue the tabs down. For the cab of the truck, start gluing from the windshield and go downwards.  Glue one or two tabs at a time and let them dry completely before continuing. There are two tabs that meet at the bottom edge of the cab.  The tabs lay on top of one another.  I placed the back piece tab on top of the front piece tab. The cab is glued to the yellow truck bed on the back of the cab piece. The tires are constructed by gluing the front of the tire to the treads first.  Do not glue the back of the tire. Construct the undercarriage and then attach the back tire tab to the undercarriage. Wait for the glue to dry on the back tire tab. Attach the undercarriage to the body of the truck with glue.  Once the undercarriage is attached, glue the front of the tire to the back to complete the construction of the tire. I added a box structure between the front and back tires, instead of an axle, to make the tires secure so they will not wobble.

I used colored card stock and metallic card stock to construct this model.

Here is the PDF.
https://drive.google.com/file/d/1n_IVRCmYznoqZ_4k_qykfutW-uEBe0to/view?usp=sharing

Here is the .Studio file.
https://drive.google.com/file/d/1kxaG5KTlQkoZG1y6sB9B7UblX6q8WC28/view?usp=sharing

 Inside of the truck bed has a lining to hide the tabs on both sides.
 Notice the box structure between the tires.  This was done to secure the tires so that they do not wobble because there is no axle.
 The back undercarriage tab is used to glue on the back fender. I glued two undercarriage pieces together to make the undercarriage more secure.
 The front fender is glued on in just two places on the sides of the truck.
 Notice the placement of the grill and headlights.
The top edge of the entire truck bed has a bent edge.which is folded downward.

Tuesday, December 11, 2018

Nativity Christmas Ornament


I love the way that the star radiates on top of this nativity ornament.  I used gold metallic card stock to make this ornament. It's pretty simple to make. Glue the corresponding image together.  Glue three together, add the hangar circle on top and then glue the other three images together to complete the scene. Make the base and slide the scene into the base. 

Here is the PDF.

Here is the .Studio file.

Here is the SVG.


 Bottom View

 Top View


Wednesday, December 5, 2018

Red Pickup Truck with a Christmas Tree


This red pickup truck looks beautiful with a Christmas tree.  I used card stock and silver wrapping paper to make this model.  I recommend gluing the model slowly tab by tab. 

Here is the PDF.

Here is the .Studio file.


My fleet of vehicles is expanding.

Saturday, December 1, 2018

VW Love Bug Ornament for the Christmas Tree

VW Love Bug Christmas Ornament with a string hangar on top.

I made a VW Love Bug for my Christmas tree.  This three inch model reminds me of the time that a friend drove me in his VW Bug with a hole in the floor on the passenger side. The hole was so big that I could see the pavement speeding by at 50 mph. It was a wild ride!

The curved tire well pieces are a little hard to put together.  I recommend curving all the pieces to their final form and then gluing them tab by tab.  It is a little tedious but it works.

I used cardstock for the model and shiny vinyl for the peace flowers.

Here is the PDF.
https://drive.google.com/file/d/17lP_S01WW1vbDrCOHJBj3Wg-h5LRV2Ny/view?usp=sharing

Here is the .Studio file.
https://drive.google.com/file/d/1g-KRolmGfNzAuGPOX3w-8G6SFzdhdjC_/view?usp=sharing

Here is the SVG.
https://drive.google.com/file/d/17ZJq-nqMWRNfU22P5YREH_8gFiP5LOwV/view?usp=sharing

 The bumpers are glued on just the ends


 undercarriage 

Prototype without the string hangar