Sunday, July 16, 2023

A STEM Project: Making a 3-D Paper Model of Sierpinski's Triangle and Programming Sierpinski's Triangle in TurtleStitch

A 3-D Paper Model of Sierpinski's Triangle


Sierpinski's Triangle is a fascinating structure whereby an equilateral triangle is reduced in size by one half to produce a smaller equilateral triangle. 

Starting with an equilateral triangle, divide this into four smaller equilateral triangles using the midpoints of the three sides of the original triangle as the new vertices. Remove the center triangle. You now have three equilateral triangles within the original equilateral triangle.

By repeating the process of dividing the equilateral triangle and removing the center,  the progression will look as above after three divisions or stage 3. This division is a fractal which is self-similar, the small parts are copies of the whole.

 Stage 3 Sierpinski's Triangle

My 3-D representation of Sierpinski's Triangle is created by taping 64 equilateral triangle together.  My equilateral triangle net does not require any tape as there are tabs which keep the triangular net together. 

Here is the PDF. I used 65 lb. cardstock.

Here is the .Studio file for Silhouette Cameo users.

Here is the file as an SVG for Cricut or another paper cutting machine. 

Constructing the 3-D Sierpinski Triangle Model


The equilateral triangle net is folded to create a triangular pyramid. The net is held together by three tabs which are inserted into their corresponding slots. Make 64 triangular pyramids.


 Tape four of the triangular pyramids together to form a Stage one Sierpinski triangle. Shown in the photo above on the right side.


Four of Stage one Sierpinski triangles are needed to make a Stage two Sierpinkski Triangle. In the photo above, four Stage two Sierpinski triangles were made.


By arranging these four Stage two Sierpinski triangles, a Stage three Sierpinski triangle is created.

In the following program in TurtleStitch, I programmed Sierpinski 's triangle to the sixth stage.  https://www.turtlestitch.org/run#cloud:Username=Elaine&ProjectName=Sierpinski%20Triangle%20Progression%20To%20Sixth%20Stage

Sixth Stage Progression Created in TurtleStitch 

To find out the stage of Sierpinski's triangle, count the number of different sized triangles.  Each different sized triangle represent another stage.

In programming this progression, I tried to create a procedure where the path by which each triangle is drawn, is never retraced. I tried to make the program recursive but I failed to do so without retracing my steps. If you would like to see a recursive version of Sierpinski's triangle, Cynthia Solomon has coded it in this Turtlestitch program, https://www.turtlestitch.org/run#cloud:Username=mqj&ProjectName=%40CynthisSolomonPeanoHilbertDragonBendingTreeFlowsnakeSierpinskiTri%26Curve%20Playground


A reimagined Stage 2 Sierpinski triangle created with pursuit triangles

In the following program in TurtleStitch, I tried to be creative and changed the equilateral triangle into a pursuit triangle which spirals inward. 

Saturday, July 15, 2023

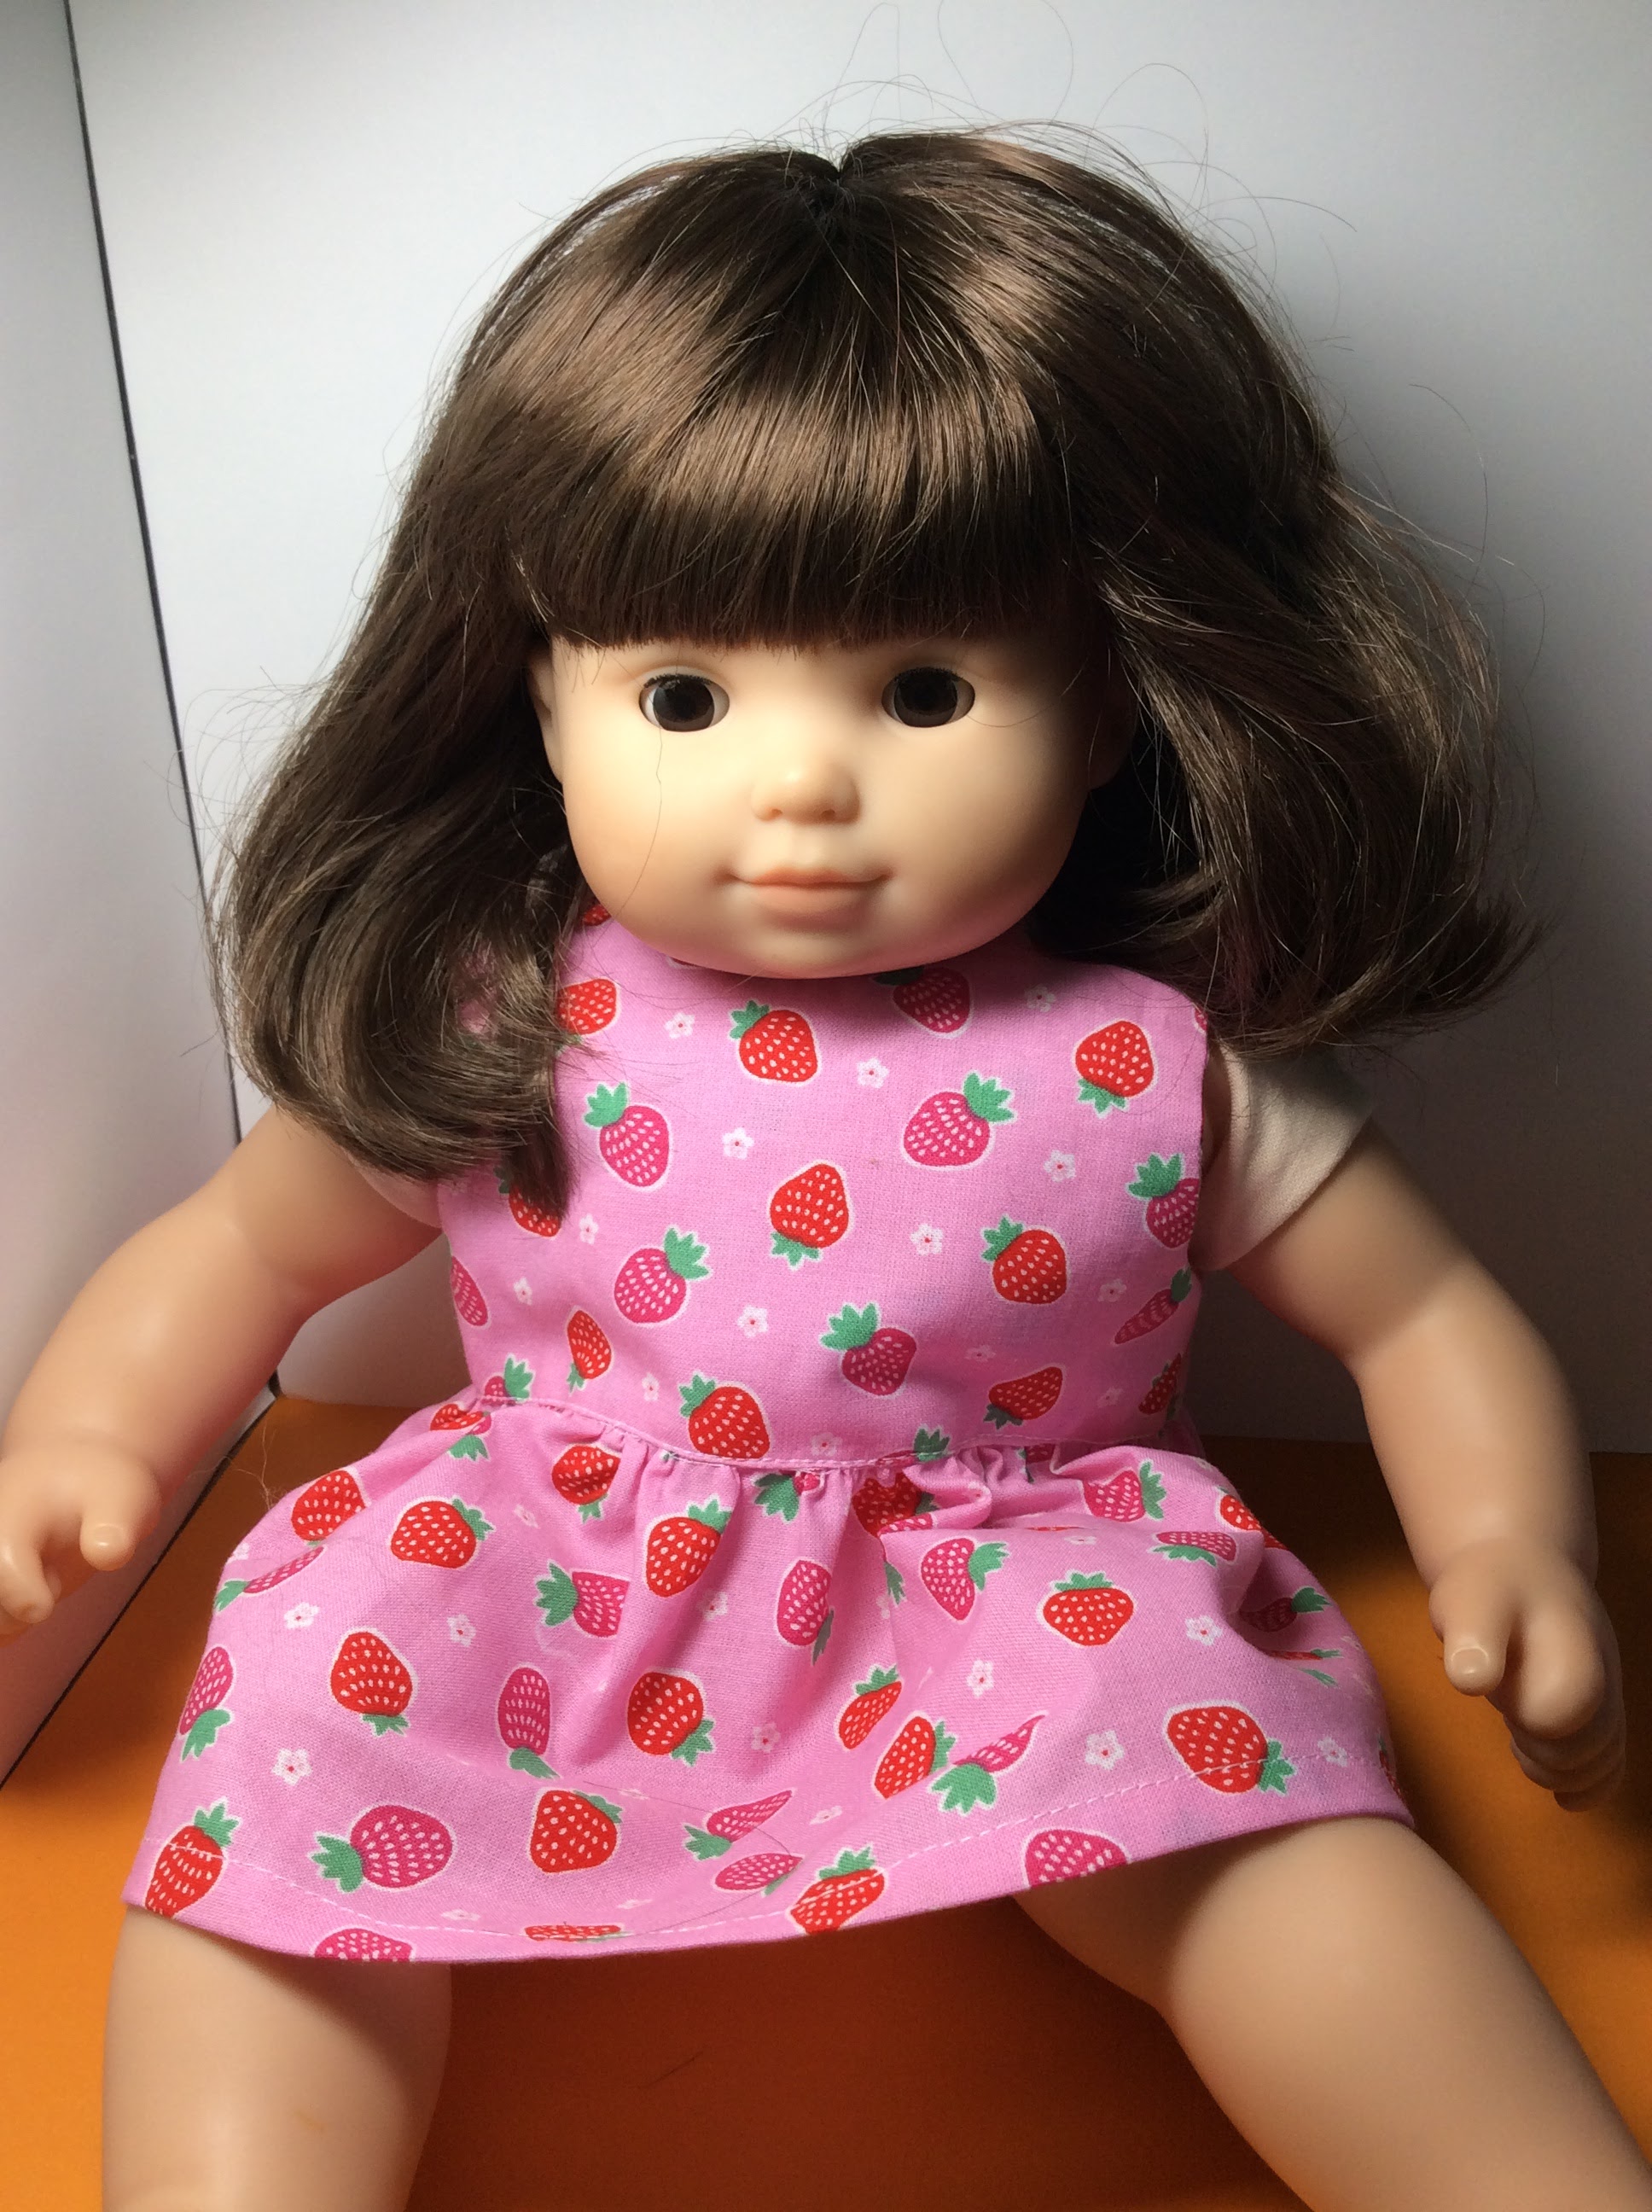
Dress Patterns For An American Girl Bitty Baby Doll And A Little Bitty Baby Doll


Dress Patterns For An American Girl Bitty Baby Doll And A Little Bitty Baby Doll 


Please note, these dresses can be hand sewn if you do not have a sewing machine using an 1/8 inch stitch length.


Here is the PDF for the dress pattern. Print out the pattern with your printer.  There is a one inch square for reference if the pattern does not get printed correctly.

Here is the .Studio file for Silhouette Cameo users. Cut the pattern piece with your Silhouette.

Here is the file as an SVG. Cut the pattern piece with your Cricut or other paper cutting machine. The file goes beyond the viewable area.  Zoom out to see the entire file

The directions to make both dresses are similar.  The only difference is the back seam is sewn partially for the Bitty Baby. The Little Bitty Baby's skirt lies flat when open.


1. Cut the dress pattern as described on the pattern pieces. I traced the pattern onto the fabric and then cut the fabric.


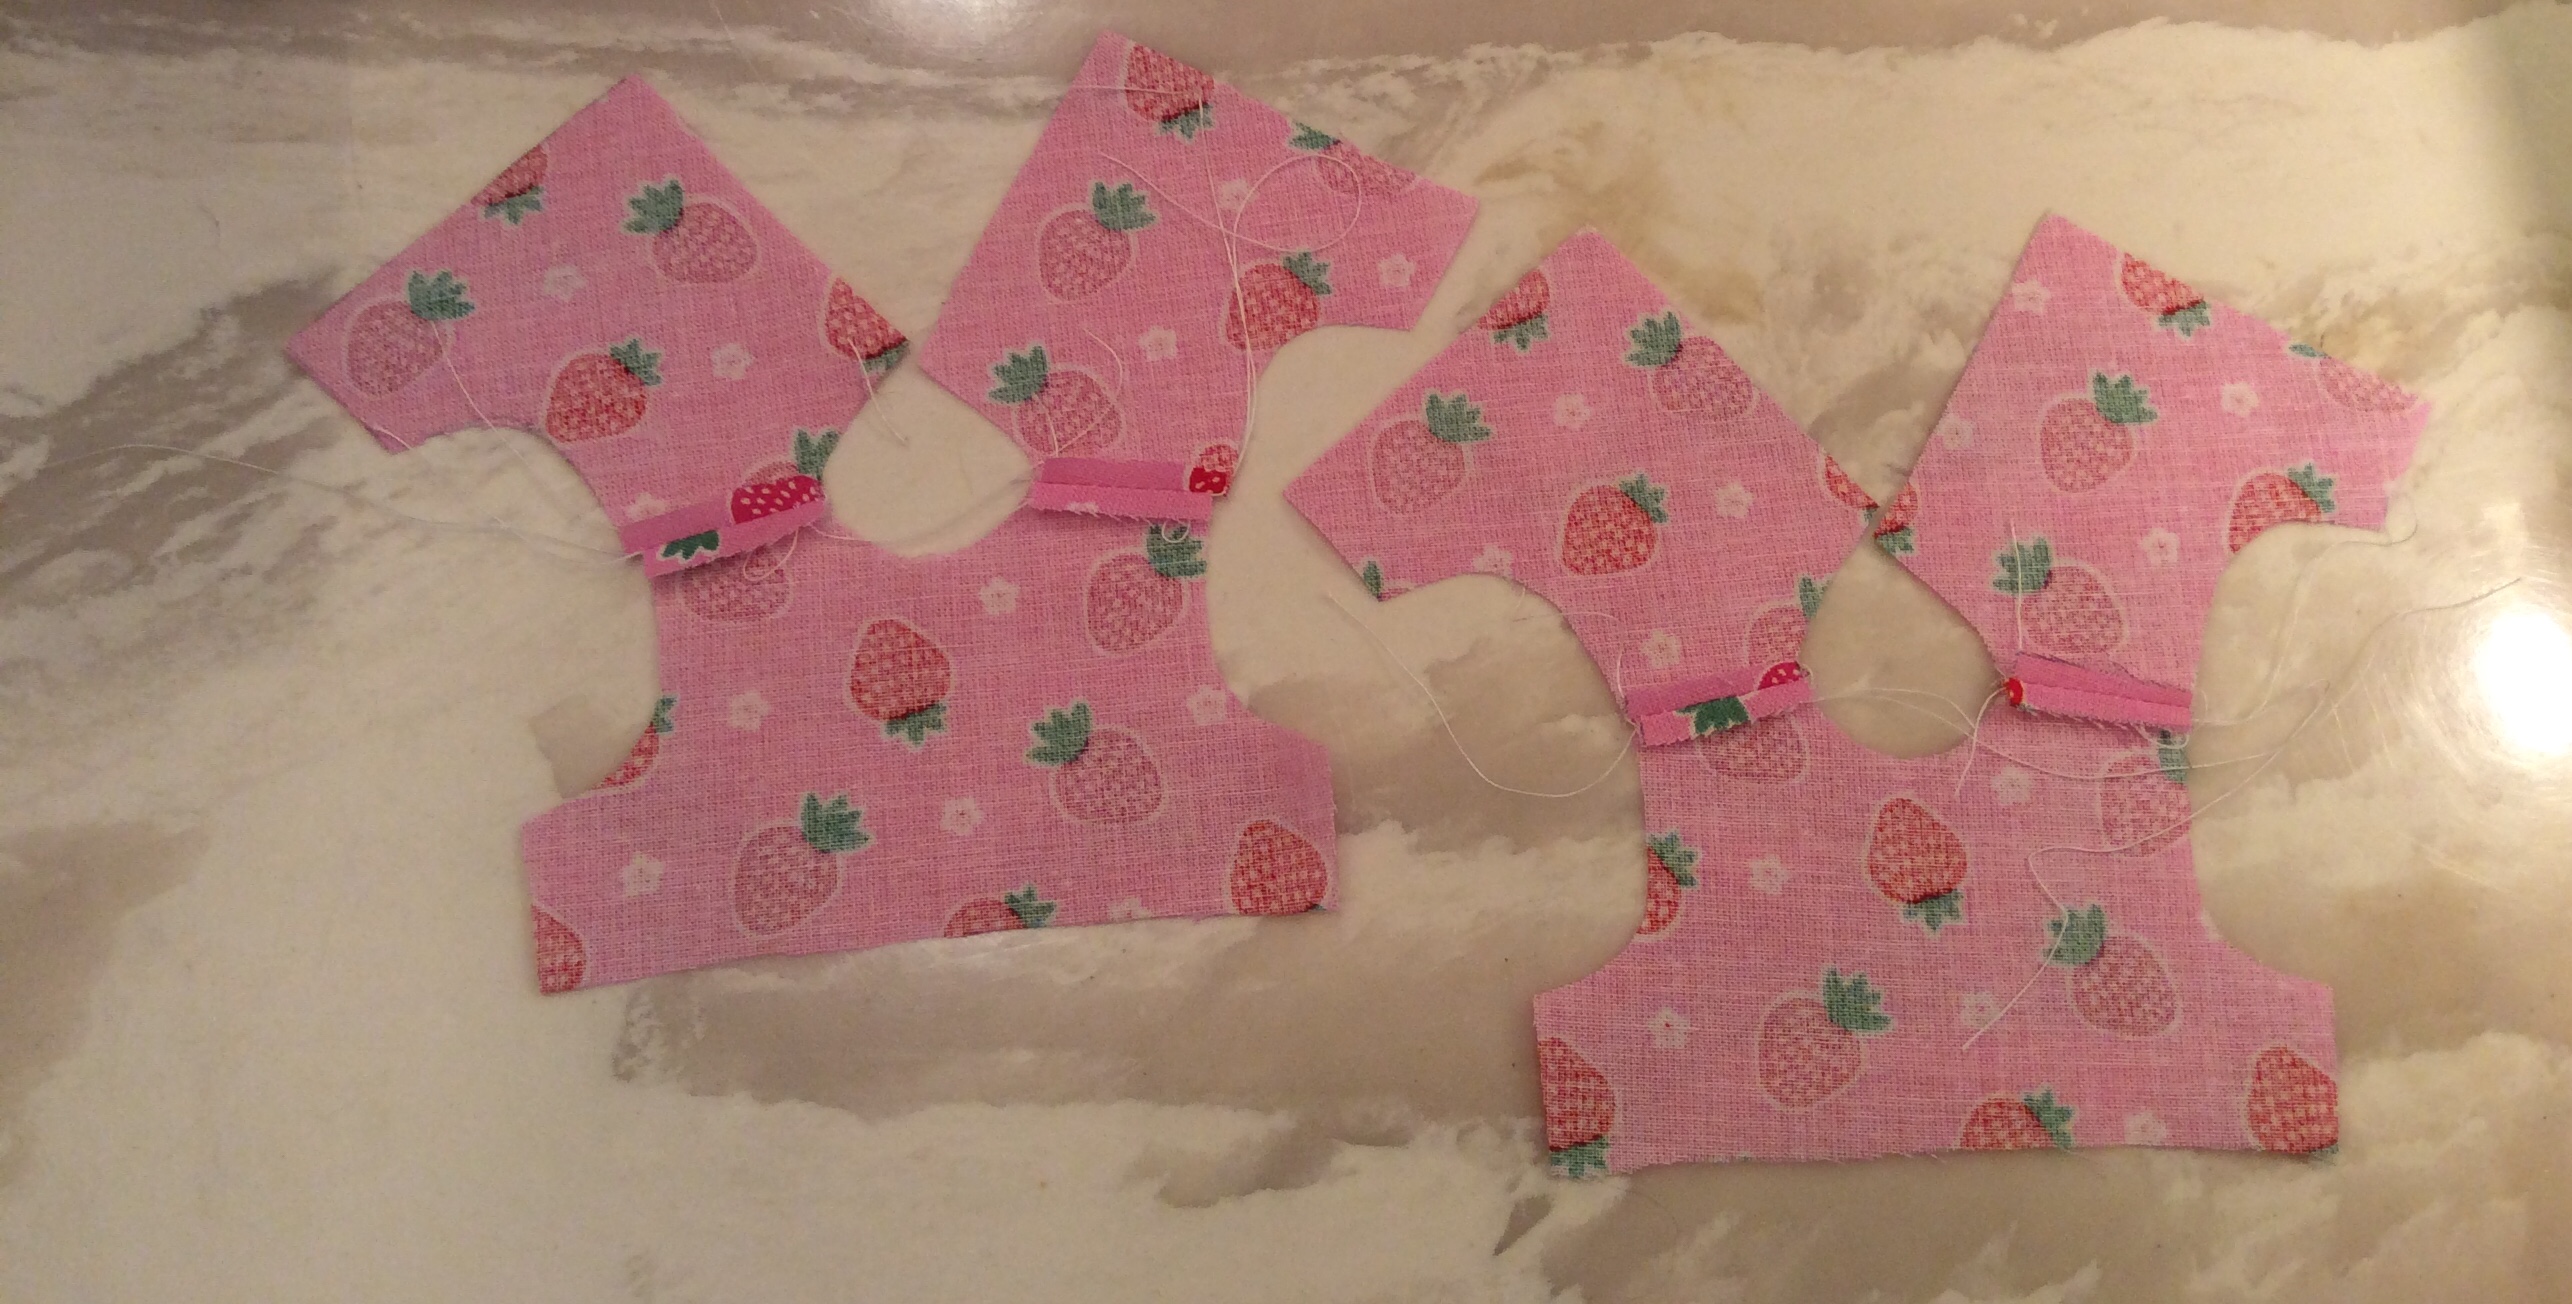
2. Sew the bodice together at the top seams. There are two bodices.

3. Place the two bodices together and sew the neck seam.  Sew the two arm hole seams.

4.Turn the piece right side out.  This is difficult and should be done very slowly as to not tear the seams.
Once the one side is done.  Turn the other side right side out.

Iron the bodice.


5. Sew the side seam together. Side seam has been sewn and finger pressed open. Repeat for the other side.

Bodice top is complete

6. Iron the bottom seam of the skirt with a 1/4 inch seam twice and sew the bottom edge.

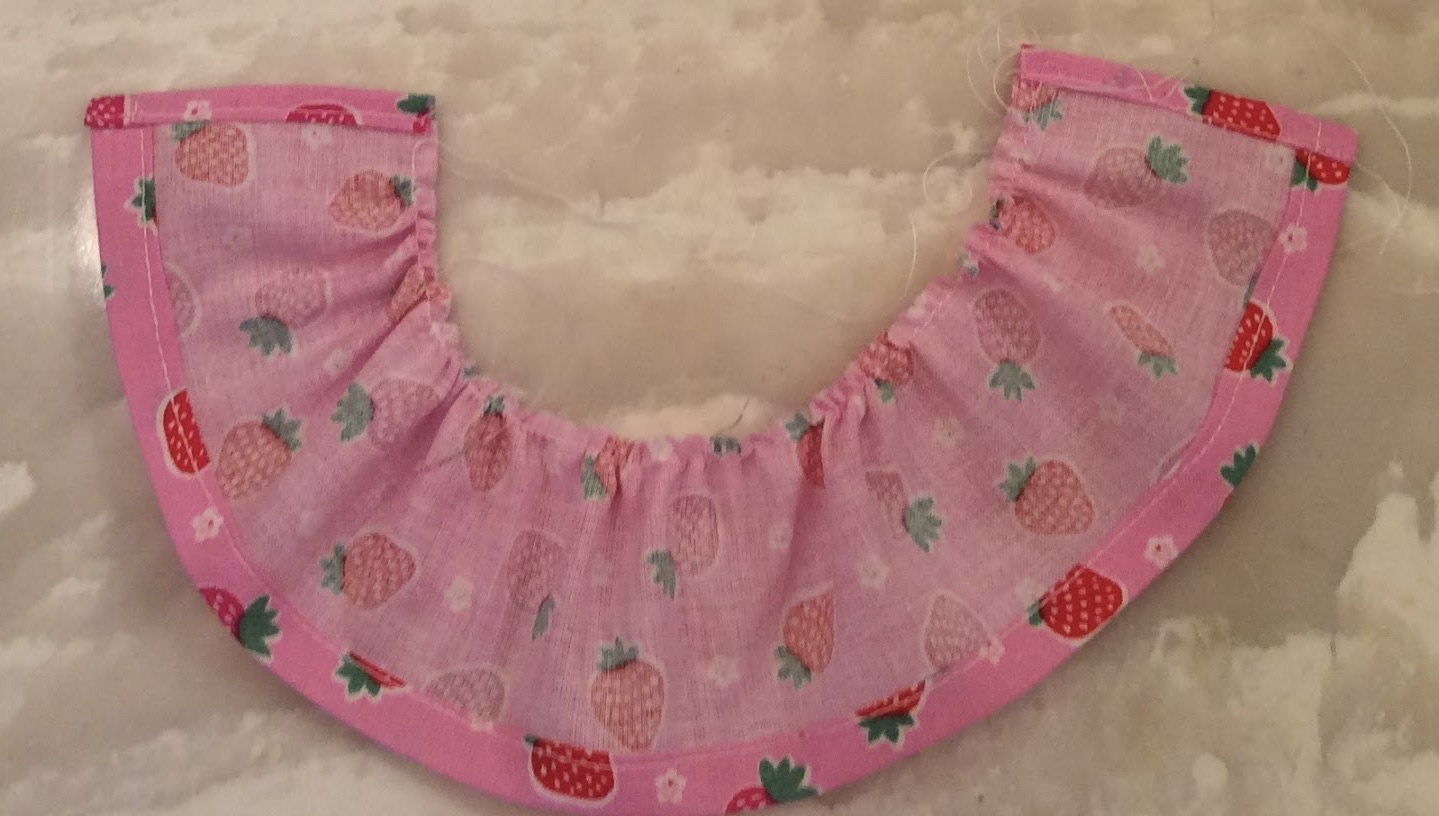
7. Ironing a 1/4 seam twice  on each side of the skirt and then sew theses seams. Sew a running stitch along the top edge of the skirt. Gather the top edge of the skirt by pulling on the running stitch.

8.This photo shows both the Little Bitty Baby and Bitty Baby pieces bodices and skirt pieces.

9. The Bitty Baby gathered skirt is sewn to the front of the bodice. 

10. The back bodice is folded under an 1/8 inch.

11.  Topstitch the bodice seam with the sewing machine.

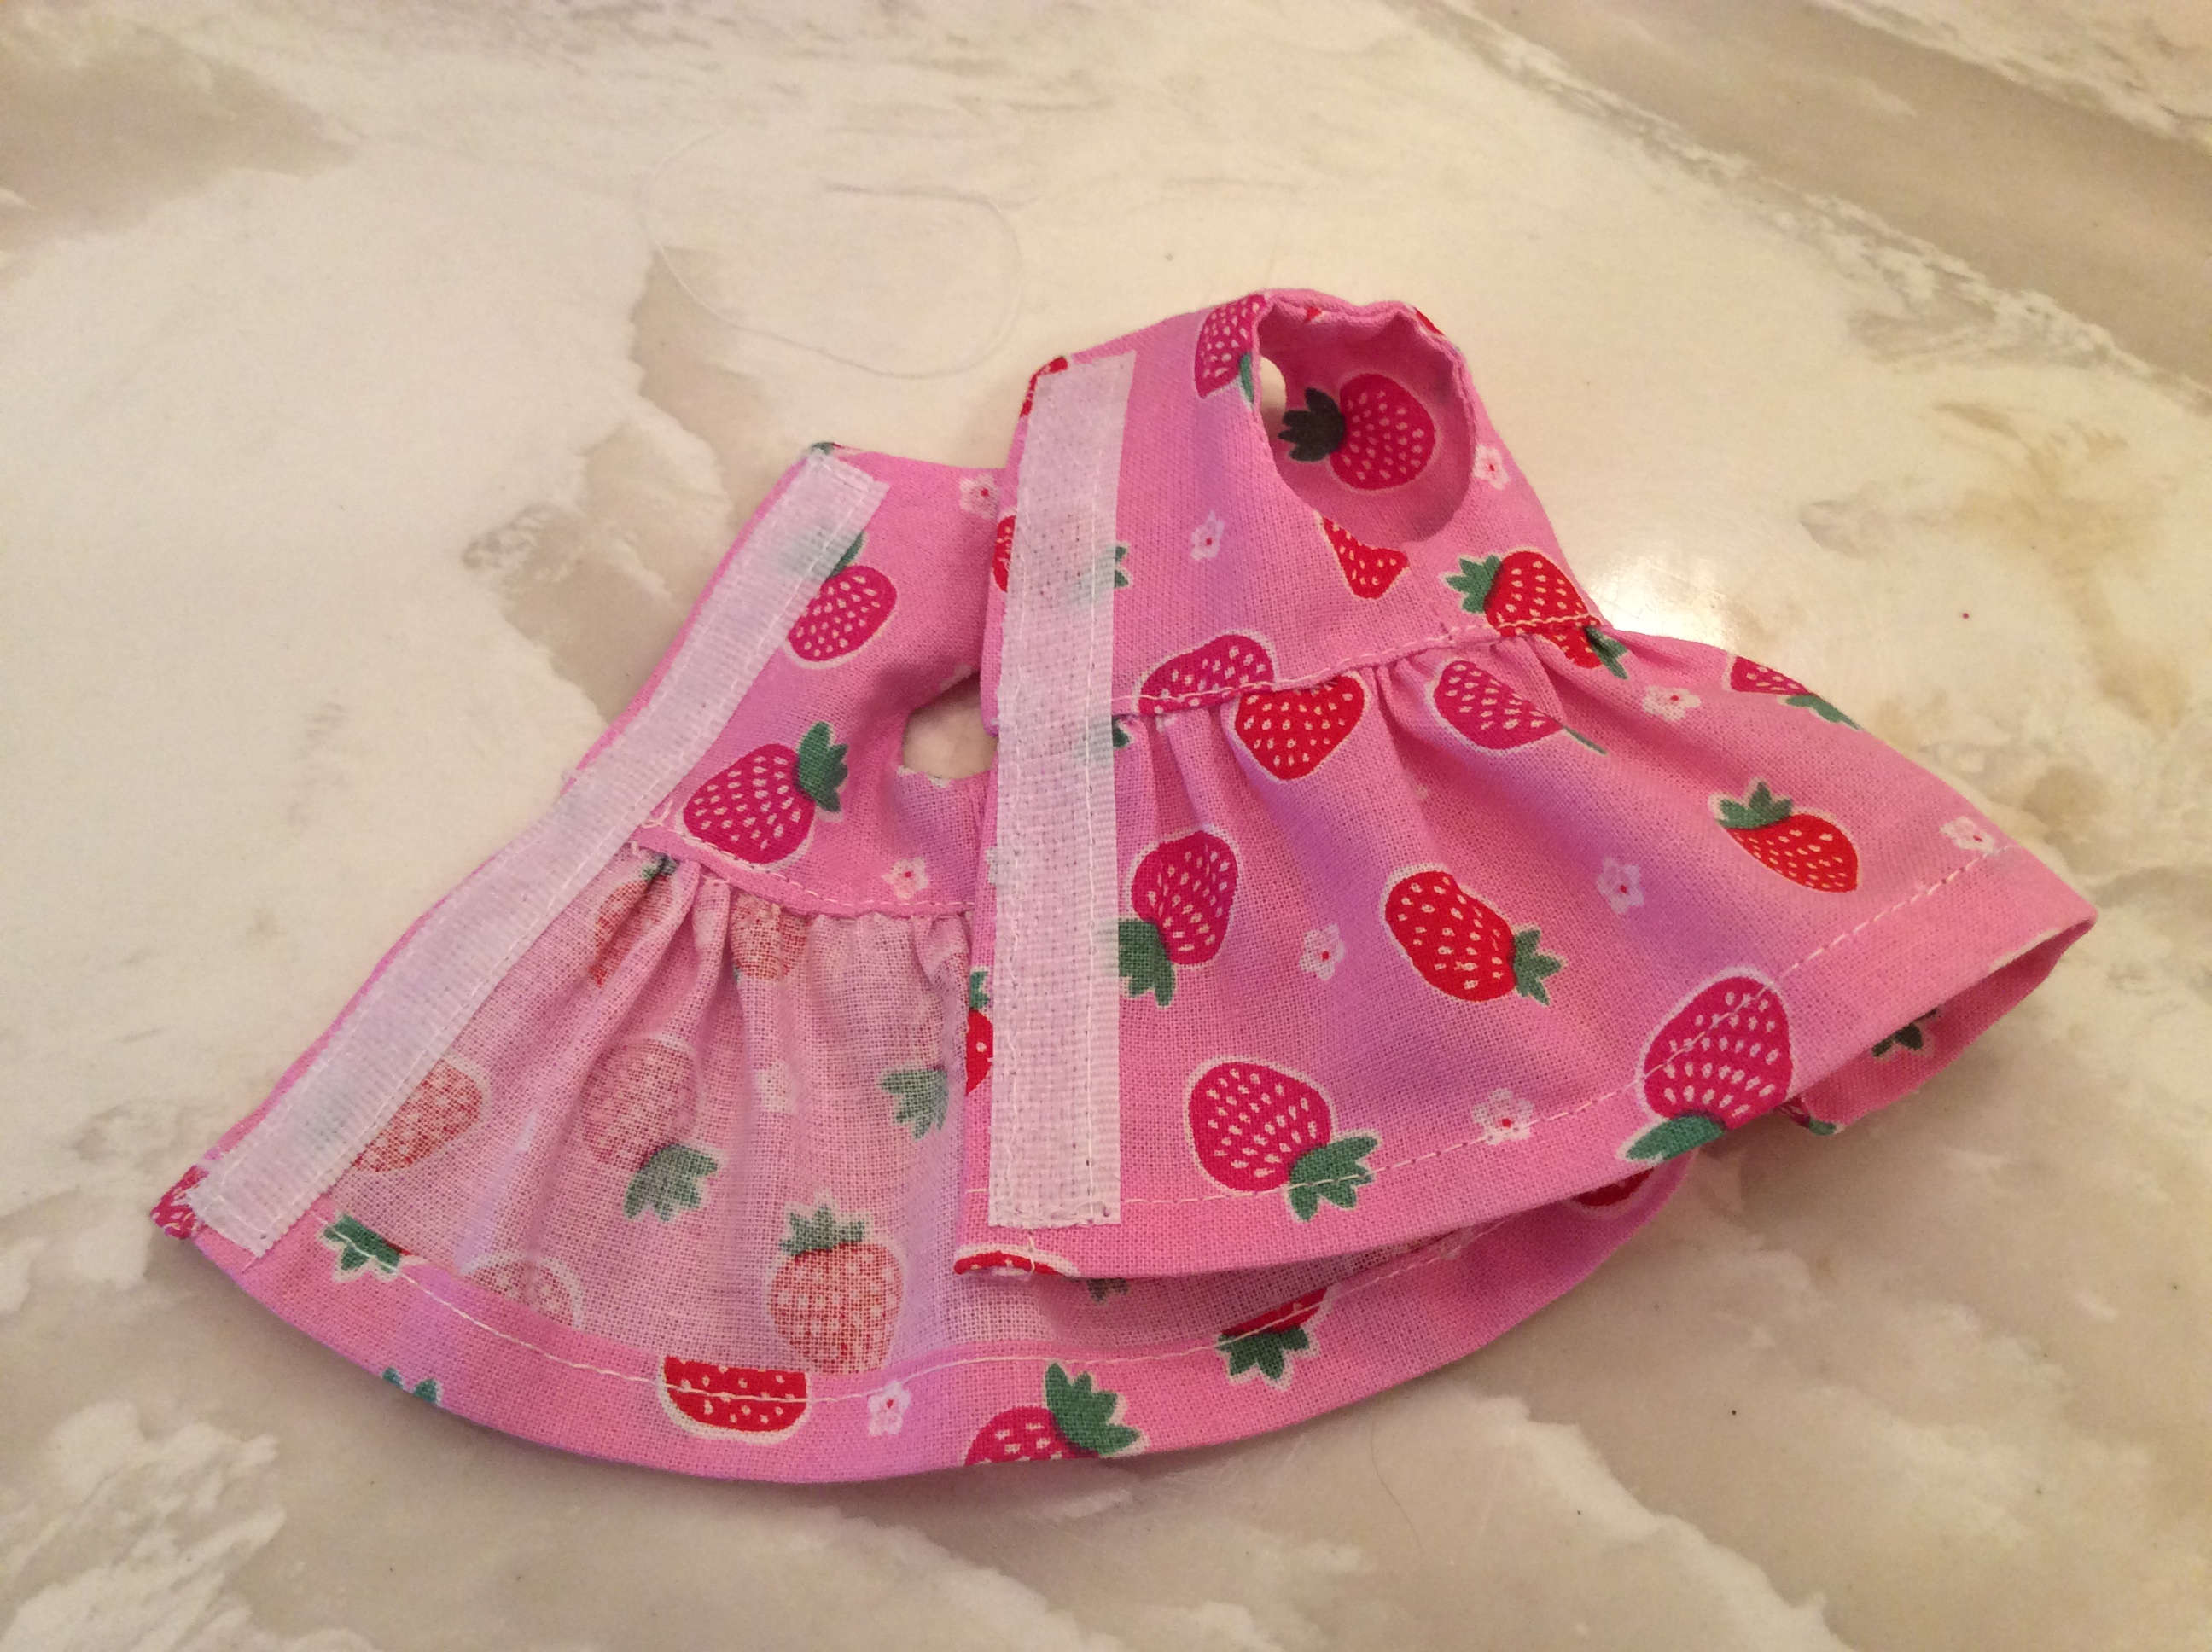
12.  For the Little Bitty Baby, sew 1/2 inch x 3 1/2 inches velcro to the side seams. The fuzzy velcro is on the left side, on the inside of the left bodice.  The hook velcro is on the right side on the outside of the right bodice.


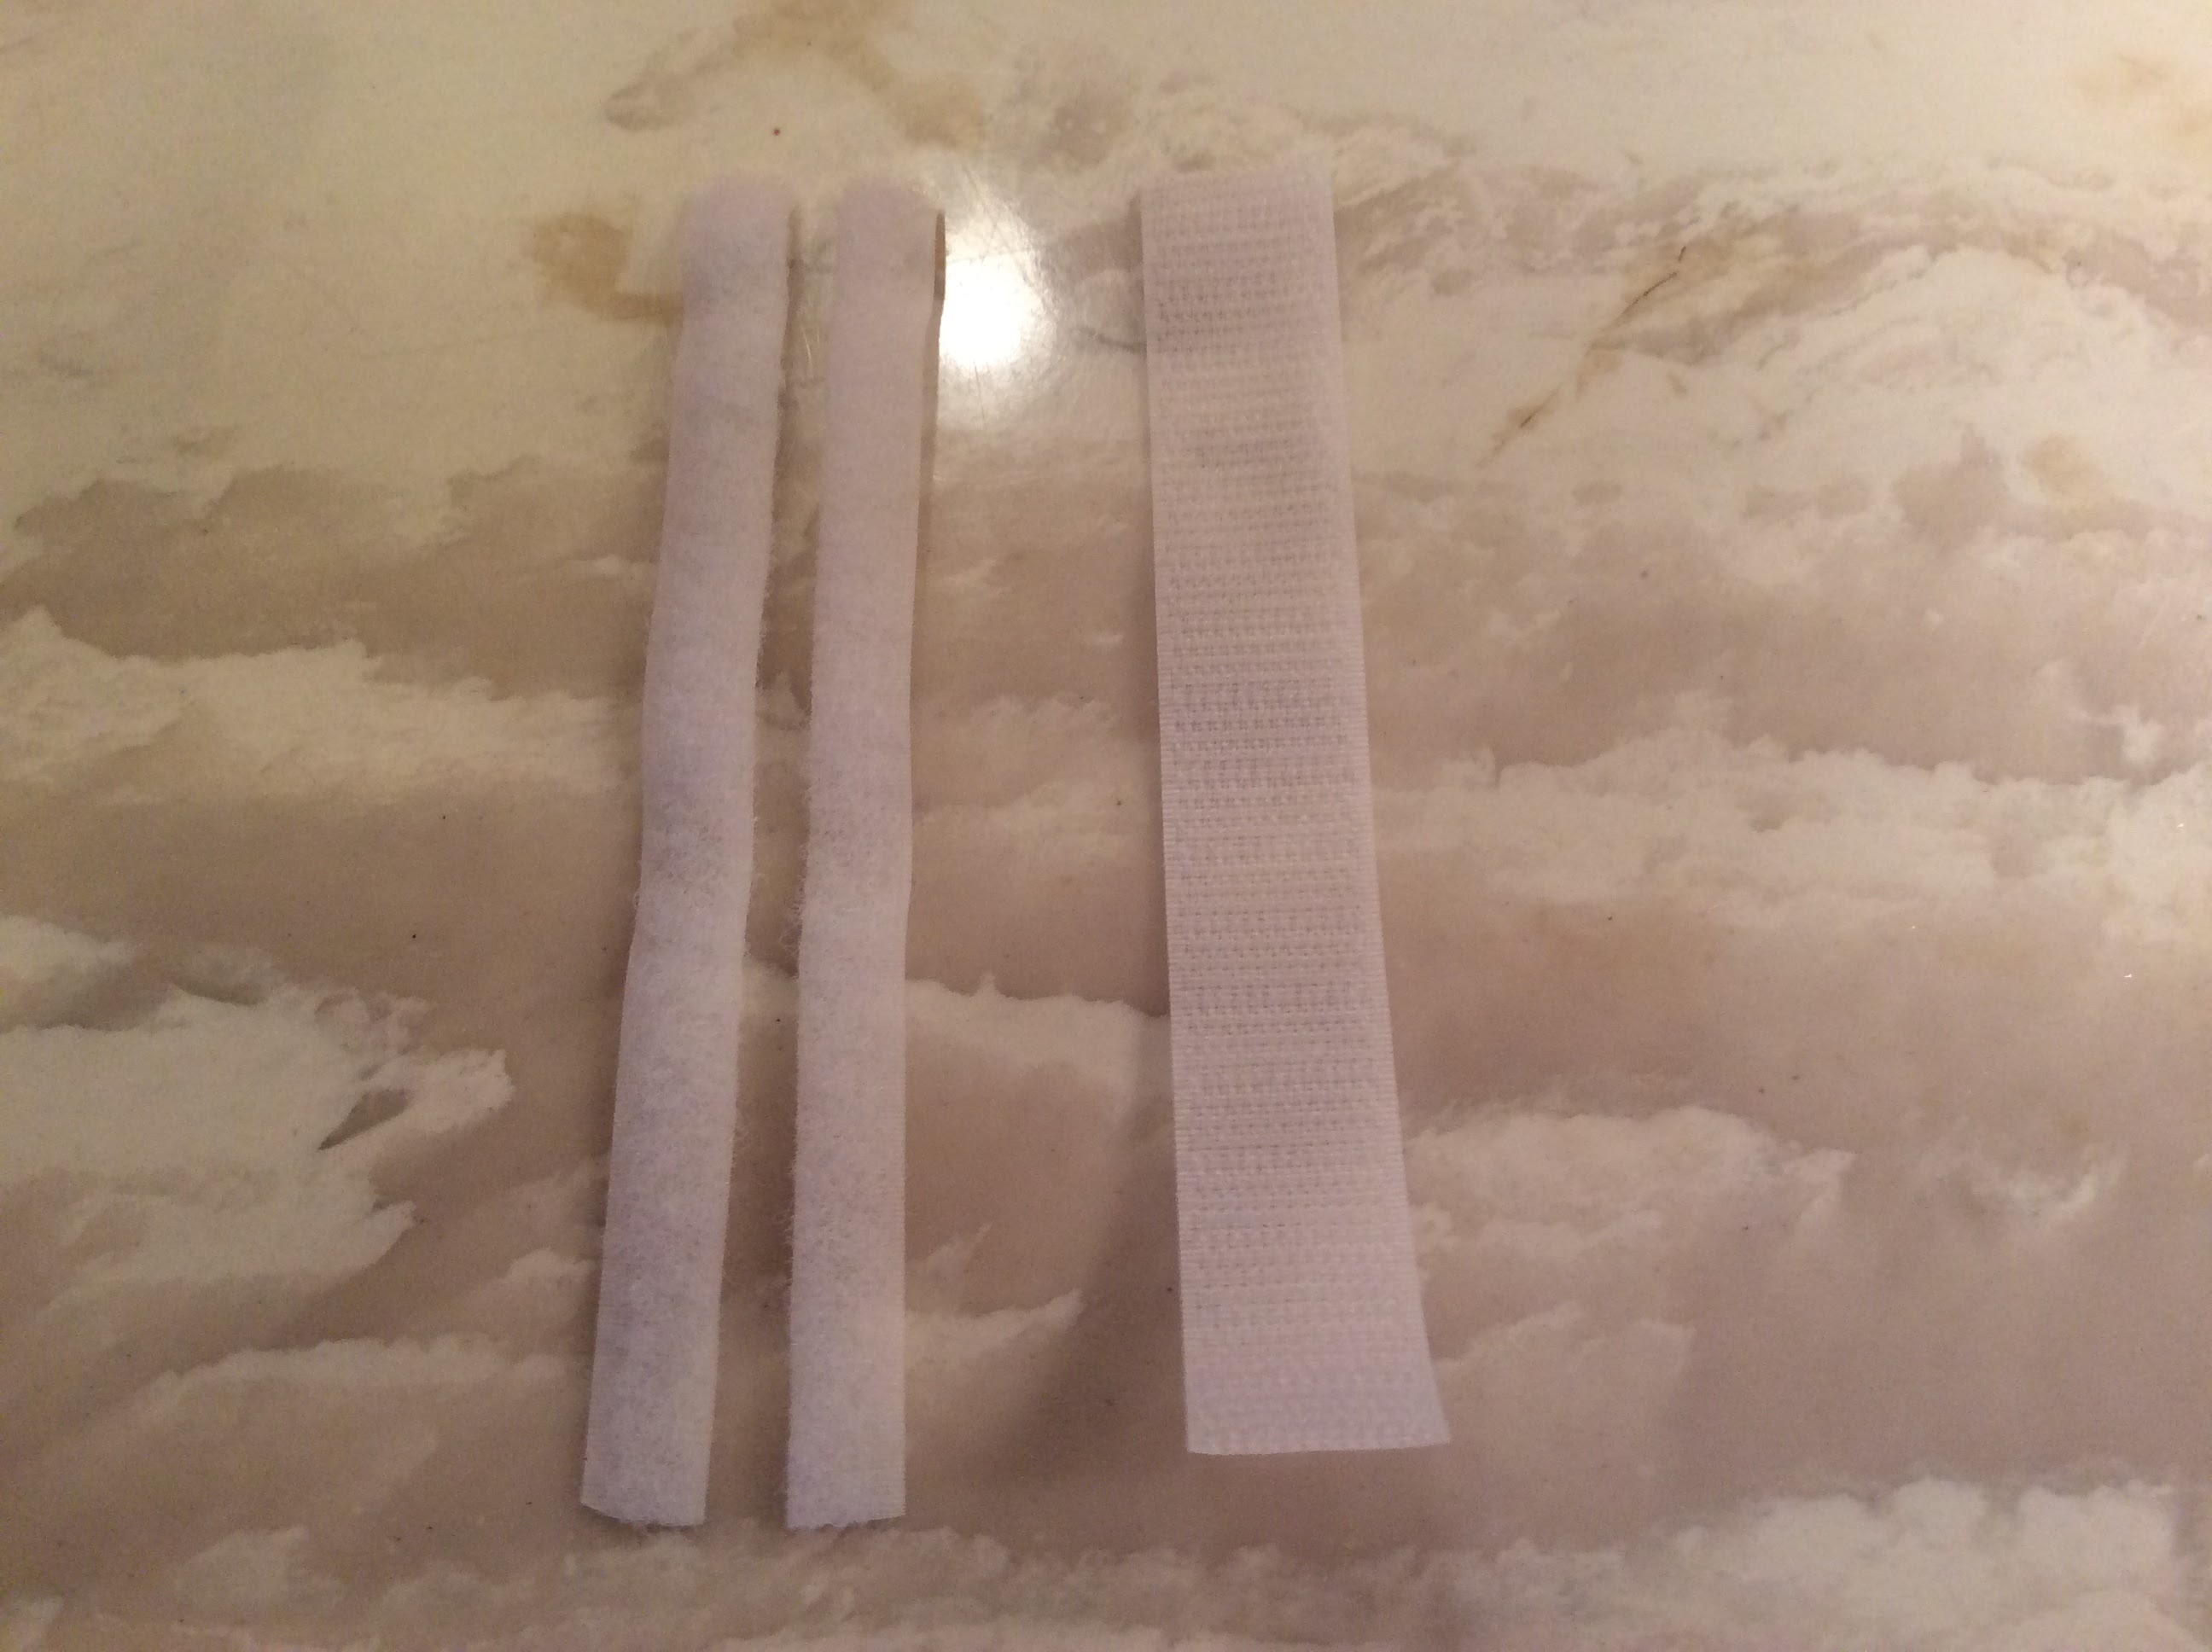
12.  For the Bitty Baby, cut the fuzzy side of a 3/4 inch x 5 inches velcro in half.


Sew this velcro to the inside of the left bodice.

Sew the 3/4 inch wide piece of velcro to the inside of the right  bodice with half of the velcro hooks exposed.

The overlapping velcro attaches to the other side of the velcro and the back seam is flat.

Little Bitty Baby

Back View

Bitty Baby

Back View with Velcro Showing

Saturday, July 8, 2023

A STEM Project: Resizing a Sun Hat Pattern for a 7.75-inch American Girl Little Bitty Baby Doll


 A 7.75-inch Sun Hat Pattern For An American Girl Little Bitty Baby Doll 
The Criss Cross dress pattern is from a previous blog posting.


Please note, this sun hat can be hand sewn if you do not have a sewing machine using an 1/8 inch stitch length. 

Resize a Pattern

Patterns for 8 inch dolls are hard to find. It is easy to find larger size commercial patterns for bigger dolls. In this blog posting, I use the larger size pattern for an 11 inch doll and resize it for an 8 inch doll.  I used McCalls pattern M 4338.

*My directions for making this sun hat is not the same as the McCalls pattern.  Smaller sized dolls need more care when sewing. I like to hand sew things for more accuracy.

Resizing a doll dress pattern is an easy task using the Silhouette Cameo software.  The first thing you need to do is to scan the pattern into your computer and open the file in your Silhouette Cameo. Trace the image. Make sure the size is preserved.  To do this measure the original paper pattern and then the traced pattern in the Silhouette design space.  Select the entire trace and resize it to this original paper pattern size. Once the traced object is the correct size, use the following calculation:

Using the original size of the doll pattern, in my case it was 11 inches, calculate the size of the new doll pattern of 8 inches.

                  New Pattern Size        =    8 inches     =  0.727 x 100 =  72.7% reduction 
                 Original Pattern Size         11 inches

In the Silhouette design space, in the Transform drop down menu, select Scale and make the scale value 72.7%.  Apply the value. The pattern piece will now be the correct size for the 8 inch doll. 
                                                                

You can double check to see if the transform worked correctly by taking the value of the original pattern, 3 1/8 inches and multiplying that by 0.727.  The value is 2.272 inches and that corresponds to the value of the transform in Silhouette.

Sun Hat Pattern for a 7.75-inch American Girl Little Bitty Baby Doll 

I have included in the files, a pattern for two different types of brims.  One brim is scalloped and the other is round.  Choose the type of brim that you like and cut that pattern.

Here is the PDF for the dress pattern. Print out the pattern with your printer.  There is a one inch square for reference if the pattern does not get printed correctly.

Here is the .Studio file for Silhouette Cameo users. Cut the pattern piece with your Silhouette.

Here is the file as an SVG. Cut the pattern piece with your Cricut or other paper cutting machine.


1. Choose your brim type. Cut out all of the sun hat pattern pieces. I traced the pattern onto the fabric and then cut the fabric.


2. Pin the two brims right sides together.
3. Stitch around the edge of the brim with a 3/16 inch seam allowance.
4. Clip around the curved edges.
5. Turn the brim right side out.


6.  Sew the four crown pieces together, one side at a time with the right sides together. Repeat for the second crown.
7.  Baste the brim to one of the crowns with the right sides together. I recommend hand basting because of the small size of the hat.

8. Turn the second crown wrong side out and fold the bottom edge with the right side showing a 1/4 inch.
9. Hem stitch by hand the crown to the same area where your previous basting stitches were located.
10.  With a sewing machine, topstitch the crown at 1/8  inch from the brim.  

The sun hat makes a pretty accessory to the criss cross dress.

Wednesday, July 5, 2023

A 7.75-inch Criss Cross Dress Pattern For An American Girl Little Bitty Baby Doll


 A 7.75-inch Criss Cross Dress Pattern For An American Girl Little Bitty Baby Doll 

This cute dress is easy to make for your little bitty baby doll. 

Please note, this dress can be hand sewn if you do not have a sewing machine using an 1/8 inch stitch length.

Back View

Here is the PDF for the dress pattern. Print out the pattern with your printer.  There is a one inch square for reference if the pattern does not get printed correctly.

Here is the .Studio file for Silhouette Cameo users. Cut the pattern piece with your Silhouette.

Here is the file as an SVG. Cut the pattern piece with your Cricut or other paper cutting machine.

1. Cut 2 of the dress pattern on a fabric fold. I traced the pattern onto the fabric and then cut the fabric.
2. Pin the two pieces of fabric right sides together.

3. Stitch around the edge with a 1/8 inch seam allowance. Leave a two inch opening at the bottom of the dress. I recommend sewing the top edge of shoulder strap very slowly.  My machine lets me stitch one stitch at a time.  I turned the fabric to go around the curve and then stitched the one stitch. 
4. Clip around the curved edges.

5. Turn the dress right side out.
6.  Hand sew the opening in the bottom edge of the dress.
7.  Sew snaps or velcro to the top edge of the shoulder. One side of the snap gets sewn to the face of the shoulder (shown) and the other side of the snap gets sewn to the top edge of the shoulder strap (not shown). When hand sewing this shoulder strap snap, do not sew all the way through to the front of the fabric because your stitches will show.  A small button can be placed on the front side of the strap to eliminate the need to be accurate with your hand sewing.

Tuesday, June 27, 2023

Hiking in the Mountains Diorama


Hiking in the Mountains Diorama 

This diorama uses five different colors of cardstock to achieve a feeling of depth.  This is the first time that I used this composition technique when making a diorama. 

Eight double thickness tabs keep the five different colored diorama scenes together.

There are two versions of the diorama with two different hikers in the files.
Pretty paper is glued to the front of the first scene.

The tabs slide into the sides of the scenes.

Here is the PDF file. I used Recollections brand colored cardsttock from Michaels.  

Here is the .Studio file.

Here is the SVG. The file goes beyond the viewable area.  Zoom out to see the entire file.


Hiking in the Mountains Dioramas

Monday, June 12, 2023

A STEM Project: The Beauty of Coding Koch Snowflakes In TurtleStitch

A Koch Snowflake


This snowflake fractal design was discovered by Helge von Koch, a Swedish mathematician in 1904. It was one of the first fractal designs to be described. A fractal is a design whereby a part of the design has the same characteristics as the whole. This snowflake fractal design is also known as a recursive design because in the coding of the program, the design block calls itself. The result is a smaller version of itself.

In 1905, Italian mathematician, Ernesto Cesaro eloquently described the self similarity of the Koch snowflake as following...

“It is this similarity between the whole and its parts, even infinitesimal ones, that makes us consider this curve of von Koch as a line truly marvelous among all. If it were gifted with life, it would not be possible to destroy it without annihilating it whole - for it would be continually reborn from the depths of its triangles, just as life in the universe is.”


Constructing A Koch Snowflake


 1). Take a straight line and divide it into three equal parts. 


 2). Replace the center with two sides of an equilateral triangle. 

(This is the self similarity that gets repeated in all levels.)


 3). Replace each side of design in step #2 with the self similarity.

Notice there are four repeats of this design which are 1/3 the size of the original self similarity.


To make this design into a Koch Snowflake, repeat the design in step #3 and turn the design by 120 degrees three times to complete the circumnavigation. 

The result is a Level 2 Koch Snowflake.


 To make a Level 3 Koch Snowflake, repeat the replacement of the self similarity in step #3 and turn the design in the same manner as before. 

 Each self similarity will be one-third the size of the previous side length.


Coding A Koch Snowflake In TurtleStitch


Here is my code

https://www.turtlestitch.org/run#cloud:Username=Elaine&ProjectName=Koch%20Snowflake


The diagram above shows  five iterations of the fractal design drawn with a recursive block called "kochcurve". The first figure represents level 0 in the recursive program (or stage 1 according to Koch's paper). The next figure represents the next level/stage and so on. This program can be repeated forever. The general size of the snowflake will alway remain the same but the size of the self similarity becomes almost infinitesimal.              

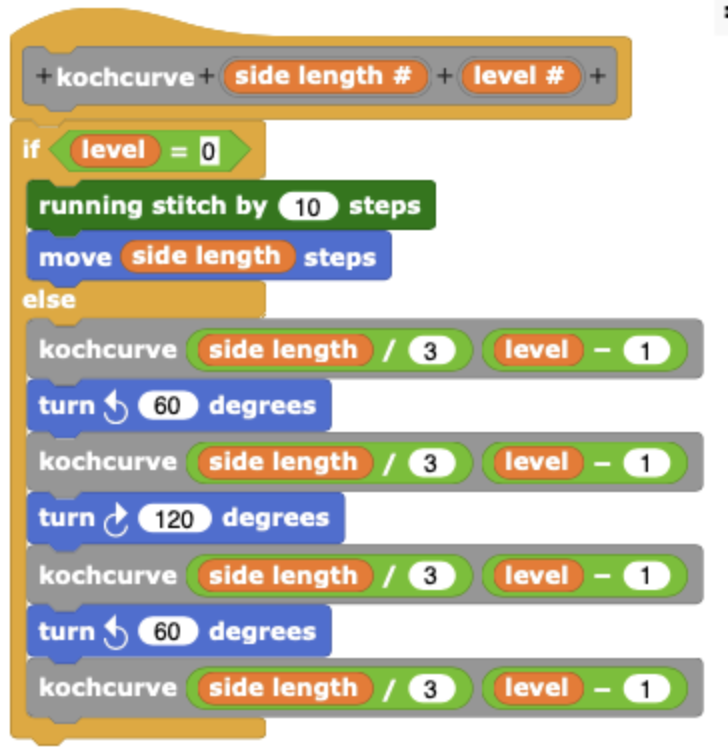
Here is the TurtleStitch code for the generalized block named “kochcurve” which produces the different levels of a Koch Snowflake. 


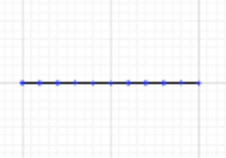
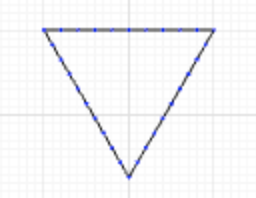
When the ‘kochcurve’ is executed with the parameters for side length of 100 and level # of 0


The result is a straight line.

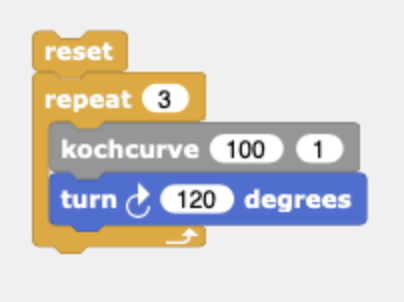
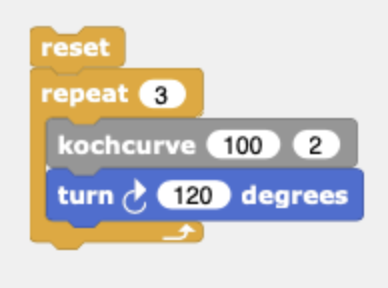
Since only one side of the snowflake is produced, a turn of 120 degrees must be added. This code is then repeated 3 times to complete the entire Koch Snowflake figure.


The result of the code is a triangle.


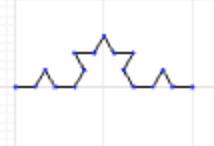
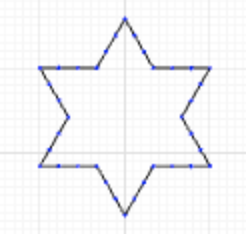
When the ‘kochcurve’ is executed with the parameters for side length of 100 and level # of 1,
the result is the figure below.

Again, since only one side of the snowflake is produced, a turn of 120 degrees must be added.


This code is then repeated 3 times to complete the entire Koch Snowflake figure.

The result of the code is a six point star.

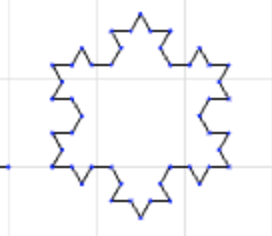
When the ‘kochcurve’ is executed with the parameters for side length of 100 and level # of 2


The result is the figure below.


Again, since only one side of the snowflake is produced, a turn of 120 degrees must be added. This code is then repeated 3 times to complete the entire Koch Snowflake figure.


The result of the code is the snowflake below.


Coding A Koch AntiSnowflake in Turtlestitch


The above snowflake is a level 3 Koch Antisnowflake.  It was coded in TurtleStitch with a "turn 120 degrees" to the left instead of "turn 120 degrees" to the right. Here is the code for the Antisnowflake, https://www.turtlestitch.org/users/Elaine/projects/Koch%20AntiSnowflake


The diagram above shows  five iterations of the Antisnowflake. It is interesting to see that the self similarity of the Antisnowflake remains inside the original triangle as its size decreases each time by one-third.


Comparing the above diagram with the five iterations of the original Koch Snowflake, the self similarity of the Koch Snowflake remains outside the original triangle design as its size decreases each time by one-third.


Two Projects to Make With the Koch Snowflake


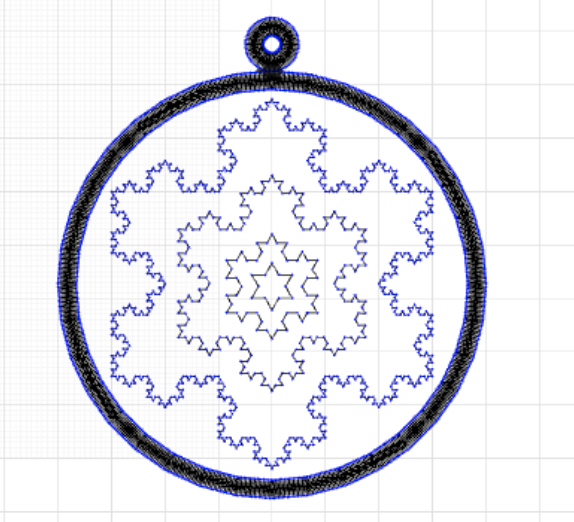
A Koch Snowflake Ornament


A Koch snowflake ornament was made in TurtleStitch using four levels of the Koch snowflake design. Level 1 is in the center and each subsequent snowflake is the next level up to level 4. A satin stitch was coded around the entire design with a circle at the top for a hanger.

This Koch Snowflake Ornament can be found at

Craft felt with tear away stabilizer was used as backing for the design.  Once embroidered, the design was cut about an ⅛ inch from the satin stitch.  It is not recommended to cut any closer to the satin stitch, as a slip of the scissors might cut the satin stitch threads. A bow and a thread hanger were sewn on to complete the snowflake ornament.


Making a Snowflake 

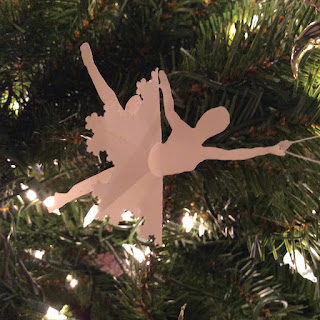
Ballerina out of a Koch Snowflake


The ballerina design was traced in TurtleStitch. (To learn more about tracing in TurtleStitch, visit this blog posting. https://papercraftetc.blogspot.com/2022/03/a-stem-project-coding-in-turtlestitch.html ) 

The snowflake is a level 4 Koch Snowflake.

The ballerina and snowflake were exported as a DXF file to a paper cutting machine like a Silhouette and cut out from 65 lb. cardstock.

Here is the TurtleStitch program to make the Koch Snowflake Ballerina: https://www.turtlestitch.org/run#cloud:Username=Elaine&ProjectName=Koch%20Snowflake%20Ballerina

Once the Koch Snowflake was cut out, pleats were added in the snowflake for interest. The Koch Snowflake was then slipped over the ballerina to resemble a frilly tutu.


FYI...In a previous blog posting, I made these snowflake ballerinas by cutting out the snowflakes (not Koch snowflakes) by hand. https://papercraftetc.blogspot.com/2013/12/when-it-snows-make-christmas-ornaments.html