Monday, March 6, 2023

A STEM Project: A Heart Box Made With a Variable Size Kite Using TurtleStitch and Embellished for St. Patrick's Day

Please note: For my Silhouette friends, I have included all the files necessary to make the St. Patrick's Day Heart boxes at the end of this posting.  I am sure my Silhouette friends would like to see how the boxes were created as I think it is fascinating and powerful to be able to make many different types of boxes with just a few lines of computer code.


St. Patrick's Day Heart Boxes

In a previous blog posting I explained how to make a variable size heart box using a square and two semicircles. https://papercraftetc.blogspot.com/2023/02/a-stem-project-making-variable-sized.html

In this blog posting, I will show how a variable size heart box was made using a kite shape and two semicircles.


In the photo above, TurtleStitch generated images of two different size kite hearts are shown.  A kite shape and the two semicircles make up the variable size heart. Each heart is surrounded by scallops to embellish the heart box.

Here is my code in TurtleStitch, https://www.turtlestitch.org/run#cloud:Username=Elaine&ProjectName=Heart%20Box%20Made%20With%20a%20Variable%20Kite%20Shape

In the program, there are two important values which regulate the size of the kite. The first one is cross ratio.  It is the difference in size between the top half and the bottom half of a kite. The second value is alpha which is the angle measure at the bottom point of the heart.  

By changing the two values, different types of hearts can be created. Here are some interesting heart kites values with cross ratio first and alpha's value is second - .35, 110, .7,75, .8,60 and .5,90 which  is a square kite because the value at the bottom angle is 90 degrees and the cross ratio is 50%. Please note, not all values of cross ratio and alpha create a viable heart figure.

Once the program is run, the parts of the box can be exported as a DXF and opened in the Silhouette software.

I should note that I have also included a scalloped heart in my design.  The reason for this scalloped heart is, there is a gap at the point where the heart meets at the top when it is glued.  It doesn't happen all of the time, but most of the time and it is frustrating to see the pinhole gap. To remediate this problem, I use the scalloped heart to hide the gap. 

Run the Heart Box Program in TurtleStitch

In my TurtleStitch program, change the "cross ratio" and "alpha" value to your desired parameters, run the program and export as a DXF file.

Directions to Cut the Heart Box in Silhouette Using the TurtleStich DXF file

The DXF file that was created in TurtleStitch is opened in the Silhouette software. The size of the one inch cube is observed. The size of the entire file needs to be resized as the size is not preserved from one application to the other.  Divide 1 by the size of the observed one inch square and then multiply by 100. Transform the entire file with the calculated percentage amount.  Check the one inch square to see if it is now one inch.  (The one inch square is no longer needed, and can be deleted.)

Cut two of each heart and side pieces. Cut two of each scalloped heart. 

Please note: The larger heart and the shorter side strip is used to make the top of the box.  The smaller heart and taller side strip is used to make the bottom of the box.

Directions to Assemble the Heart Box 

Bend and apply glue to the tabs

Glue the opposite side together to form a loop. The tab is glued inward.

Bend the tabs and apply glue to each of the tabs.

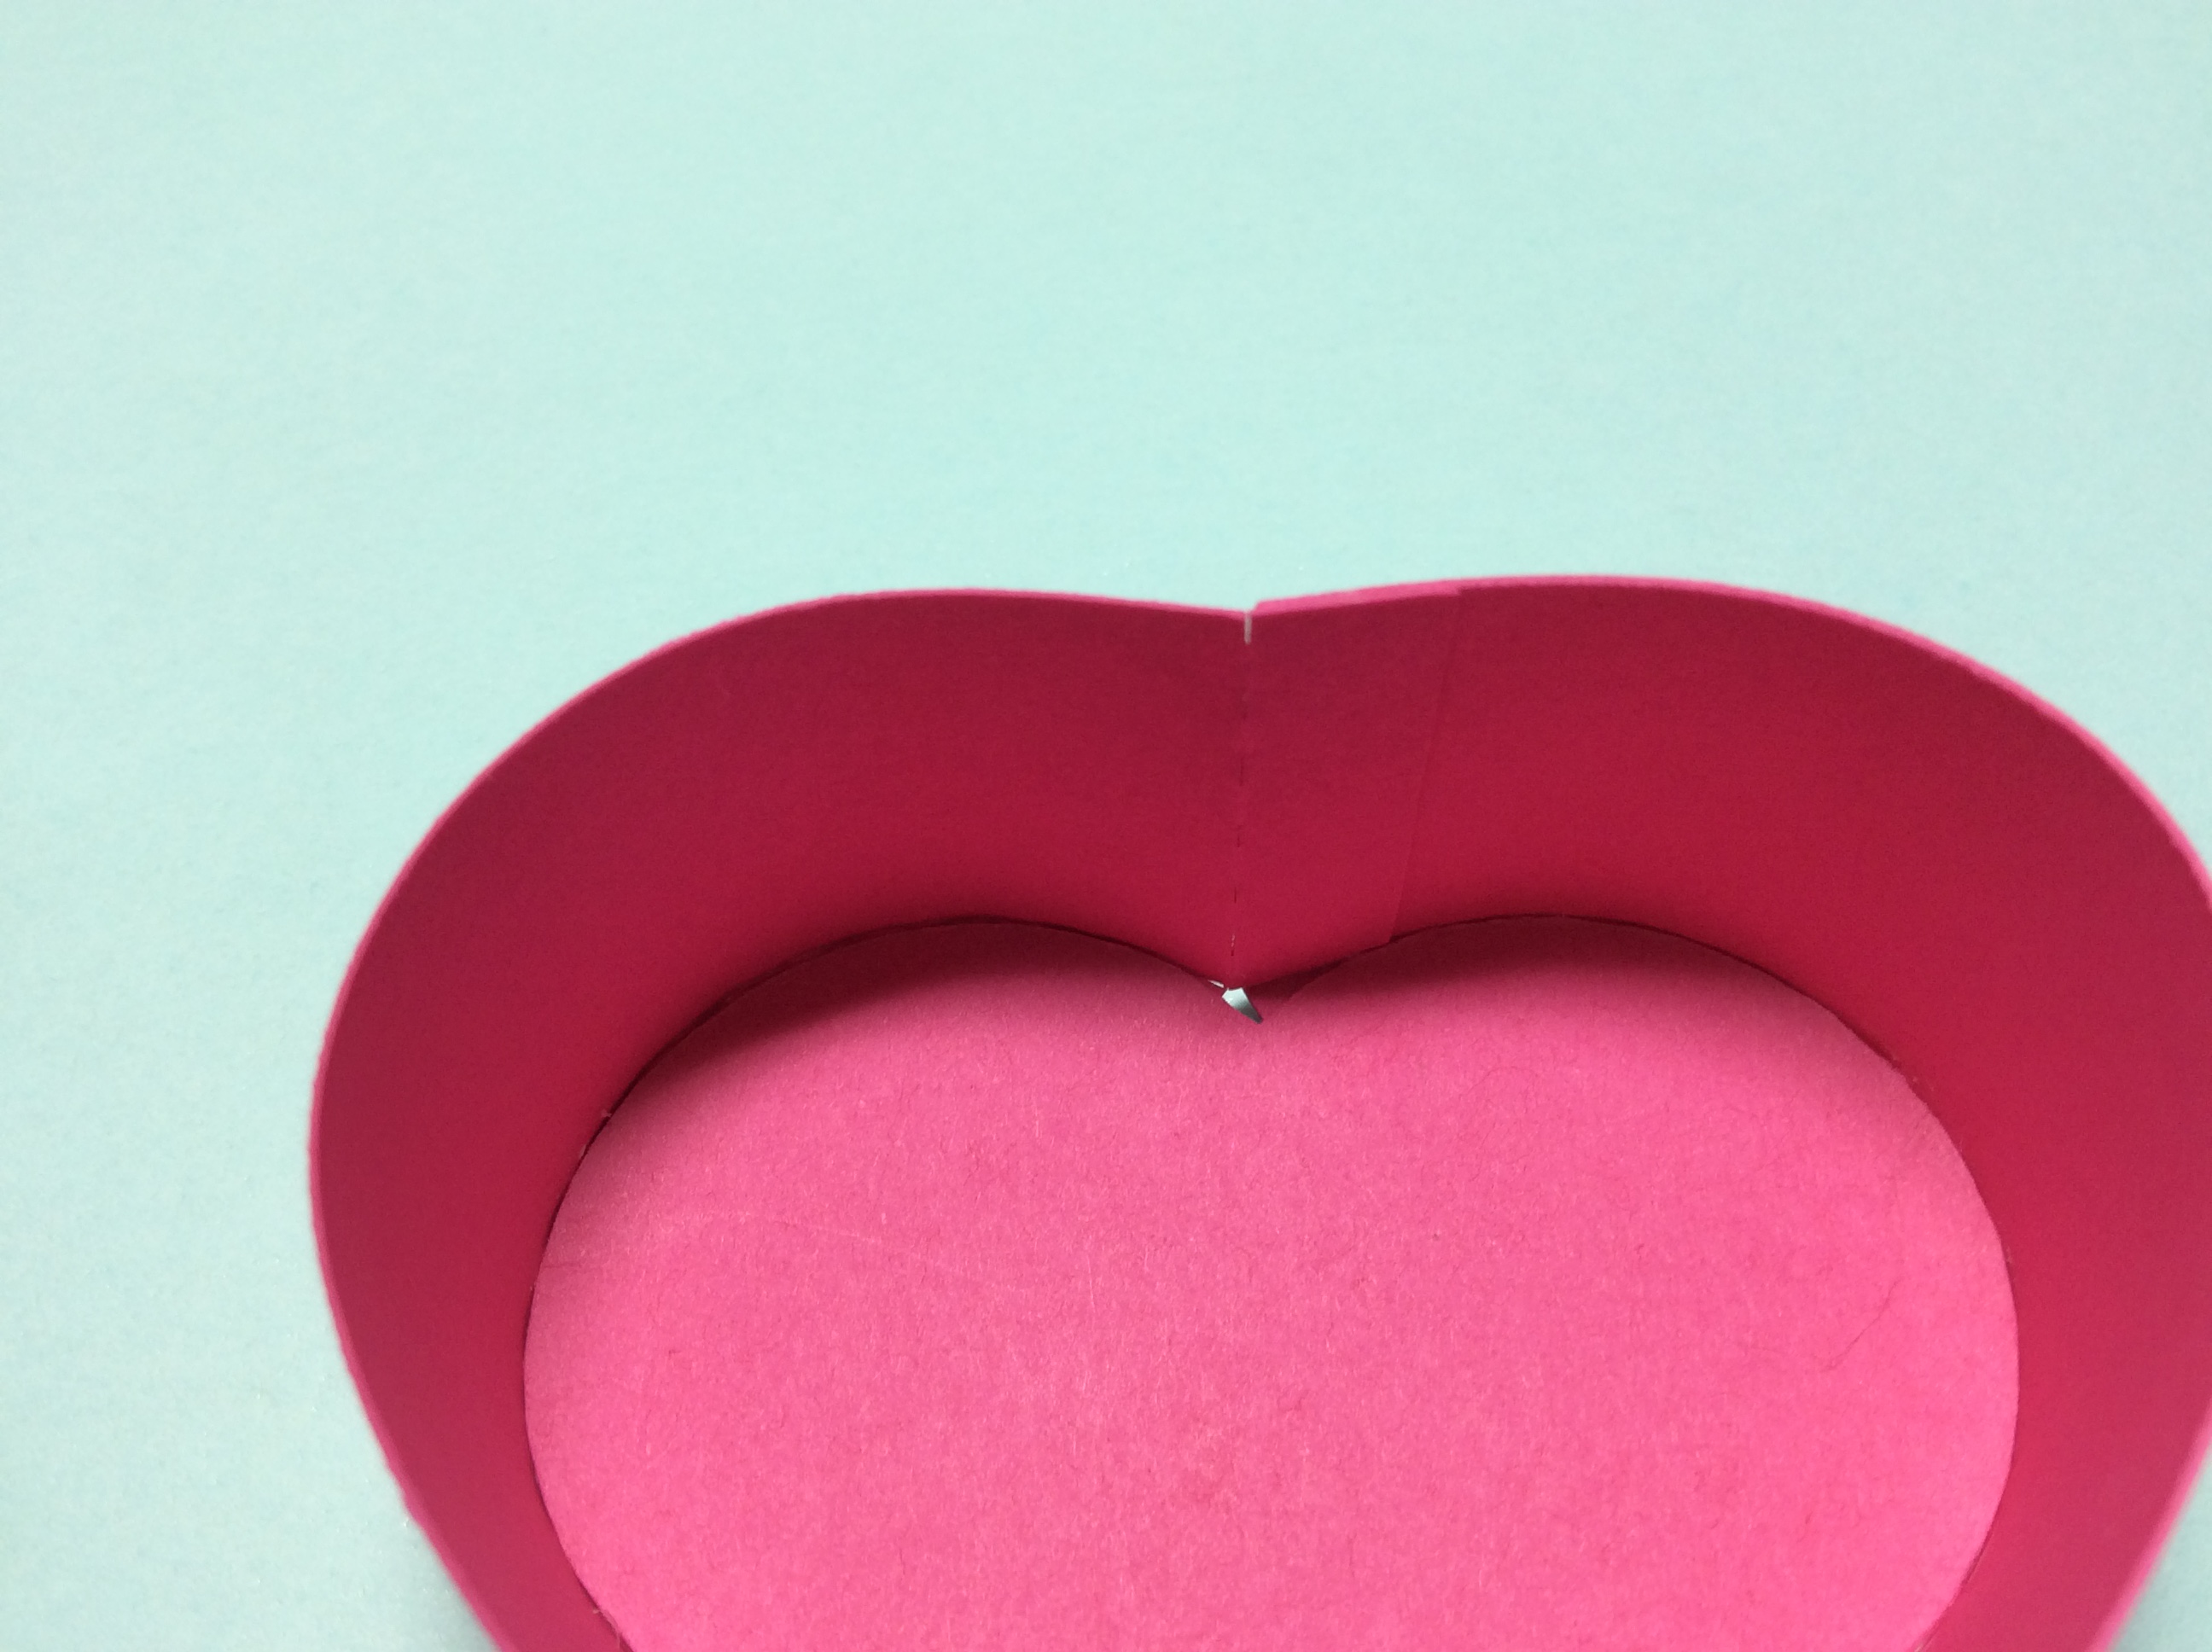
Insert the bottom point of the appropriate heart first (see note above for correct heart/side strip placements) and then adhere the sides the heart.

Align the side seam to the point in the top of the heart.
Turn the piece over and make sure all of the tabs are adhered correctly. 
Repeat the above instructions for the other side of the box. 

Glue and adhere all of the remaining parts together.  

Embellish the boxes as desired.

I also made a Minnie Mouse box with Cricut Minnie paper.

I centered the hearts on the Minnie designs on the sheet of cardstock by measuring the spot on the cardstock and placing the heart in the correct location on the Silhouette screen. I did make a mistake, which I corrected by cutting another side piece, because I did not orient the box sides so that the design would be facing upward.  If you are cutting paper that needs to be in a certain direction, please take note.

Here is the PDF.  I used a 6 x 6 Recollections paper pad from Michaels which included an assortment of 65 lb. cardstock and glitter paper.

Here is the .Studio file.

Here is the SVG.  The file extends beyond the scope of the viewing field.  Zoom out to see the entire file.

Sunday, March 5, 2023

A STEM Project: Making a Potholder and a Tea Towel using TurtleStitch

A Tea Towel and a Potholder made using TurtleStitch created designs

This blog posting is for reference as to the possibilities of creating designs in TurtleStitch and using them in every day items.

I took a previous design that I had traced in TurtleStitch, https://papercraftetc.blogspot.com/2023/02/a-stem-projectcreating-embroidered.html and I machine and hand embroidered the design onto two different fabrics which became a potholder and a tea towel. 

Potholder Design

The potholder is a 9 inch x 9 inch piece of polyester/cotton fabric backed with Pellon TP971F fusible interfacing.  The design was machine embroidered and then cut to its final size of 7 inch x 7 inch. The reason for cutting the design to its correct size after embroidering allows for adjusting the design if it is not exactly square in the embroidery frame. I hand embroidered the potholder with French knots and the satin stitches for the flowers and stem stitches for the stems.

I made a quilting design for the back of the potholder. Again I took a 9 inch x 9 inch piece of polyster/cotton fabric and backed it with Pellon TP971F fusible interfacing.  I programmed a Sashiko design called Tate-Waku or Rising Steam in TurtleStitch.  It is a gently curved line paired with its mirror image. Here is the code that I used, https://www.turtlestitch.org/run#cloud:Username=Elaine&ProjectName=Pot%20Holder%20Quilt%20Pattern%20for%205%20x%207%20Hoop


Sashiko Tate-Waku or Rising Steam is an embroidery design that is typically used for the backing of potholders.

The square on the left is the Sashiko Tate-Waku design which was cut to 7 inches x 7 inches.  The designs were placed with their backs together and double fold bias tape was sewn around the edges starting at the top left of the square.  After the four side have been sewn, the bias tape is sewn together and then a loop is made.  The loop is sewn to the back of the left corner.

Completed Potholder

Tea Towel Design


The finished tea towel is approximately 14 inches x 24 inches.  A piece of polyester/cotton fabric was cut to 18 inches by 28 inches.  The design was machine embroidered with tear away stabilizer and then cut to 16 inches by 26 inches to align the design correctly.

The tea towel was then created by folding and ironing the edges.  The left and right edges were folded and ironed twice by a 1/2 inch. The ironed seam was then sewn with a sewing machine at the folded edge.  The top and bottom sides were folded and ironed by one inch twice. The ironed seam was then sewn with a sewing machine at the folded edge.  After the tea towel was sewn, I then hand embroidered the tea towel with French knots and the satin stitches for the flowers and stem stitches for the stems to complete its embellishments.

Completed Tea Towel

Wednesday, March 1, 2023

A STEM Project: Making a Variable Kite Box Using TurtleStitch

A Kite Box Made Using Code Generated in TurtleStitch 

Today was a good day to fly a kite because it was a blustery day. While I did not make a kite to fly, I did make a kite box by coding it in TurtleStitch. Here is my code in TurtleStitch, https://www.turtlestitch.org/run#cloud:Username=Elaine&ProjectName=Variable%20Size%20Kite%20Box  It is a dynamic program where different types of kite boxes can be made by changing the values of cross ratio and alpha. Cross ratio is the ratio of the top triangle to the bottom triangle.  A larger alpha value will generate a wider kite.  

If a new kite is generated in TurtleStitch, Export the file as a DXF file. Open the DXF file in the Silhouette program. Resize the entire file by using the one inch square as reference.  Cut two of each kite and one of each strip.  

Here is the PDF.  I used 65 lb. cardstock and a 5 inch length of 1/8 inch ribbon. 

Here is the .Studio file. 

Here is the SVG. The file extends beyond the visible area.  Zoom out to see the entire file.

Make the Kite Box

Glue the corresponding strips together to make a loop.  The bottom strip is taller than the top strip.Bend and apply glue to the tabs


Glue the opposite side together to form a loop. The tab is glued inward.

Bend the tabs and apply glue to each of the tabs.

Bend the tabs of the strips at a right angle.  Glue the smaller kite to the inside of the bottom strip and glue the other small kite to the top of the bottom strip.  Repeat for the top half of the kite. 

Glue on a five inch piece of ribbon for the tail.

Embellish the box with colored papers to complete the construction of the kite box.
                                                                                             

Saturday, February 18, 2023

A STEM Project: Making a ShuffleBoard Game Using a TurtleStitch Created Board Frame

Making a ShuffleBoard Game Using a TurtleStitch Created Board Frame 


Here is a video of the shuffleboard weights in action.

Coding a design in TurtleStitch allows for a dynamic method of creating board games.  https://www.turtlestitch.org/run#cloud:Username=Elaine&ProjectName=Shuffleboard   In this blog posting, I created a shuffleboard game which allows for a collared ball bearing also known as a shuffleboard weight, to glide across the surface of the board when pushed.   Play alternates between two players pushing their shuffleboard weights across the board to the numbered sections.  The numbered sections represent the value which is tallied when all of their shuffleboard weights are played. The winner is the player with the most tallied points.

I believe coding a variable size board frame in TurtleStitch is a valuable tool for creating other board games.  The playing field can be modified for other types of imagined games which require a ball rolling over a playing field. The possibilities of creating a board game are limitless and are only bounded by your imagination.

Cut the Shuffleboard Model Pieces

Here is the PDF.  I used 65 lb. cardstock from Michaels. Six 9mm ball bearings for the shuffleboard weights.

Here is the .Studio file.

Here is the SVG. The entire design is present.  Zoom out to see the entire file.

Make the Shuffleboard Frame

Apply glue to the tab on the frame and adhere to make the piece flat.  Once the glue has dried, make the frame piece into a block.

Glue the sides together at their corners.

I glued the outmost tab first and then applied glue to the three other sides.

Inserting the sides together results in a frame with mitered corners

Glue the orange frame to the playing board.  My printer did not print the playing board correctly so I had to cut the playing board to the correct size. Glue the playing field to the center of the backing.

Apply glue to the frame and adhere to the backing.

Completed playing field.

Make the Shuffleboard Weights

Glue the collars together at their seams.

Apply glue to the washer as shown above.  Place the collar in the center of the washer.  Repeat for all of the game pieces. Please note, there are two sizes of collars.  The collars look like hats once they are glued. The hats are placed into one another to encase a ball bearing.

Allow the glue to dry to a point that the surface of the glue is dry but the inside of the glue is not thoroughly dry.  Place a 9 mm ball bearing into the center of one of the collars and slide the other size collar onto the top of the ball bearing.

The ball bearing is now encased in the collar and can roll freely.  Make sure that any glue that might be present is removed from the ball bearing so that it can roll freely.

The game is now ready to be played. Make your own game rules to further enhance play.

Imagine A New Type of Game

Try to make a new type of game using my TurtleStitch program and the shuffleboard weights as game pieces.  

I can think of a bullseye type of game with a square frame and a circular playing field.  The players try to knock each others pieces out of the  bullseye.

Here is the .Studio file for the bullseye game.

Here is my version of a bullseye game. 

Can you think of more types of games?

Tuesday, February 14, 2023

A STEM Project: Making a Variable Sized Heart Box Using TurtleStitch

Variable Sized Heart Box 

In this blog posting, I will explain how to make a variable size heart box using TurtleStitch to generate the components of a heart box and to cut them out with the Silhouette or another electronic cutting machine. 

NOTE: For my Silhouette friends, I have included a file for the regular size heart box, with a scale of 1, at the end of this posting.

How to Make a Heart Box in TurtleStitch

The first thing that you need to understand is how a heart shape is created.

Since the heart shape is made up of a square whose side is the same size as the circle's diameter.  It is easy to navigate the turtle around the perimeter of the heart. 


I started at the  bottom point of the heart and 'Turn'ed the turtle 45 degrees to 'Move' the side length of the square. An 'Arcleft' block was used to create the semicircle. (The value of the radius is half the length of the side of the square).  Next, the turtle was pointed in the -45 degree direction.   'Arcleft' and 'Move' blocks are used to complete the simple heart. 


The next thing that I needed to do was to make the sides of the heart box.  That is simple because I know the length of the side of the box and the circumference of the semicircle. Using these calculations, I can make a strip for the side of the box. 

To make the tabs necessary for the strip, I modified an Edgefold block and made them with variable size teeth.  Here is the program that I made to perform this task. https://www.turtlestitch.org/run#cloud:Username=Elaine&ProjectName=Edgefold%20Width%20With%20Multiple%20Teeth

I incorporated this program into the simple heart program to produce the heart box sides.

Here is my Simple Heart Box program with two hearts and sides for the top and bottom to make the top and bottom of the box.

I should note that I have also included a scalloped heart in my design.  The reason for this scalloped heart is, there is a gap at the point where the heart meets at the top when it is glued.  It doesn't happen all of the time, but most of the time and it is frustrating to see the pinhole gap. To remediate this problem, I use the scalloped heart to hide the gap. 

Run the Heart Box Program in TurtleStitch

In my TurtleStitch program, update the 'Set Scaling Factor' to your desired scaling parameter, run the program and export as a DXF file.

Directions to Cut the Heart Box in Silhouette Using the TurtleStich DXF file

The DXF file that was created in TurtleStitch is opened in the Silhouette software. The size of the one inch cube is observed. The size of the entire file needs to be resized as the size is not preserved from one application to the other.  Divide 1 by the size of the observed one inch square and then multiply by 100. Transform the entire file with the calculated percentage amount.  Check the one inch square to see if it is now one inch.  (The one inch square is no longer needed, and can be deleted.)

Cut two of each heart and side pieces. Cut two of each scalloped heart. 

Please note: The larger heart and the shorter side strip is used to make the top of the box.  The smaller heart and taller side strip is used to make the bottom of the box.

Directions to Assemble the Heart Box 

Bend and apply glue to the tabs

Glue the opposite side together to form a loop. The tab is glued inward.

Bend the tabs and apply glue to each of the tabs.

Insert the bottom point of the appropriate heart first (see note above for correct heart/side strip placements) and then adhere the sides the heart.

Align the side seam to the point in the top of the heart.
Turn the piece over and make sure all of the tabs are adhered correctly. 
Repeat the above instructions for the other side of the box. 

Glue and adhere all of the remaining parts together.  I decided to use the bottom heart for the scallop that is placed on the top of the box because the scallops will show a little more.  It is a matter of preference but I thought I should mention what I did.

I made three boxes in different sizes by scaling.   In the photo, the largest box's scaling factor is 1.25, the medium box is 1 and the smallest box is .75.   (I ran the TurtleStitch program for each of the different size boxes and exported them to be cut with the Silhouette program.)

Embellish the box as desired. I added the word 'Love' to my box. 


Here is the PDF of the regular size box with a scaling factor of 1. I used 65 lb cardstock from Michaels.

Here is the .Studio file of the regular size box.

Here is the SVG of the regular size box.

I have included the word 'Love' and a rose in my files as optional embellishments.