An Oval Box Coded In TurtleStitch and Embellished with Designs Created with the Silhouette For Mother's Day
I coded the oval box in TurtleStitch and then cut it out with a Silhouette
I love making boxes embellished with beautiful designs and this box fits that desire. This is a lovely box which can be given for Mother's Day with its cheerful flowers and butterfly embellishments.
I designed the oval box in TurtleStitch and then copied it to the Silhouette software to be cut. The flower and butterfly embellishments were made with the Silhouette software.
For my Silhouette friends and those of you who do not want to program, I have included all files to make the oval box with embellishments. The instructions to put the box together are at the end of this post.
Here is the PDF. I used 65 lb. cardstock.
Here is the .Studio file.
Here is the SVG. The file extends beyond the scope of the viewing field. Zoom out to see the entire file.
Coding an Oval Box in TurtleStitch
Here is the program in TurtleStitch where I made the oval box components. https://www.turtlestitch.org/users/Elaine/projects/Oval%20Box
Coding the Box Top and Bottom
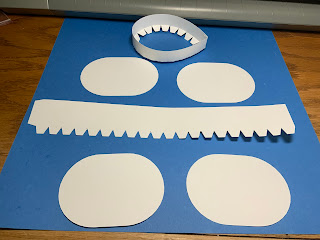
Before I explain how I coded the box, I would like to talk about the thought process required when coding a TurtleStitch design. Can the shape be broken down into manageable parts that are easily programmed? Draw a picture of the shape and break it into simple parts. The oval shape looks like two circles that are joined by a rectangle. See photo below.
Looking at just the outer edge, there is a blue semicircle followed by a red straight line and then another blue semicircle with a straight red line that makes up the oval figure.
Knowing this information, the coding is a simple task.
Using the arc right block, determine a radius that you want and then move the turtle 180 degrees to create the first semicircle. Use a move block to get to the next semicircle, and then repeat these two instructions, arc right and move blocks, to finish the oval.
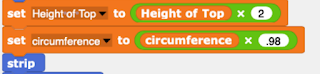
I repeated these instructions for the bottom of the box with a 98% reduction in size. The bottom of the box needs to smaller so that the top can slide easily onto the bottom of the box.Programming the Sides of the Box
The photo above shows the design for the side of the box. It is a strip of paper with tabs. The bottom tab adheres to the oval and the left side tab creates an oval strip when the tab is adhered to itself on the other end.
To calculate the circumference of the oval, two semicircles plus the two lengths of the rectangle need to be added together.
Since the two semicircles equal the circumference of one circle, the circumference of one circle plus the two lengths of the rectangle is coded.
Make the Tabs for the Side of the Box
To create the tabs and dotted lines, two special blocks need to be used. The first special block is for the tabs. Here is the program in TurtleStitch if you would like to play with it functionality. https://www.turtlestitch.org/run#cloud:Username=Elaine&ProjectName=Edgefold%20Width%20With%20Multiple%20Teeth
The edgefold block can creates different types of tabs with a different number of teeth.
Make the Dotted lines for the Side of the Box
The second special block is for the dotted lines. Here is the program in TurtleStitch if you would like to play with it functionality.
The move block can create different lengths of dotted lines.
Make the Strip Block For the Side of the Box
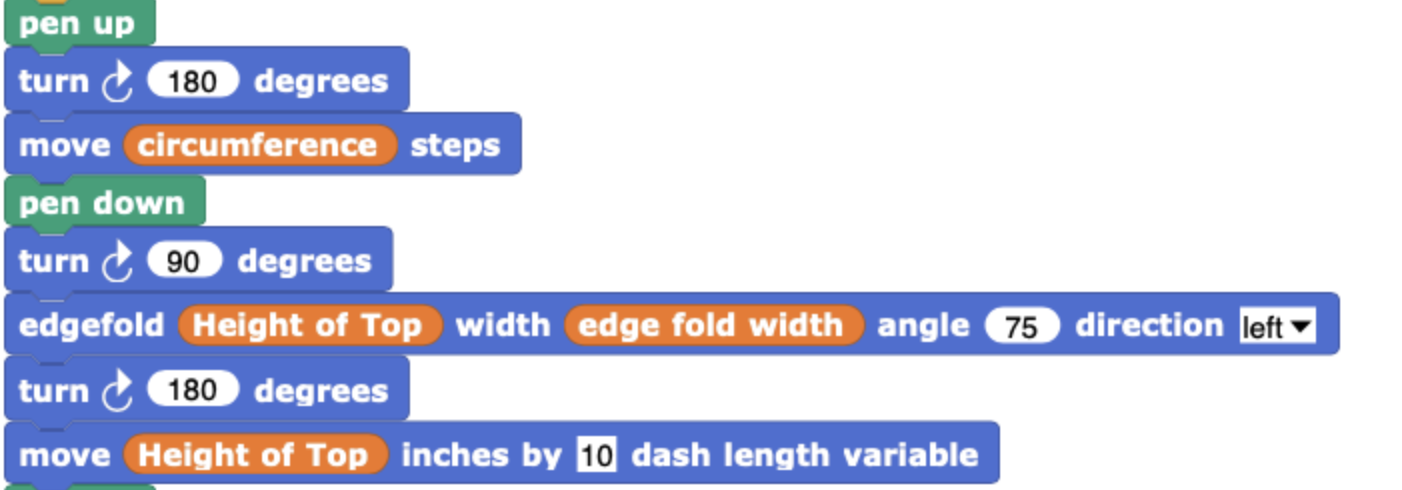
Here is the strip block that I created. The turtle is moved for the length of the circumference and then turned at a right angle for the height of the top. The turtle is moved again at a right angle and dotted lines are created with the move block. The turtle is turned around 180 degrees and the edgefold block creates the bottom tabs.
The turtle is turned around 180 degrees and aligned to create the side tab with the edgefold and move blocks
The instructions are repeated for the bottom side of the box with a 98% reduction in size.
A one inch block is used to create a one inch square so that the image can be resized in the Silhouette software. The design is then saved as a DXF file for the Silhouette.
Open the Oval Box in the Silhouette Software
When a design is saved in TurtleStitch as a DXF file, the file measurements are not preserved and the file needs to be resized in the Silhouette software. Photo above shows the size of the one inch square in the Silhouette software.
The size of the entire file needs to be resized. Divide 1 by the size of the observed one inch square and then multiply by 100.
1/0.618 x 100 = 161.81%
Transform the entire file with the calculated percentage amount.
Check the one inch square to see if it is now one inch. (The one inch square is no longer needed, and can be deleted.) Realign all of the components of the oval box on your Silhouette screen and cut as usual. In the file, I added another top and bottom oval to my Silhouette file, since I wanted the box to be two walled as this produces a sturdy box.
Make the Box
The height of the top of the box is smaller than the bottom of the box. Repeat these instructions for each half of the box. Glue the strip together to form a loop as shown in photo above at the top. Fold the tabs of this strip at a right angle.
Apply glue to the inside tabs as shown above. Adhere the corresponding oval to the tabs.
Turn the piece over and apply glue to the tabs. Adhere the corresponding oval to the tabs.
Add embellishments to create a pretty oval box to give for Mother's Day.


No comments:
Post a Comment