This poodle embroidery was designed using the Silhouette software and converted to a PNG file.
I just purchased a Brother PE800 embroidery machine and I found a way to convert any image from a PNG or JPEG file to an embroidery file which my embroidery machine will recognize. It is a fairly easy process to convert the file.
Embroidery is produced by layering different color threads on a garment or textile. In this blog entry, I will explain the process of producing the embroidery file using open source and free software called Inkscape and Inkstitch.
For Silhouette users
I created my PNG file from a Silhouette Cameo image that I designed. A simple Silhouette design needs to be saved as a PNG or a JPEG file. Here is a PDF explaining how to adjust and save the Silhouette design for an embroidery machine in a PNG or JPEG file. https://drive.google.com/file/d/1emG5BSLSK-Oc9AlYBGUghRbdly57YCWT/view?usp=sharing
Here is the design that I used in Silhouette in the .Studio file format. https://drive.google.com/file/d/1nTO0IefrTB_83bXEcALZSjHbYzHqYgb9/view?usp=sharing
Using a PNG or JPEG file
Once the PNG or JPEG file is created, it needs to be imported and converted into a bitmap using the Inkscape software. A bitmap shows where each of the colors in the design are located. Multiple bitmaps are created in the Inkscape software for each layer of the design.
The Inkstitch software assembles these bitmaps and digitizes it for the embroidery machine. This digitized software will be saved as a PES file (or any other file that your embroidery machine requires) and copied from your computer to the embroidery machine via a USB stick.
Both of the software programs, Inkscape and Inkstitch software need to be installed on your computer. The Inkscape install can be found at https://inkscape.org and the Inkstitch install at https://inkstitch.org
Here is a copy of my PNG file if you would like to follow along with the instructions below. https://drive.google.com/file/d/1QIijXvjlHIuy7-hXzbg7T5tticF4eKaq/view?usp=sharing
Creating an Embroidery file using Inkscape and Inkstitch
Open the Inkscape software. Import the PNG or JPEG file. Move the imported image to the workspace if it is off the screen.
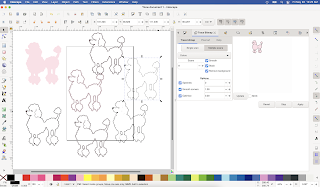
Under the Path tab, Trace Bit Map will show the above screen when selected on the right. Note the things that are selected. Multiple scans, colors, smooth, stack and remove background. Select Update to update the selections and then Apply the selections.
A bounding box will be shown around the image. (see above) The Trace Bit Map command created multiple bit maps of your image. The original image plus all the created bitmaps are present and stacked on top of one another. You can tell the difference between the original image and the created bitmaps by the bounding box size. The original image is no longer needed so it can be deleted.
Ungroup the bit maps (in the Object menu) and pull them away from each other to examine them. (The zoom in and out is in the bottom right corner of the screen.) Only two bitmaps are needed. The background layer which is pink and the foreground layer which is black and white. Look for the foreground layer which has the most detail that you like. Delete the bitmaps that you do not want. The result is just two bitmaps. Please note, you can use more bitmaps/layers but for simplicity sake, I am just using two layers for this design. (I made a third layer for a different colored nose but decided to make this tutorial simpler.)
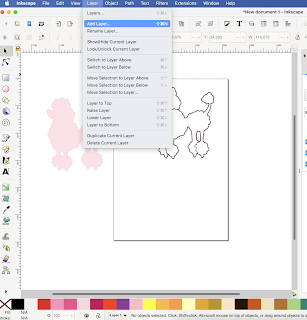
Both of the bitmaps are on the same layer and one of them needs to be moved to a different layer because each layer will have a different color to embroider. The embroidery machine needs to know when to change the color. Copy the Foreground layer to your clipboard(Command C). Once copied, delete this foreground image. Go to Layer and Add a second layer. I called mine "Layer 2".
Paste the Foreground to Layer 2. You can tell that it is on Layer 2 by looking at the highlighted area on the right in the screen above.
Select both of the layers by going to the Edit command. Select All in All Layers. The bounding box will be highlighted around each image. Go to Object, and then the Align and Distribute panel.
Center both of the images, first on vertical axis and then on the horizontal axis which is directly below that command on the screen. The two bitmaps are now stacked on top of one another.
I moved the image to the workspace because it had moved off the workspace when it was aligned. In the Object menu, Group the images together. The size of the design was in millimeters. I changed it to inches.
I decided that the design was too big and I wanted the height of the design to be 2.5 inches. I locked the lock so that the image would be resized proportionally.
Go to Extensions, Ink/Stitch, Fill Tools and then Break Apart Fill Objects to enable the Inkstitch software.
Select the image. Make sure there is a bounding box around it. I selected complex and then apply. The system will appear to be working and then the same message comes up when completed. This is normal. Close this window.
Go to Extensions, Ink/Stitch, Params to simulate the embroidery design.
The embroidery design will be generated by the apply and quit command. This command might take a couple of minutes to produce the digitized embroidery design. Notice at the bottom of the screen in the ribbon area, there is a disk design with a yellow bird, this is the Inkstitch software.
Once you are happy with the design, go to Extensions, Ink/Stitch, Visualize and Export and then Simulate and Realistic Preview.
This GUI or graphical user interface simulates the embroidery machine and how the design will be sewn.
Note how the two colors will be sewn. This is important as you want the pink color as the background.
Here is my completed embroidery simulation.
To Export your file to your computer. Go to Extensions, Ink/Stitch, Visualize and Export and Embroider.
Create an exported copy of your file.
I saved the file as a PES file for my Brother machine. You can select a different file type for your machine.
Here is a copy of my poodle PES file if you are interested.


Wonderful job dear Elaine Wolfe... This is great info on converting files in different format. I was looking to convert jpg to pes; so thanks for it.
ReplyDeleteamazing
ReplyDeleteGreat embroidery patches.
ReplyDeleteAppreciated!
ReplyDelete