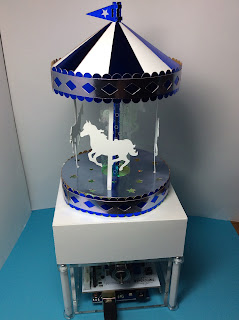
A Rotating Hyperdino Carousel With Multi-Color Flashing LED Lights
This carousel uses a Hyperduino with a yellow motor and LED lights to rotate and illuminate a carousel. I have a special plexiglass box for my Hyperduino. If you do not have this plexiglass box, you can use this Hyperduino paper presentation box in this blog posting. https://papercraftetc.blogspot.com/2021/06/a-stem-project-hyperduino-presentation.html
Disclaimer:
- Adult supervision is recommended when using the Hyperduino.
- This project involves a motor which could cause a fire. Do not operate unattended.
I used 65 lb foil cardstock from Michaels for the blue and silver foil. I used Cricut brand Foil Acetate for the center column and transparency film for the base.
I used Aleene's tacky glue in a glue bottle and Glue Dots to adhere the pieces together.
Here is the PDF.
Here is the .Studio file.
Here is the SVG.
Make the Light Box
Make the light box bottom by gluing the tabs on the two sides of the box.
Apply glue and adhere the bottom of the box.
Turn the box over. Apply glue and adhere the bottom of the box. The box has two bottoms for added strength.
Completed bottom of the light box.
Glue the two tabs for the top of the box.
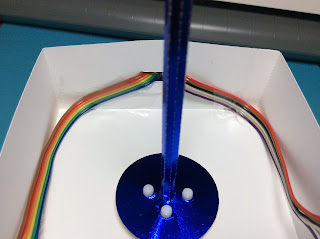
Apply glue and adhere the piece in the same direction as shown above. The holes are for the LED lights. The LED wires will get tangled in the center axle if not placed correctly.
Turn the box over. Glue the tabs and adhere the corresponding piece. Notice the placement of the rectangle on the side of the box. Make sure everything is aligned correctly.
Completed light box. Set this aside.
Make the Carousel
Glue two carousel horses together. Do not apply glue to the tab areas at the top and bottom of the pole.
Completed carousel horses.
Insert the tab and glue the carousel horse tabs on either side of the star base.
Repeat for all of the carousel horses. Make sure that the carousel horses are all going in the same direction.
Glue the acetate column together with Glue Dots. I cut a strip of Glue Dots into pieces and adhered them.
Insert the acetate column into the center hole of the star base. Use Glue Dots to affix the tabs.
Attach the top of the carousel.
Make sure that the carousel horses are aligned correctly and they are at a right angle to the base.
Glue the tabs of the carousel horse down. Glue the tabs of the acetate column down with Glue Dots. Set this carousel horse assembly aside.
Glue the outer band to the inner scalloped band.
Notice the placement of the outer band. It allows for a tab.
There is an overhang of the outer band at the other side of the piece as shown. This overhang is necessary because when both bands are bent, the outer band needs to be a little bigger.
Crease the ledge piece at a right angle and apply glue to the area opposite the scallops.
Adhere this piece to the scalloped edge by aligning the scallops.
Apply glue to the tab as shown above.
The tab gets inserted underneath the scalloped edge band. Notice that the outer band has come unglued. This might happen because there is tension on the glued areas. Reglue the pieces where needed.
Bend the scalloped edges inward. Set this lower band piece aside for now.
Make the upper band by bending the ledge scallops at a right angle on both sides of the strip.
Apply glue as shown on the side opposite the scallops.
Adhere the ledge to the band. Unbend the scallops to align the piece. Notice the placement. A tab is needed. Apply glue to the tab on both sides.
Insert and adhere the tab by aligning the edges of the scalloped ledge.
Bend the scalloped tabs at a right angle. This is the upper band. Set this aside.
Make the canopy cone. Glue the triangles to the top of the carousel canopy.
I used a silver colored spacer here to determine the placement of the next triangle which needed to be glued down.
Repeat for all of the triangles. Apply glue to the tabbed edge.
Adhere into a cone.
Apply glue to the upper band, the one with two scalloped edges inside.
Adhere the canopy.
Apply glue to the top of the horse carousel.
Adhere the circle as shown. Make sure the shiny foil side is facing down.
Apply glue to the tabs of the scallops.
Adhere to the top of the carousel horse assembly.
Apply glue to the scalloped edges of the lower band as shown. My glue did not adhere correctly because of the slipperiness of the acetate.
So then I used Glue Dots to adhere the acetate to the scalloped ledge by turning the piece over and adhering the Glue Dots to the inside ledge.
Turn the piece over and apply some Glue Dots to the top of the acetate.
Adhere the carousel assembly to the acetate.
Attach the Carousel to the Hyperduino
Insert the black box of the Multi-Color Flashing LED Lights into the Hyperduino in pins 8 - 13.
I used clips to organize the wires.
Tape the bottom portion of the light box to the Hyperduino. Make sure the bottom of the box is centered over the hole and the side hole is oriented in the direction of the rainbow ribbon cables..
Insert the LED's through the hole in the side of the box.
Slide the motor connecter onto the yellow motor shaft. Attach the axle. If you do not have a motor connector, slide the axle onto the yellow motor shaft. The carousel will still operate correctly.
Separate the six wire LED into 2-three wire strands. There should be six inches of wire that should be exposed in the box.
Tape the LED wires to the side of the box.
Slide the top of the box onto the center axle.
Insert one LED into each light circle. First on one side of the strand and then on the other side of the strand.
Notice the LED lights are not at a right angle. This is ok. Tape the top of the box to the side of the Hyperduino.
Slide the completed carousel onto the center axle
Make the flag by gluing the contrast color to the inside of the flag and wrap the flag around the center axle and glue it together. The flag should be able to move up and down over the axle.
Completed Rotating Hyperduino Carousel with Multi-Color Flashing LED Lights
Program the Hyperduino
Code the Hyperdino as shown in the screenshot above. The Hyperduino is now ready to operate.
Video of the Hyperduino in action.


Wonderful!
ReplyDeleteFred