House Box
Two cube boxes and a House Box
To create a simple cube box, all the side lengths will be the same. Make a square with the drawing tools, make sure to hold down the shift key to make it square. Make a copy of the box by using the Edit/Copy function. Replicate the box in all four cardinal directions.
It should look like the above figure.
The boxes have overlapping lines at this point. I want just the outer edge of the figure. I use the offset window to offset the image a little bigger and then a little smaller. I do an offset of .01 with a right angle corner. I selected the image created and then do an internal offset of .01. Center to page this figure. Paste a copy of the original square onto the page. Change the straight lines to a dotted one. Center to page this square.
The image should now look like this.
The only thing that is left to do is to make tabs for the box. The tabs are needed so that the corners of the box have a space to be glued to. I like to make my tabs from .25 to .5 inches wide depending on how big the box will be.
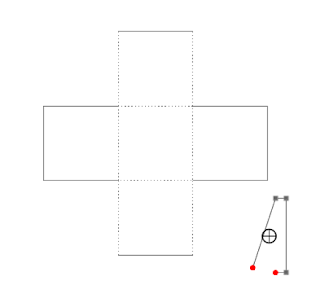
In the point editing mode, break the path for all of the red points above. The points will turn from gray to red when the points are released in the Object/Release Compound Path mode. This will allow you to change the solid lines to dotted ones.
The image should now look like the above figure. The box needs tabs.
Paste a copy of the original box. In the Transform scale window, resize the box so that the width is .25 inches and apply the change. The rectangular box needs to be open ended. There are a number of ways to do this. Here is just one way. Double click the rectangular box, click on the bottom left point. Break the path. Pull the red dot away from the figure and then delete the red dot that is being pulled away from the figure.
Notice the red dot that is being pulled away. This is the dot that needs to be deleted. An image that looks like a bracket is created. Move this bracket to the side of the cross on the bottom right.
You might have to zoom in to see that the tab is aligned correctly. Mirror this tab in the Replicate window to the left. Repeat for the upper cube. When completed, group the image in the Object menu so that it does not get distorted in any way.
The box template should look like the above figure. This can be the bottom or the top depending on what you choose. I chose to make it the bottom. Duplicate the box template and drag one of the corners of the bounding box so that the entire image is bigger by approximately .2 inches. This amount is arbitrary depending on the thickness of your paper. I recommend using scrap paper to test whether the tolerance is good enough to allow the box to be easily pulled apart but not too loose that it slips out without any resistance.
In the file you will find, a copy of the above box. Try it out and see if you understand its construction. I also added a different height box top to the file. Make a copy of the the original box top and alter the height. Each of the four sides need to be shortened. How do you do that? Ungroup the figure and select the top square with the two tabs.
In the bounding box, there are small squares, select the top square in the middle of the figure (below the green dot). Drag the box down and you will see the height decrease. Please note, zooming in will allow you to get very precise measurements. Repeat this process for the other three sides. A box top with shorter sides is now created.
Think about how you would make a rectangular box. You can not just drag the image in the center of the bounding box to make it wider because the opposite sides would remain unchanged. In order to make a rectangular box, each side measure must be calculated.
Here is the PDF. I used 65 lb. cardstock.
Here is the .Studio file.
Next, cut out the house box that I made. Do you notice the similarities and differences in the make up of this box compared with the one you made? In the house box top, I used just one tab and I placed all of the sides together. In the house bottom, I made it similar to the square box that you constructed. There are many configurations of the sides that will accomplish the same result. The next time you open a box, check out its construction. It is fascinating to see all of the different ways things can be constructed.
Box bottom on the left and House Box Top on the right.
Completed House Box


No comments:
Post a Comment