Monday, October 12, 2020

A STEM Project: Adding Scenery to a Slice Form Sphere

A Slice Form Birthday Themed Sphere with a Base that Folds for Mailing

A Slice Form Birthday Themed Sphere with a Base that does not Fold

In the previous blog post https://papercraftetc.blogspot.com/2020/10/a-stem-project-how-to-make-slice-form.html, I described how to make a slice form sphere.  In this post, I will explain how to add scenery to this sphere and how to display the sphere.

Here is the .Studio file which reflects the 4 inch snow globe that was made in the previous posting.

I used 65 lb. Neenah metallic card stock from Office Depot to make this slice form.

https://drive.google.com/file/d/1l6ekHJjy63DM-Bpe_JUEY1HtRslktYE1/view?usp=sharing

Making a Birthday Themed Slice Form Sphere


The outer slice of the slice form sphere has a plain circle in the middle.  This area will be used to display the diorama with five scenes, one on each inner circle.  Notice that there are only three outer slices above. The 3.872 inch and 3.464 inch slice will be duplicated on either side of the center slice.


Choose some images to put in your diorama.  Make sure the images do not have any broken paths.  You can determine this by double clicking the image and looking for any red dots.  If there are any red dots, make sure to close them by moving the one red dot to the other red dot.


Arrange the circles, one 4 inch outer circle, two 3.872 inch outer circle and two 3.464 inch outer circle. Move the image that you would like to see on each circle. Group the image to the circle  

Move the circle to the center of the page and imagine what the slice form sphere will look like. The  circle with the banner will not center correctly.  Center the circle first and  then move the banner to the circle. If you are happy with the positioning. Attach the shape to the circle with the following instructions. 

The Sophia name was made with the Silhouette software using the font Lucida Grande, 25.72 pt - character spacing - 135 %.  The Silhouette text to path grab handle put the letters on the edge of the circle.
The letters were attached using the Modify function. The Modify function is dependent on images being in the foreground and background. To determine the location of the image you can use a fill pattern and move the one image to the other image to determine if you need to move it forward or backward.

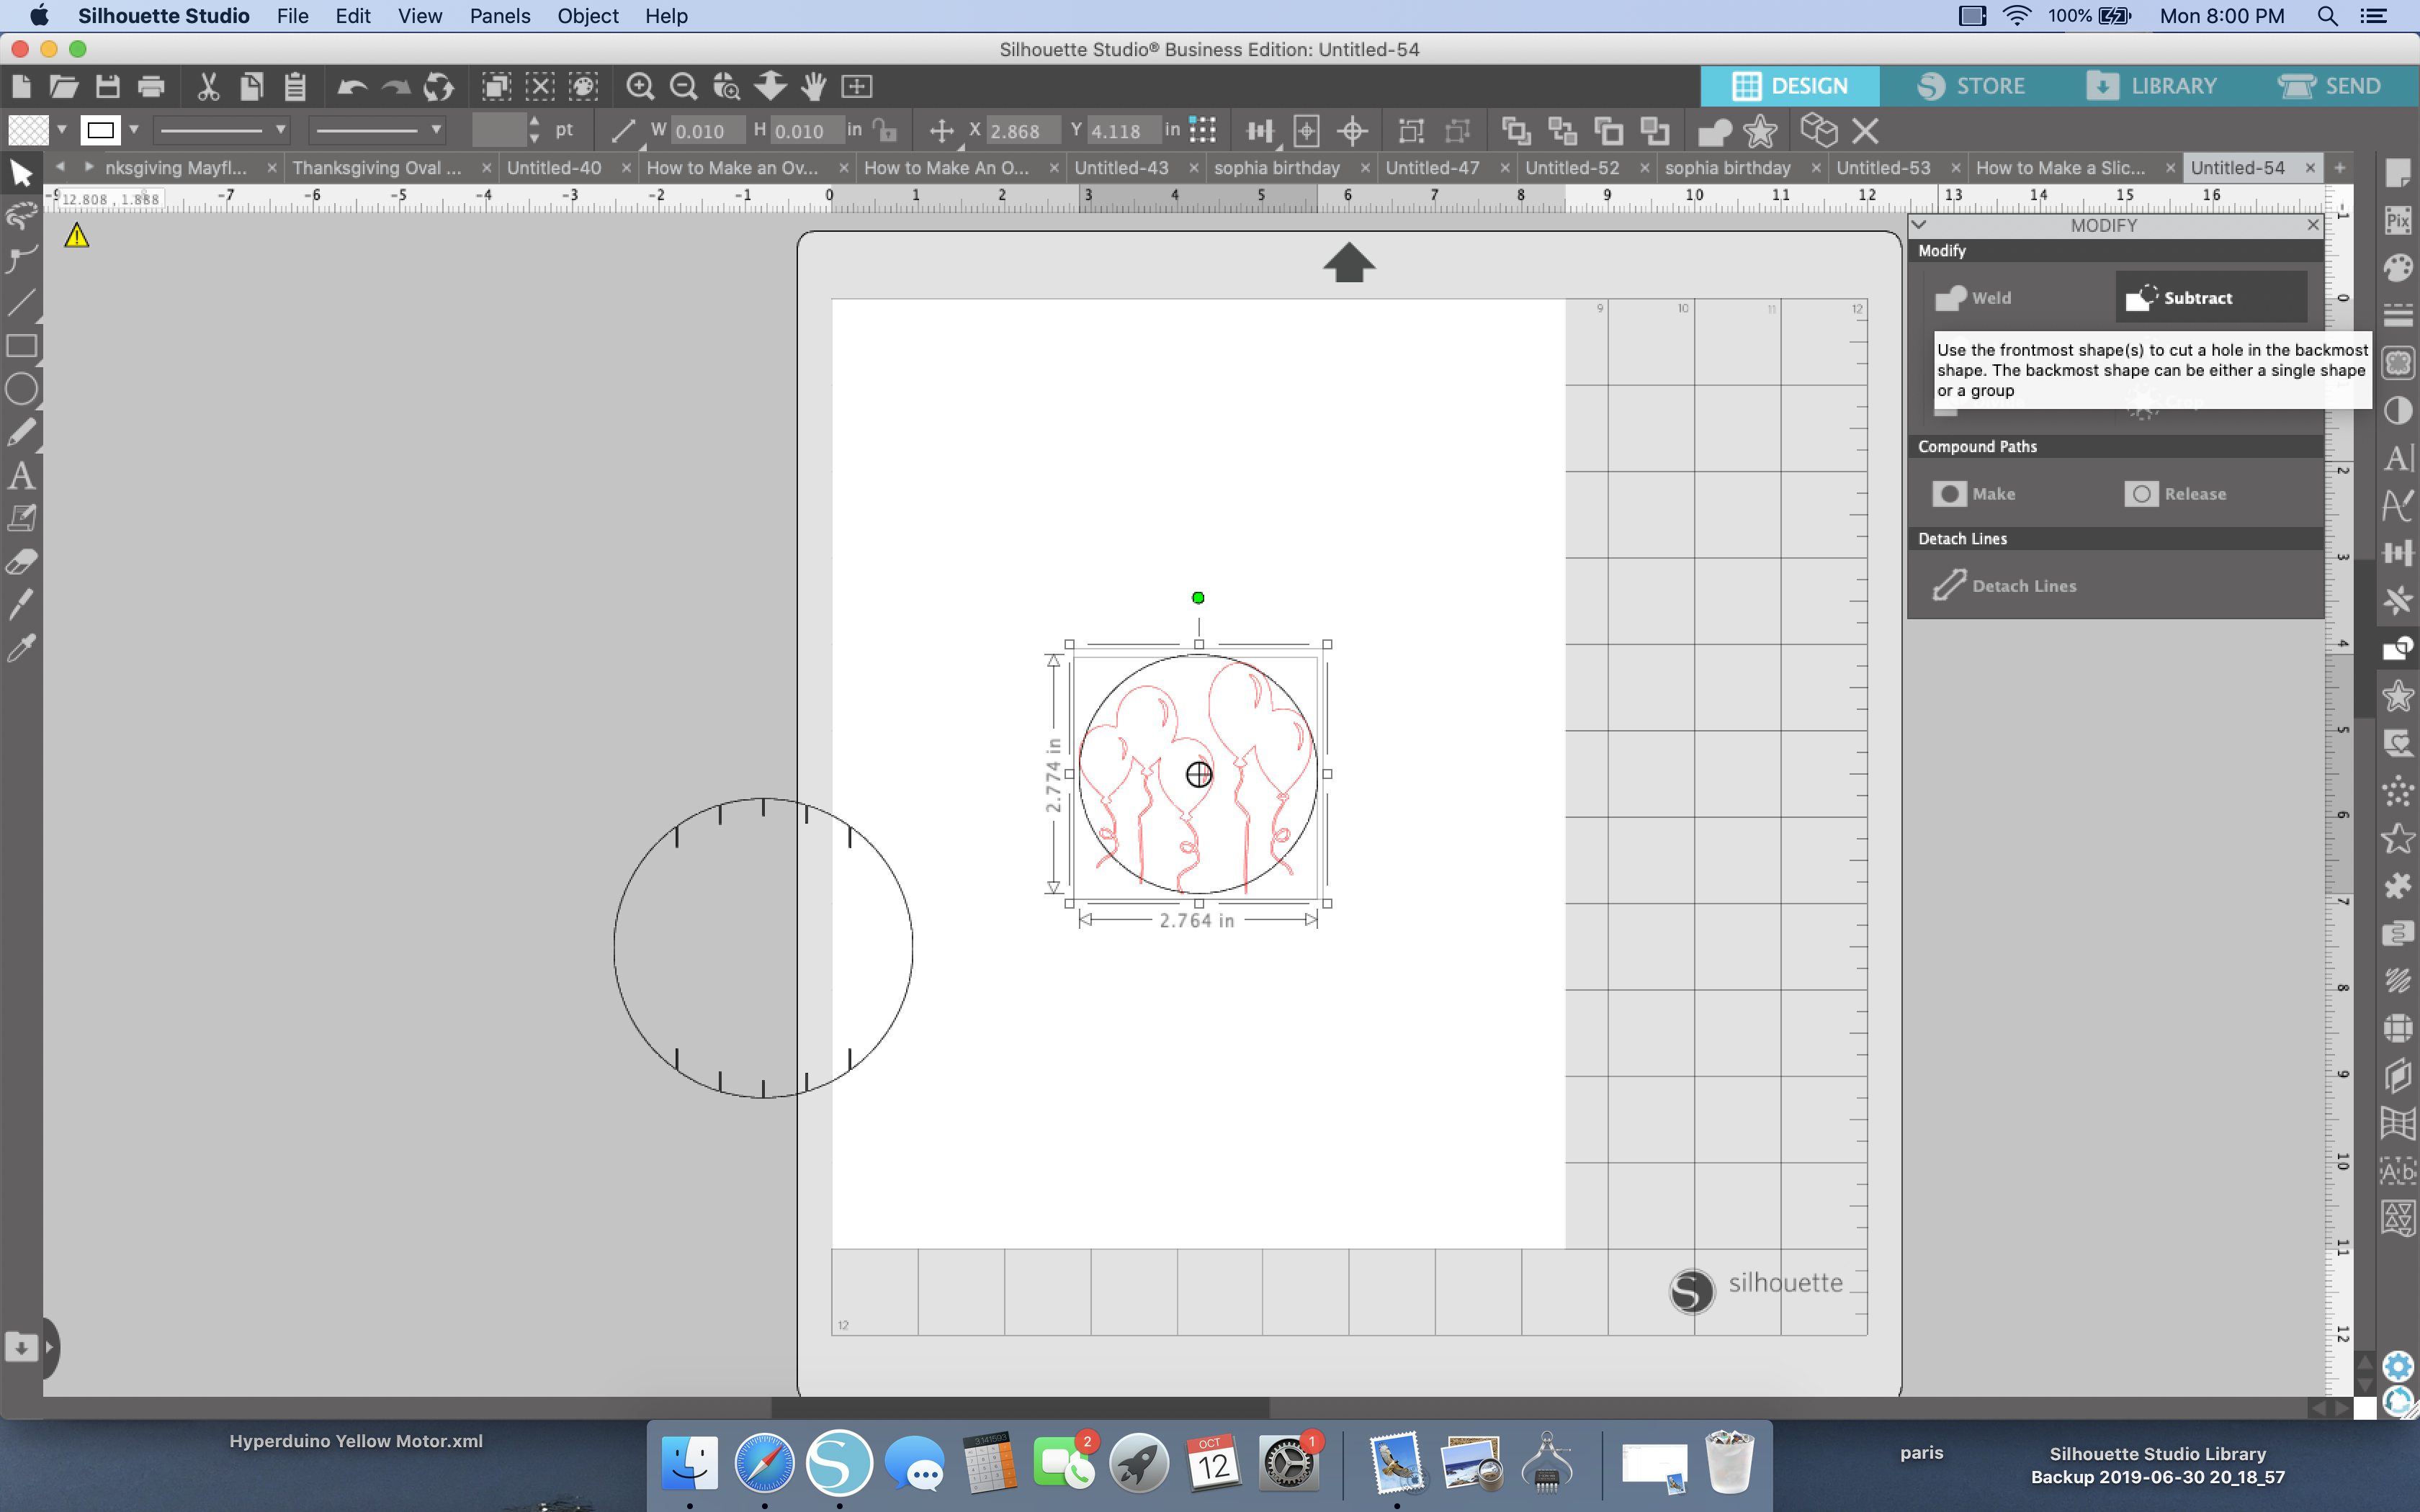
Notice that the red balloons are in front of the circle.  In order to use the Subtract function in the Modify window, the image that you are subtracting must be in the front.  The procedure to attach an image to the circle is as follows:

1. Center the outer slice form circle to the Center of the Page

2.  Ungroup the circle.

3. Move the circle with the slits off to the side, while keeping the inner circle untouched.

4.  Move the image that you want onto the circle.  Make sure that the edge of the image overlaps the circle.

5.  Select both the circle and the image to highlight them. In the Modify window, Subtract the image.

6. Select the circle with the slits and center it on the page.

7. Select the entire image and Object Group it.
Completed image.  Repeat for all of the other slice form circles.

Making a Foldable Base Suitable for Mailing

Arrange the base pieces

Slid the two largest pieces into one another and place them face down.  It s easier to do the bottom first.

Add the next largest piece to either side.

Add the smallest piece to either side and flip the entire base over.

Add the largest piece on either side.  Repeat for the smallest piece.

Completed base that can fold flat.

Slice Form Sphere With Foldable Base


Making a Base That Does Not Fold

Cut out the base pieces

Glue the Strip together. Fold the tabs and apply glue to each triangular tab.

Insert the tabs into the circular base and adhere the tabs.

Slice Form Sphere With Non-Foldable Base


Saturday, October 10, 2020

A STEM Project: How to Make a Slice Form Sphere Using the Silhouette Software

A slice form sphere is a dazzling spectacle. A two dimensional object, paper, is transformed into a three dimensional object by sliding slices of the form into one another. 

A slice from sphere can also lie flat.

In this blog posting, I will explain how to create a slice form circle with the Silhouette software and then use the Pythagorean theorem to create the other circles spaced across the sphere.

How to Make a Custom Sphere

- Make the Center Slice

The slices in a slice form can not be enlarged or decreased once the sphere is made because the paper slits need to accommodate the thickness of a piece of paper.  Each slit is 0.02 inches wide. Once you determine the size of the sphere, you need to determine the number of slices.  The number of slices will always be an odd number. The center slice and the corresponding slices on either side of the center. (Only three slices need to be designed.  One center slice and the two slices on one side of the sphere. Once these two slices are designed, they can be duplicated for the other side of the sphere.) I determined that five slices total was a good number because it would visually allow you to see the scenery (my goal is to make a diorama) but still give a nice structure. 

Using the Silhouette software, draw a circle the size of your sphere. In this example, I am going to make a four inch sphere.  Center the circle to the center of the page.  

Draw a vertical rectangle the length of your sphere, 4 inches by the width of a slice, .02 inches. 

Using the Replicate function, Number of Copies will be 4 (one less than the number of slices).  Custom Position each Copy of this vertical rectangle in the X offset by 0.5 inches. The slices will be 0.5 inches apart.

Make Compound path of the vertical rectangles and center them to the page.  These vertical rectangles will become the slices. (At this point, you can change the spacing of the slices, but the calculations will be different then what I have given.)

Move the vertical rectangles from the center of the page.  Internal offset the 4 inch circle by .35 inches to create a circle frame. 

The center of this circle frame is found by doing a .175 inch internal offset of the 4 inch circle. This center location is the stopping point when the opposite slice is slid into one another. 

Align Center the vertical rectangles to the top of the circle. Release the compound path of the vertical rectangles and move each individual rectangle downward so that it slightly overlaps the center of the circle frame.

I used the downward arrow key to move each vertical rectangle. Make a copy of this screen for later use;  either on the same page or to another file. I like to copy it to a temporary file because I like to use the Undo function for mistakes and it is easier if things are not complicated with multiple revisions.


Delete the center of the circle frame.  Make a compound path of just the circle frame.  
Select all of the vertical rectangles and make them a compound path. Copy it to memory using Edit Copy.

Select the vertical rectangles first and then the circle frame.  In the modify window, Subtract the vertical rectangles from the circle frame.

The result will be outer slice of the slice form circle.  Rotate this image 180 degrees in the Object window.

The image has been rotated 180 degrees. Go to the Edit window and Paste in Front.

The vertical rectangles will be placed in the same exact location as the last time. Select the vertical rectangles and then the circle frame as before.  

In the Modify window, Subtract the vertical rectangles from the circle frame.

The result will be one of the slices of the slice form. This is the outer slice because the slits are on the outer side.  The inner side slice needs to be made next.

Retrieve the the file that you saved earlier to make the inner slice.

Select the vertical rectangles and make them smaller so that they will fit inside the circle, as shown above. Group them together in the object window to move to the inside of the circle and Align Center the vertical rectangles as before.

 Ungroup the vertical rectangles. With the up arrow key, move the vertical rectangles individually upward so that it slightly overlaps the center of the circle frame.

Delete the center of the circle frame. Select all of the vertical rectangles and make them a compound path. Copy it to memory using Edit Copy.

Select the vertical rectangles first and then the circle frame. 

In the modify window, Subtract the vertical rectangles from the circle frame.

The result will be one half of the slice form circle.  Rotate this image 180 degrees in the Object window.

The image has been rotated 180 degrees. Go to the Edit window and Paste in Front.The vertical rectangles will be placed in the same exact location as the last time. Select the vertical rectangles and then the circle frame as before.  In the Modify window, Subtract the vertical rectangles from the circle frame.

 The result will be the corresponding slice. This is the inner slice because the slit is on the inner side. 

A pair of slices, the outer slice and inner slice, complete the center slices for the slice form sphere.


- Determine the Size of the Other Two Slices with the Pythagorean theorem

The two smaller circles are equally spaced from the center circle. Here is the PDF of the calculations if you want to print them out. 


The size of two smaller circles will be 3.872 inches and 3.464 inches respectively.


Repeat "Make the Center Slice" instructions with a 3.872 inch circle. 
   The offsets and all of the other instructions are the same for making an outer and an inner slice.

- Repeat "Make the Center Slice" instructions with a 3.464 inch circle.
 The offsets and all of the other instructions are the same for making an outer and an inner slice.


Once completed, the slice form circles should look as above.

Here is the .Studio file that I created for this blog post and the next post.

I used 65 lb. Neenah metallic card stock from Office Depot to make this slice form.

The interior of the slice form sphere is an area where a diorama can be created. In my next blog posting https://papercraftetc.blogspot.com/2020/10/a-stem-project-adding-scenery-to-slice.html, I will explain how to use these slice form circles to make a slice form sphere with a diorama inside.


Assembling a Slice Form Sphere

Please note: The center slice (four inch circle) only needs to be cut out once.  All of the other circles need to be cut out twice.


Arrange the slices according to size and slit location (outer or inner slits).

Take the the two largest circles and insert the slits into one another.

Insert the slits (top and bottom) of the next largest slices on either side of the center. I recommend doing the  outer slices first (slits are on the outside of the circle).

Insert the slits for the smallest outer circles.

Insert the slits for the next largest inner circles. The inner slices are slid into place by first doing all of the top slits and then inserting the bottom slits. This will take some time so go slowly as the slits like to slide out by themselves.

Insert the slits for the smallest inner circles.

Completed Slice Form Sphere

Tuesday, September 22, 2020

Halloween Trick-or-Treat Greeting Card

This Halloween card is similar to the scenes from my two previous blog posts.  The card is 5 inches x 5 1/2 inches.

Five scenes are combined to create the Halloween card.

The scenes are connected in a zig zag design.

The back of the card looks just as good as the front of the card.

I used 65 lb cardstock to make this card.

Here is the PDF.

Here is the .Studio file.

Here is the SVG.

Glue the tabs to the back of each scene. The back scene has the tab glued first and then the metallic paper is glued on top of it. The metallic oval is centered in the back of the this scene.


An Oval Slice Form Pumpkin With A Halloween Scene inside

I modified my previous blog post of a sphere Halloween slice form and made an oval pumpkin out of the outside slice form.  I added a stem, some leaves and a spiral curl to complete this new model.  This pumpkin slice form is mailable as the entire design does go flat when using the foldable slice form base design included in the files and shown in the previous blogpost https://papercraftetc.blogspot.com/2020/09/a-halloween-sphere-slice-form.html


Oval Slice Form Pumpkin with Halloween Scene Inside

I used 65 lb cardstock to make these slice forms.  The lettering on the round base that says "Happy Halloween" can be cut out from card stock, Foil Quilled or sketch penned.

Here is the PDF.

Here is the .Studio file.

Here is the SVG. 

The directions to make the slice form are in this blog post. https://papercraftetc.blogspot.com/2019/11/a-sliceform-snow-globe-with-ice-skating.html

The non-foldable base is glued at the seam and the base tabs are glued inside.

The brown slices for the stem are slid into the yellow stem that is protruding from the yellow center oval slice. Glue on the leaves and the two strips that have been curled to complete the model.


Monday, September 21, 2020

A Halloween Sphere Slice Form

This Halloween sphere slice form tells the story of three trick-or-treaters walking with their dog through a pumpkin patch who see a witch flying though the night sky.  

This slice form would make a nice Halloween display or a gift to someone special. Since slice forms can be folded flat, this diorama is suitable for mailing.  I have included two different types of bases.  One base can be made flat for mailing or the round base as a Halloween display in your home.

Halloween slice form with a base which will fold flat for mailing.

Another version of the mailable base.

Halloween slice form with a round base for a home display.

I used 65 lb cardstock to make these slice forms. The lettering on the round base that says "Happy Halloween" can be cut out from card stock, Foil Quilled or sketch penned.

Here is the PDF.

Here is the .Studio file.

Here is the SVG. 

The directions to make the slice form are in this blog post. https://papercraftetc.blogspot.com/2019/11/a-sliceform-snow-globe-with-ice-skating.html

I put a tea light in the round base as it is a little difficult to see all of the intricate cuts when black card stock is used. 

Tea light from the Dollar Tree in the base.

Illuminated scene with a tea light in the base.

Check out my next blog post which uses the same scenery and is made into a pumpkin slice form. https://papercraftetc.blogspot.com/2020/09/a-oval-slice-form-pumpkin-with.html