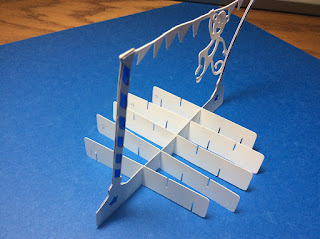
Circus Party With A Locking Slice Form Base
Paper is an amazing material to create slice forms. Slice forms can only be made with pliable materials which can be maneuvered to allow for each slice to be slid into place. Wood, metal or hard plastic will not suffice. In this blog posting, I have created a slice form base that does not fall apart when the figure is picked up from a surface. Two of the slices have a special slit design which creates the locking mechanism.
In this blog posting, I made a Circus Party slice form which exemplifies how to make your own design.
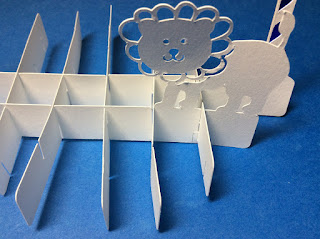
Looking at the above slice, you can see the locking mechanism. It is a small slit that zig zags to the top of the right slit. The lion on top of this slit spans over the slit to hold the two pieces of paper together. In my design, front facing slices #2 and #4, have this feature. When designing your own slice form, the figure that is placed on top of the slice must be large enough to span this gap.
There are two types of slices to make a slice form base. There are side slices and front slices. I recommend numbering your slices to keep everything orderly because the placement of the slices matter.
To design your own slice form, the figure is placed on top of the slice and welded to the slice using the Silhouette software in the Modify window. The special slices, #2 and #4 need to have a figure which spans the locking mechanism.The side slices can be modified but I do not recommend doing this until you have mastered the front slices.
There are five front facing slices. Add your designs to these slices. Cut out these slices along with the five side facing slices to make your slice form.
Here is the PDF. I used 65 lb cardstock. https://drive.google.com/file/d/1O0DfzzdcSz5DRDgaN3pqTcean3oSx854/view?usp=sharing
Here is the .Studio file.
Here is the SVG. The file goes beyond the viewable area. Zoom out to see the entire file.
Please notice that I have numbered all of my side slices in pencil so that they can be erased after the project is completed. Slide all of the side slices onto the #3 front slice. Placement of the slices matter so make sure all of the side slices from left to right start at #1 and end with #5.
Slide the #2 front slice into place. This may require the slice to be moved up and down and bent to be put into place.
Slide the #4 front slice into place. Repeat for the #1 front slice and then the #5 front slice.
The result is a grid like pattern which will not fall apart when picked up.
The circus party with a locking slice form base can lay flat and fit into an A4 envelope.


No comments:
Post a Comment