The ideas for coding in TurtleStitch come from the nature around us. In this multidisciplinary blog posting, I will explore the science, literature and mathematics of snowflakes and the different methods of coding snowflakes in TurtleStitch.

Snowflakes are a thing of beauty and wonder.
Imagine walking through a forest on a cold winter day with snowflakes falling from the sky. There are hundreds of millions of them falling gently to the ground. You reach out and touch one with your gloved hand and there lies a perfect snowflake in all of its wonder. But wait, the next snowflake looks just as beautiful and unique as the last. How can this be? How can each snowflake be more beautiful and different than the last?


Looking closely at the structure of a snowflake, you will see that each snowflake almost always has six points. (Occasionally, there is an anomaly and it is only three points.) Why is this true you may ask? The answer is in the structure of the water molecule. Water is made up of two hydrogen atoms and one oxygen atoms, H₂O. Each snowflakes is made up of billions of water molecules and at the core, are water molecules that are “holding hands”. These water molecules, at the center, create the six point structure or hexagonal shape. Atmospheric conditions such as temperature and humidity change the structure of the forming snowflake but the core shape always remains the same.
An interesting book about snowflakes is Snowflake Bentley, https://www.youtube.com/watch?v=rtyLpo3cWic, by Jacqueline Briggs Martin. This book depicts the true story of child named Wilson Bentley, who was fascinated with snowflakes. Bentley's enthusiasm was misunderstood at the time. He started his passion for snowflakes by drawing them. When he was seventeen, his parents gifted him a microscopic camera to photograph the snowflakes to document the uniqueness of the snowflake shapes.
Bentley’s Photographs of Snowflakes
In 1885, he photographed the first snowflake in Jericho, Vermont. He went on to photograph and publish a book about snowflakes. Wilson Bentley, a self-taught scientist, was the first person to claim that no two snowflakes are alike.
Here is a lesson plan from the Smithsonian Institution in Washington, DC about Snowflake Bentley.
https://siarchives.si.edu/sites/default/files/pdfs/1.%20Looking%20at%20Snowflakes%20-%20Shape%20and%20Structure%20Activity.pdf
The TurtleStitch Snowflake
Your mission is to create snowflakes using TurtleStitch. Start with making a six spoke structure. A spoke is just a straight line.
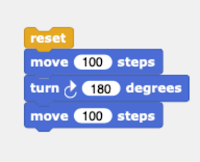
Here are two ways to make a spoke. It doesn’t matter which one that you choose.
Notice that the turtle is pointing in two different directions. What will that do for coding the turtle? The turtle will need to be turned differently.
Coding a Snowflake
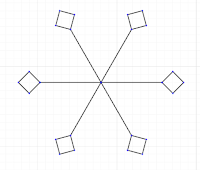
Since a snowflake is a six-sided figure or a hexagon, the next step is to place the spokes evenly in a circle. There are six spokes. We know that a circle is 360 degrees so that we want the turtle to turn 360/6 which is 60 degrees.


Here are two versions of code for a snowflake. They both produce the snowflake on the right.
Comparing Coding Techniques
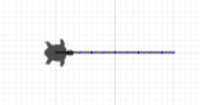
Comparing the snowflake code after one repeat, the turtle is located in different positions. The red arrow represents the starting point of the turtle.
In the screen capture above, it appears that the turtle moves a greater distance than the code on the right. However the turtle on the left needs to traverse the same line to get back to center.


The screen capture above, the turtle has already traversed the same line twice and is positioned to move.The distance travelled in both cases will be the same after six repeats.
Another difference is the turtle travels in a clockwise motion in the screen capture on the left. The turtle moves in a counterclockwise motion on the right.
More Comparisons
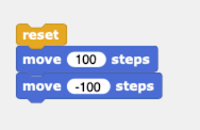
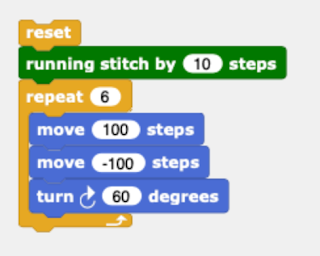
In this set of blocks, the snowflake is created by the turtle moving 100 steps and then moving a -100 steps to return to the center. Notice that the turtle turns right 60 degrees after drawing a spoke.
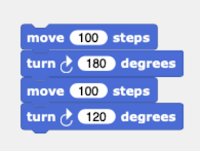
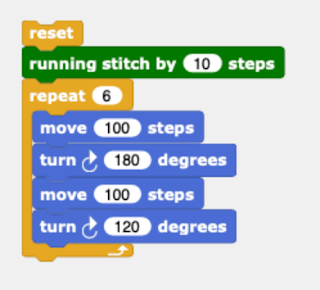
In this set of blocks, the turtle is moved 100 steps, turned 180 degrees and then moved 100 steps back to return to the center of the figure. The turtle is then turned 120 degrees to complete the first spoke of the snowflake structure. Why was 120 degrees used instead of 60 degrees?

The answer is the direction in which the turtle is pointing. This is an important concept in TurtleStitch and it is hard to envision without an example like this. The move is different because it is an interior angle.
In the figure shown, the blue area represents the interior of the hexagon. The angle y forms a 120 degree angle. The angle x in yellow represents the exterior angle and it forms a 60 degree angle.
Both sets of codes accomplish the same result. It is interesting to see mathematical concepts come to life with the move of the turtle in TurtleStitch.
For future reference, to calculate the move for a polygon of n sides, the interior angle formula is:
180 - (360/n) Adding An Endpoint to the Snowflake Spoke

A square was added as an endpoint to this snowflake. The first turn is only 45 degrees to set the square diamond into position. The next three turns are 90 degrees to complete the square. There is a 45 degree turn to return to the center of the snowflake. Since the turn is an interior angle move, it is a 120 degree turn to get to the next spoke. Repeat this code 6 times.
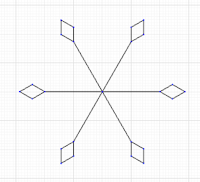
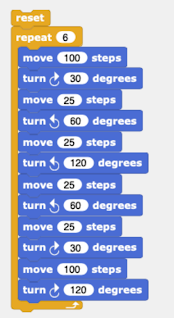
A diamond was added as an endpoint to this snowflake. The first turn is only 30 degrees to set the diamond into position. The next three turns are 60, 120 and then 60 degrees to complete the diamond. There is a 30 degree turn to return to the center of the snowflake. Since the turn is an interior angle move, it is a 120 degree turn to get to the next spoke. Repeat this code 6 times.
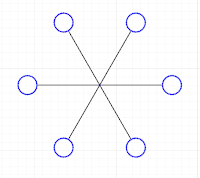
Comparing Two Methods Of Adding Circle Endpoints to the Snowflake Spoke
Both sets of code produce circles at the end of a snowflake spoke but one is easier to code than the other.
This code required calculations to make the circle, center the circle at the end of the spoke and then realign it.
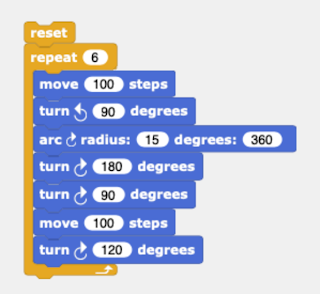
This code is the simplest. Once the line is drawn, the turtle is coded to move 90 degrees. This will align the turtle in the correct position. The Arc block takes care of the alignment calculations.
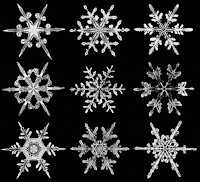
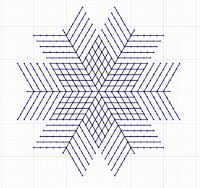
Here are some snowflakes that were created in TurtleStitch. In each snowflake, a different feature was added with a turn or move. As in nature, snowflakes can become very complex.
Now take the opportunity to see what type of snowflake you can code.
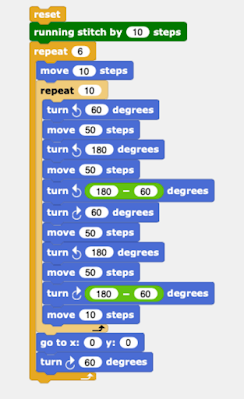
Making a Snowflake With Branches - A reimagined Markus Gaelli’s snowflake
Once the 10 branches were made, the turtle was moved back to the center of the snowflake (0,0).
This spoke code was repeated 6 times to complete the snowflake.
The overlying branches in the center of the snowflake produce the interesting pattern in the center of the snowflake.
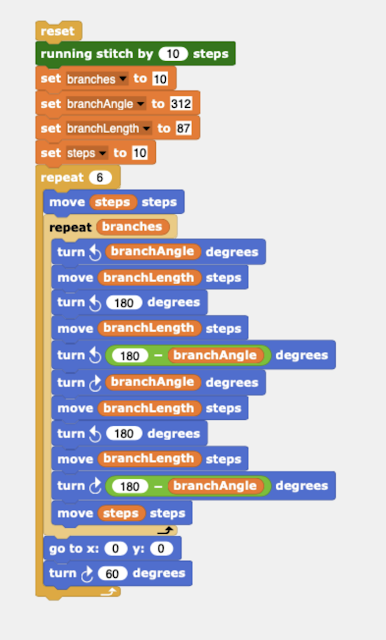
Making a Generalized Snowflake With Branches
This program is exactly the same as the previous program except the numerical values were replaced with variable names. The variable names were given values in the beginning of the program. This type of coding makes it easy to change values of different variables without having to change the logic of the code.
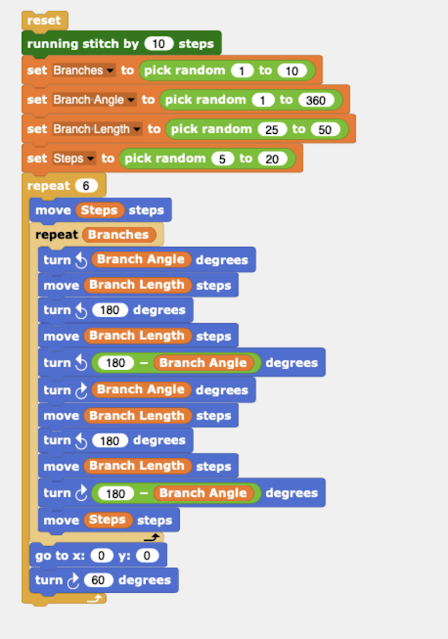
Making a Generalized Snowflake With Randomized Branches
Continuing the quest to code beautiful snowflakes.
This program is exactly the same as the previous program except the variable names were given a range of values with the ‘pick random’ block. This generates random numbers between the numbers that were specified.
Each time the program is run, a different randomized snowflake is created with different number of branches, with different angles at which the pair of branches intersect the main spoke, different branch lengths and different spacing between the branches.
If you like a certain snowflake design, write down the randomized number that created the snowflake to recreate it. Remove the ‘pick random’ block and replace it with the values that you like. The values are shown in the stage area.
Making Nine Generalized Snowflakes With Randomized Branches
Continuing the quest to make beautiful snowflakes:
- This program generates nine random snowflakes because there are two nested ‘for’ loops which creates the rows and columns of snowflakes.
- The 'for x' value represents the rows, moving left to right and the ‘for y’ value represent the columns, moving vertically up the grid.
- The outer loop ‘y’ starts with its first value.
- Then, the inner loop ‘x’ runs completely, processing all its set of instructions for that particular value of the outer loop.
- Once the inner loop finishes, the outer loop moves to its next value.
- This process repeats until the outer loop has gone through all its values.
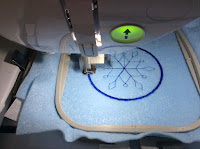
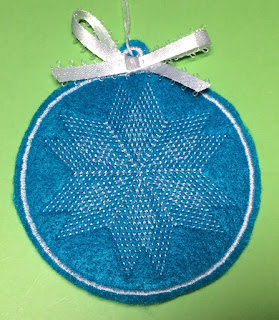
Embroidering the Snowflake Design
A snowflake ornament was made by coding a satin stitch around the snowflake design and adding a circle as a hanger. Craft felt with tear away stabilizer was used as backing for the design. Once embroidered, the design was cut about an ⅛ inch from the satin stitch. It is not recommended to cut any closer to the satin stitch, as a slip of the scissors might cut the satin stitch threads. A bow and a thread hanger were sewn on to complete the snowflake ornament.
Snowflake Ornaments Designed With The Randomly Generated Code


No comments:
Post a Comment