Thursday, May 25, 2023

Zigzag Circus Birthday Card

Zigzag Circus Birthday Card 

This Zigzag Circus Birthday Card is a companion to the Circus Diorama Decoration from the previous blog posting,  https://papercraftetc.blogspot.com/2023/05/circus-diorama-decoration-for-birthday.html

The birthday card is like a diorama.  

There are five sections, which when folded together, create a three dimensional scene. Notice the zigzag that is formed when the sections are glued together. The tent design is placed on both sides of the front and also on both sides of the back.

Here is the PDF file. I used Neenah brand 65 lb White Gold metallic cardstock from Office Depot.  I also used 65 lb. red foil cardstock and red sparkle cardstock from Michaels.

Here is the .Studio file.

Here is the SVG. The file goes beyond the viewable area.  Zoom out to see the entire file.

Making the Zigzag Card

When cutting out the design, I recommend using overcut as the intricate pieces might not cut out correctly and also cutting the design with two passes. The five sections are glued together by a tab.  Each section is numbered in the file to help with the placement.

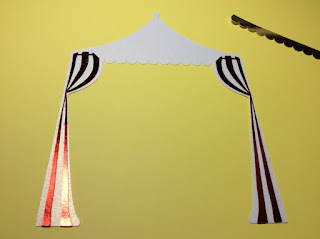
Make four of these tents.
The red curtains are centered in the middle of the side panels.  Align the bottom of the red foil first and then glue down the rest of the curtain/

Align the gold scallops at the top corners and then glue the gold scallops down on the piece. Align the canopy on top and glue it down.  Glue on the gold pinnacle to finish the tent. Repeat for the other three tents.

The tent pieces will be glued back to back at the top portion of the tent as shown above.

Slide the tent pieces onto the last slice of the zigzag.

Glue the lower portions of the curtain down, (on both sides). Repeat for the other side.

Cut out the Happy Birthday but do not remove the letters from the mat.  Cut a string about 8 inches and glue each letter to the string at the same location as the mat.


Carefully remove the letters from the mat and make sure the letters are adhered correctly.

Cut the string to size and add a gem embellishments to the ends.

Front of card
The birthday card looks great when viewed from either side of the card.  

Back of card

Monday, May 22, 2023

Circus Diorama Decoration for a Birthday Party

Circus Diorama Decoration for a Birthday Party
This circus diorama would make a beautiful table decoration for a birthday party.

Eight double thickness tabs keep the five diorama scenes together.

The tabs slide into the sides of the scenes.

Here is the PDF file. I used Neenah brand 65 lb White Gold metallic cardstock from Office Depot.  I also used 65 lb. foil cardstock from Michaels.

Here is the .Studio file.

Here is the SVG. The file goes beyond the viewable area.  Zoom out to see the entire file.

When cutting out the design, I recommend using overcut as the intricate pieces might not cut out correctly and possibly, cutting the design with two passes.

 Look at the photos for embellishment placement.

Saturday, May 20, 2023

A STEM Project: Sewing a Cloth Tote Bag Using a Pattern Traced With TurtleStitch

Sewing a Cloth Tote Bag Using a Pattern Traced  With TurtleStitch

Sewing a cloth tote bag is an easy project using a tote pattern traced in TurtleStitch. I have included a pattern file for an 8 x 8 x 4 inch tote in this blog posting so no programming is necessary unless you want to modify the size.  Skip to the next section if you do not want to modify the tote pattern size.

How to Make a Tote Pattern in TurtleStitch Using Silhouette Software

To make a tote pattern in TurtleStitch, set the dimensions of the bag and execute my program.   https://www.turtlestitch.org/run#cloud:Username=Elaine&ProjectName=Basic%20Tote%20Pattern There are four pattern pieces to make a basic tote bag. Once executed, the file must be brought into the Silhouette software so that the pattern pieces can be cut with the Silhouette Cameo paper cutting machine.

In TurtleStitch, export the design as a DXF file. Open with the Silhouette software.  Resize the pattern using the one inch square as reference. 

8 x 8 x 4 Tote - File Section

If you do not have a Silhouette or Cricut machine, print the PDF file on any printer and cut the pattern pieces with scissors. (Please note, there is a 1/4 inch seam allowance and the finished tote bag is really 7 1/2 inches square.) 

Here is the .Studio file for Silhouette machines.

Here is the SVG for all other paper cutting machines. The file goes beyond the viewable area.  Zoom out to see the entire file.

Materials

The fabric required for this project is two fat quarters or 1/2 yard of fabric and a 1/4 yard of Pellon TP971F fusible interfacing. Twenty four inches of 3/8 inch ribbon trim is needed for the handles.

Make the Tote Bag

The pattern pieces are a front and back, two sides and a bottom and two handles. 
* The embroidered piece is the front*

When cutting out the pattern pieces, the more precisely that you cut the pattern pieces, the easier it is to sew the tote.

. Cut out all of the pattern pieces on your main fabric. (Only one back piece is necessary when an embroidered piece is used)

. Cut out all of the pattern pieces, except the handles from the lining fabric. 

. Cut out all of the pattern pieces, except the handles from the Pellon interfacing.  

. Cut two handles out of the Pellon interfacing by modifying the handle pattern.  Using the handle pattern, cut one out of Pellon interfacing and then cut this piece's length in half.  This piece will then be only one inch wide.

 .Iron the fusible interfacing to the back of the main fabric - front and back, two sides and the bottom.
(Please note: the interfacing can be ironed onto the lining fabric instead. This is a matter of preference.  Actually, I think it is better to iron the interfacing to the back of the lining which I did in subsequent totes.)

Here is a photo of all of the pieces that make up the tote.
The fusible lining was ironed onto the back of the main fabric so it is not visible.

Sew the back piece, side, front piece, and the second side of the main fabric together using a 1/4 inch seam allowance. 

Sew another side seam so that a circular tube is formed. 

Sew the sides seams for the lining fabric to form a circular tube.
 Iron all of the main and lining fabric seams open.  Ironing the seams gives the bag a more professional look when completed.

Place four dots at the four corners of the bottom piece. 
The dot should be position exactly 1/4 inch from each side of the corner.

Align the bottom piece so that it is centered on the circular tube  The dots should match the where the seams meet. Pin the piece into place and bring it to your sewing machine.

Place the sewing machine needle on the dot and sew exactly to the second dot. Leave the needle in the down position on this dot. 

Pivot the fabric on the needle at a right angle.  Make sure the corner is flat. When you resume sewing the corner seam of the bottom will align exactly with the fabric on the circular tube.

I recommend taking your time with the corners.  Make sure the material is not puckered. The material should lie flat. If it does not lie flat, use a pointed object like a pen to push the fabric by the needle (do not remove the needle from the fabric) to lie flat.

 Repeat the sewing to the next dot and pivot as before. Continue the process until the bottom is attached.  

The bottom on the bag should look like this. Once the bottom is attached, repeat for the main fabric.

Turn the main fabric inside out and iron the top edge down by 1/4 inch.
(Please note: I sewed on a pink ribbon border around the Matisse embroidery because I thought it needed to be framed as an accent.)
Iron the top edge of the lining down by 1/2 inch.
Insert the lining into the main fabric.  Set this aside.

Make the handles by folding the top edge down by 1/2 inch and ironing it down. 

Insert the fusible lining (fusible side up) into the pocket formed by the fold.

Wrap the bottom half of the fabric around the fusible lining and iron.

Sew two seams on each side of the ribbon to the center of the handle.  
Repeat for the second handle. 

Align the main fabric and the lining fabric so that the seams are matched.  Insert the handle about a 1/2 inch between the main and lining fabric in the front of the tote. The handle should be placed one inch from the side seam on each side. Pin the handle to the top edge of the tote.  Align and pin the sides.

 Insert the second handle about 1/2 inch between the main and lining fabric in the back of the tote. The handle should be placed one inch from the side seam on each side. Pin the handle to the top edge of the tote.  

Sew a 1/8 inch seam around the entire top edge of the tote.

The front of my bag is a Henri Matisse drawing, Visages III, 1946. 

I traced this Matisse drawing in TurtleStitch  The tracing of the Matisse can be found here,  https://www.turtlestitch.org/run#cloud:Username=Elaine&ProjectName=Henri%20Matisse%2c%20Visages%20III%2c%201946%20Lithograph 
Type the letter 's' and hit enter to execute the design, the design can then be exported (from the drop down program file) as an embroidery file (I use 'Export as Tajima/DST' for my Brother PE800 machine).  The file is then copied to a USB stick on your computer and then inserted into your embroidery machine for use.

If you would like to trace your own design, check out this blog posting on how to do this in TurtleStitch, https://papercraftetc.blogspot.com/2022/07/a-stem-project-coding-in-turtlestitch.html


Saturday, May 13, 2023

The History of Marvin Minski’s Logo

I recently attended a workshop hosted by the Logo Foundation, https://el.media.mit.edu/logo-foundation/, featuring the topic of "Minsky Logo". This workshop paid homage to Marvin Minsky.  Marvin Minsky, along with Seymour Papert, and Cynthia Solomon worked together to develop and implement Logo in a classroom environment.

Logo is a graphical programming language where children can instruct a "turtle" to move using a series of simple computer commands. The “turtle” can be either a virtual triangle on the computer screen or a physical device/robot moving across a floor.  The movement of the “turtle” follows a path which is analogous to a place in the computer’s memory. When the “turtle” is moved, a trail is recorded.  These trails can draw complex shapes and patterns as shown below.

A Minsky Logo Program

Marvin Minsky was one of the founding fathers of artificial intelligence at MIT and his goal was to make computers "think".  Seymour Papert, was a student of Jean Piaget in Switzerland where he developed theories of learning and the importance of hands-on discovery and exploration. He believed that technology could provide new ways for children to think. In 1963, Marvin Minsky invited Seymour Papert to join him at MIT to do research in intelligence. 

 Both Seymour and Marvin believed there was an interconnection of how children think and how to make machines think.  They both wrote papers about how to learn, one with children and the other with computers. In conclusion, they realized that their outcomes were exactly the same results.

Logo was created in the late 1960's at the Artificial Intelligence Lab at MIT for children to develop critical thinking and problem solving skills. In doing so, it established computers as a tool for learning. 

In 1973, Marvin Minsky built a physical device which he called a "turtle".  He named this device/robot a TT2500. TT is supposed to stand for Turtle Terminal and 2500 was their guess as to how much it would cost in retail dollars. It did not have enough memory to run the Logo program because it only had 4K of memory. The 4K memory was sufficient for the TT2500 to be run as a terminal by another computer in the PDP 11 family. The 4K chip was eventually replaced with a 64K chip four years later.  Interestingly enough, the new upgraded memory was sufficient to run Logo at the same price as its original memory as the cost of chips decreased significantly over time. While Marvin built the physical machine, his daughter, Margaret designed the circuitry for the text display.

After the construction of the TT2500, it was placed in a 7th grade classroom taught by a mathematics teacher for observation and implementation of learning Logo. It was here that Cynthia Solomon noticed that it was being implemented incorrectly.  The students were being taught with rout learning and were not given the time to explore the immense possibilities of Logo. Cynthia took over the class and her influence created an environment were Logo flourished.  Today Cynthia is known as the "mother of Logo" because she was the first to nurture and enable students to use Logo successfully. https://www.youtube.com/watch?v=maDzjHIiXZc

In Cynthia's classroom, the TT2500 could move on the floor with the Logo commands that were programmed into the machine. It was placed on butcher paper and lines were drawn with the movement of the turtle.  The turtle became a drawing instrument with the addition of a pen. 

Today, this early version of Logo can be emulated online because Brian Silverman produced the computer code to execute the Logo commands. https://www.playfulinvention.com/demos/MinskyLogo/  Brian Silverman was involved in Logo almost since the beginning of its development.

The Logo screen is divided into three sections. The bottom left area is where simple commands can be entered next to a flashing line. The top left area is where routines can be entered.  The turtle is a triangle in the center of the screen.  It is outlined in white on a black background. The turtle's playground is in this section.

Logo commands 
 fd - forward
 bk - back
 lt - left
 rt - right
 pu - pen up
 pd - pen down
 st - show the turtle
 ht - hide the turtle
 seth.(set heading) - rotate the turtle in a clockwise direction by a specified angle        from its home position.
 clean - Clears the screen of trails but the turtle remains where it is without moving

 repeat - repeat 3 [fd 60 rt 120] The square brackets indicate that the enclosed commands are to be executed three times.


During the workshop, Brian Silverman showed a 50 year old demo that displayed the capabilities of Logo. This program and others can be found in the examples at the bottom of this document.  https://playfulinvention.com/demos/MinskyLogo/help.txt

The TT2500 had a new command called spin because kids love animation. New computer hardware had to be built to accommodate this.  This was the era were hardware development needed to be done if you were serious about software development.

The above image is repeated twice and spun together.


The image spins through the set of all spirals which is appealing for children. Environments like this is Seymour Papert's vision of Mathland whereby children could explore mathematical ideas and concepts in a creative way instead of rout memorization and repetition.

Cynthia Solomon's favorite demo of Logo was this Ferris wheel.  The squares with the triangular tops(seats) rotate around a central point while the base remains static.

In conclusion, I really enjoyed this workshop. I loved exploring and recreating programs with Minsky's Logo.   It was interesting to hear about the origin of Logo and how it was applied in Marvin Miniski's Artificial Intelligence Lab at MIT. Logo became a tool to enhance learning and provided children with new ways to think.