A zoetrope is an early animation device that consists of a drum containing hand drawn or photographic images. It consists of a cylinder with vertical slits cut into the sides and a series of images or drawings placed on the inner surface. When the drum is rotated in a circular direction, and viewed through the slits, it creates the illusion that the still images are moving, creating the perception of motion. The zoetrope played a significant role in the development of motion pictures and is an early form of the motion picture projector.
Zoetrope with a box base.
The drum spins around because the model is using a paper axle. There isn't much drag if you use a paper which has a smooth surface. A textured paper would cause some friction and the drum wouldn't move as easily.
Spinning the drum in a clockwise direction and looking through a slit in the peep strip. The images appear to be moving.
I used 65 lb. cardstock.
Here is the PDF.
https://drive.google.com/file/d/1fBLuN_JeLukLRy_-vHMwZfK0ClGGT5f5/view?usp=sharing
Here is the .Studio file.
https://drive.google.com/file/d/1db9LGFp35S1s1_Ygd_g_9Jpll1M-y8R1/view?usp=sharing
Note: When joining the tabs together, the dotted lines should be visible ever so slightly. Try to be consistent with the spacing throughout the model.
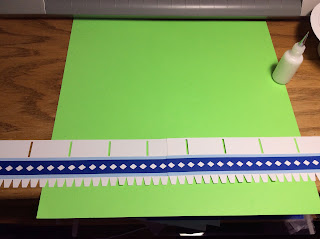
Glue the embellishments on the peep hole strip of paper. Start the embellishment to the right of the tab. Do not put any embellishment on the tab. There is a slight overhang of the embellishment on the opposite end as shown above where a slight amount of blue is showing in the turned over piece.. This is necessary due to the curvature of the piece.
Glue the two strips together.
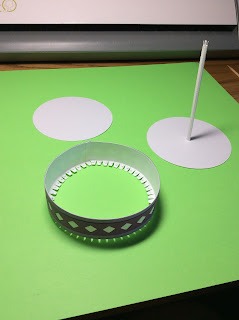
Glue into a circle. Notice that it is not exactly a circle. Don't worry, once the round bottom is inserted, it will become round. Bend the tabs at a right angle. Put a dot of glue on each tab at the bottom of the peep hole piece. Insert the round bottom. Apply pressure to the bottom of the drum so that the glue adheres correctly. Flip it over.
Notice that all of the tabs have adhered correctly. The bottom is two walled for strength.
Put glue on each of the tabs and attach the corresponding piece. This completes the drum assembly.
Box Base Pieces.
Glue the bottom into a circle and bend the tabs at a right angle. Apply glue to each of the tabs. Insert the round bottom piece.
Flip it over and glue the tabs. Attach the corresponding piece. Apply pressure to the bottom of the box. This will take a few minutes for the glue to adhere. This completes the bottom of the box.
Glue the embellishments to the lid of the box as shown. Notice the placement of the strip. Leave room for the tab.
Again there is a slight overlap to compensate for the curvature of the piece. Glue the second strip of embellishment by the dotted lines but not on the tabs. The tabs are needed as a platform for the base.
Apply glue to the tabs inside the box lid and attach the round circle without the hole in the middle. Flip the top over.
Crease the axle at each of the folds. Bend the tab down and apply glue as shown.
The axle can be folded in half as shown. Apply pressure to the area where the glue was applied. Make the axle into a tube as soon as possible after the glue has bonded to the paper.
Thread the axle spokes through the hole at the center of the top lid piece.
Glue the spokes down as shown. Make sure they are evenly spaced and have good bonding to the paper before proceeding.
Apply glue to the tabs on the box lid and attach the axle lid assembly.
Completed box with axle.
Glue the animation strip into a circle.
Evenly space 10 motion picture pieces to the inside of the circle.
Slip the animation strip into the drum. Bend the spokes down at the top of the axle and apply glue to the top of the axle.
Attach one of the Platonic solids to the top to the axle. A tetrahedron is attached.
Starting at the top left...the Platonic solids are...Cube, Tetrahedron, Dodecahedron,
Bottom row...Icosahedron and Octahedron
There are exactly five Platonic solids. I have included a net for each one. The tabs are small but very doable to put together. The hardest one to put together is the dodecahedron. Yes, you might get glue on the outside of the piece but not to worry. The glue dries clear.
Platonic solids are regular polygons where each face is the same size and same shape. All of the polygons that I have constructed are the same volume. I thought it would be interesting to show the correlation between the shapes each having the same volume. Hopefully, you can try making them all.


