A Moravian Star
I have always been fascinated by the look of the Moravian star. I love the way that the pyramids radiate from the center. I guess it appeals to my mathematical side. In fact, the origin of this design originated as a geometry lesson in a Moravian Boys school in Niesky, Germany in the 1830's. Students would make shapes out of paper and glue them together. The results were stellations or stars. This star was adopted by the Moravian Church as an advent symbol and is commonly used in nativity scenes to represent the star of Bethlehem. Traditionally, the star is hung the first Sunday of Advent and remains up until Epiphany, January 6, or the time of the coming of the Magi.
This Moravian star is a 26 point star. It has 18 large points and 8 small points. It is built on a base which is a rhombicuboctahedron. A rhombicuboctahedron is an Archimedean solid with eight triangular faces and eighteen square faces.
Here is the PDF file. I used 65 lb. cardstock.
https://drive.google.com/file/d/1JolhWICmJxlC7aen1-CqpDvi4ZjM91Kr/view?usp=sharing
Here is the .Studio file.
https://drive.google.com/file/d/1ihzLN7tdll_koeN4tXdOisMcRKyJxAFp/view?usp=sharing
Here is the SVG.
https://drive.google.com/file/d/1Zc76_nLUyG6wUPGvoS2YpTVVhmX4gF-3/view?usp=sharing
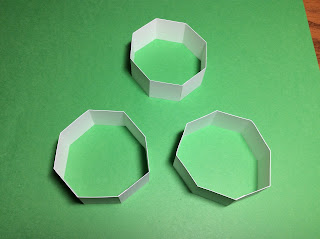
Fold the three strips of paper
Glue them into an octagon.
Apply glue on the two opposite squares of one octagonal strip. Slip the other octagonal strip over the glued area to form a structure as shown in the photo above.
Apply glue on the four middle squares as shown above.
Slide the third octagonal strip over the glued areas. This structure is now called a small rhombicuboctahedron
Fold the perforations of the small triangular pyramid. Apply glue on the left side which looks like a triangle.
Completed small triangular pyramid. Repeat for the remaining triangular pyramids.
Bend the large square pyramid and apply glue as shown.
Large square pyramid.
Glue all of the large square pyramids. If you want to hang up your Moravian star, tape a string in the center of the large square pyramid.
Glue the large square pyramid closed and allow the string to protrude from the center apex of the pyramid.
Completed parts before final assembly.
Glue the large square pyramid to the top as shown with the tabs attached to the adjacent squares. Glue another large square pyramid to the bottom.
Repeat gluing the large square pyramids to the four cardinal points as shown.
Using the large square pyramid, bend two of the tabs inward and the opposite tabs outward. Apply glue to the tabs as shown above.
The two outward tabs will be bent under the small rhombicuboctahedron. In other words, every spot where there is a square next to an open triangle, you will use this method of attaching the large square pyramid. Notice in the above photo, the tabs are attached inside the small rhombicuboctahedron. Repeat until all of the large square pyramids are attached.
Here is a photo of all the large square pyramids attached. The only thing left to do is attach the small triangular pyramids.
Apply glue to the triangular pyramid tabs and insert it into the open equilateral triangle. Repeat for the other triangular pyramids.
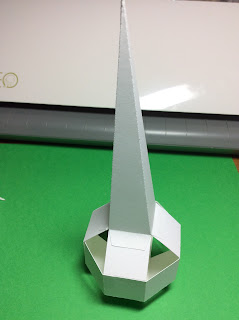
Completed Moravian Star
After completing the Moravian Star, you might like to try my next model, the Bethlehem Star. https://papercraftetc.blogspot.com/2019/11/a-stem-project-bethlehem-star-model-and.html It uses the same construction as the Moravian Star but the pyramid sizes vary.


Wow! that is amazing
ReplyDeleteThank you!❤️ That's amazing. Just made in and ist looks beautiful😍
ReplyDeleteThese are great! Can you include your blog name/address on the silhouette file so when i open it i can find the instructions again? thanksso much for sharing!!
ReplyDeletethis is challenging but fun
ReplyDeleteI am so glad that you are enjoying the challenge. It will look amazing once it is completed!
Deletei have to do this for school. its amazing
ReplyDeleteI am glad that you think this is an amazing project. The Moravian Star is very mesmerizing to look at, once it is completed.
Deletecould you please tell me if i can make your stars without using a cutting machine. also what is the actual size of the squares in the strips .thank you.
ReplyDeleteYes, you can cut out the stars and score the dotted lines to make the stars. Print the PDF on 65 lb. cardstock. The squares on the strip are 1 inch.
DeleteStruggled with making the flaps stick especially on the inside. However it is a fun project and will do nicely for my presentation modle
ReplyDeleteI am sorry to hear that the flap was difficult to glue. Maybe a different glue would work...I use Aleene’s Tacky glue. You might also try a Glue Dot for difficult areas.
Deletei love your Bethlehem star model and i hope to try this traditional one too. i love the mathematics behind the star as well
ReplyDeleteWould you be able to post an SVG file? We are hoping to make these for a ladies craft night at my church and I want to save some of the older ladies from having to cut a lot.
ReplyDeleteI just updated the posting to include a SVG file.
DeleteThank you so much!!!
DeleteThanks so much for this pattern. What is the size of your 65# card stock? 8x11 or another size?
ReplyDeleteThe cardstock is 8 1/2 X 11.
DeleteWhat is the original paper size, 8x11 or another? Thanks for the pattern.
ReplyDeleteThank you!
ReplyDeleteIs there a pdf with your instructions? I'd like to save them to my computer for future reference.
ReplyDeleteCopy and paste the blog entry into a Word document and then save it.
Deletethis was so fun
ReplyDeletethx amazing
ReplyDeletecool
ReplyDeleteJust wondering how to cut the shapes if you don’t have a silhouette machine. On the Starr Bethlehem silhouette file, it doesn’t show the tabs being cut with the pyramid??
ReplyDeleteby hand with scissors using the PDF
DeleteYes, this can be cut using a PDF and scissors
DeleteI’d like to know how to cut the designs for those of us who do not own a silhouette. Is there another way? Also the Star of Bethlehem silhouette file doesn’t show the tabs being cut with the pyramid ?
ReplyDeleteYou can use a printer and cut them out with scissors. The tabs are part of the folds.
DeleteThis comment has been removed by the author.
ReplyDeleteThanks for this very helpful tutorial, Elaine! Quite a lot of work, but the result is great. I wanted lighting inside, so I cut out a square in each part of the octagonal strips. For better light distribution. I must say: I'm quite proud :) Now let's hope our stars bring peace to the world 🙏🏼
ReplyDeletePlease post the measurements for the small triangular pyramids and the large square pyramids
ReplyDeleteLarge is 4:88 inches, small is 2.723 inches
DeleteThis looks like the most impossible thing ever. Sorry, but I'm making a first impression.
ReplyDeleteThank you for this!!
ReplyDelete