Monday, January 18, 2021

A Tactile Paper Ruler and a Folding Yardstick


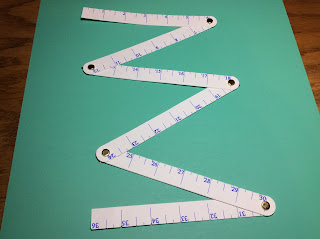
A Folding Yardstick and a Tactile Paper Ruler are cheap additions to a math classroom.  They are easy to produce and are cheap alternatives to a store bought ruler and yardstick. 

Tactile Paper Ruler

As a math teacher, I often found that students had difficulty measuring with a ruler for a variety of reasons. The student didn't know where to place the ruler because so many plastic rulers have a quarter of an inch of plastic before the tick marks start or the student couldn't read the hash marks. This ruler that I created from cardstock will help those students visually and tactilely see the different measurements.  The leading edge of the ruler begins the measurement.  There are three different size markings.  The inch marking is the longest slit, the half inch slit is a little smaller and the quarter inch slit is the smallest.  At the top of the ruler, there is a large notch at the inch mark and a smaller notch at the half inch mark. The ruler can be manipulated so that the student can fold up a portion of the ruler if needed to make sure a measurement is correct.

The ruler can be folded up and the slits can be turned upwards at the quarter inch and half inch marks.

Here is the PDF file. I used 65 lb. cardstock.
https://drive.google.com/file/d/1dbncq2L0P15cyK1kLTWWpPQe3ctjMFmC/view?usp=sharing

Here is the .Studio file. 
https://drive.google.com/file/d/1gtX0m0VhUR9JeuX8hH5JDe19zilHzebE/view?usp=sharing

The folding yardstick has six segments which are connected with five brads and is 36 inches long when fully extended. The folding yardstick has notches at the inch and half inch mark.  It was created by gluing a backing to each segment because the 65 lb. cardstock was not sturdy enough. 

Sunday, January 17, 2021

Victoria and Albert Museum Style Accordion Fold Card For Valentine's Day


Victoria and Albert Museum Style Accordion Fold Card For Valentine's Day
The card has a slip case that ties with a ribbon to hold the accordion folds down. 
The card is a half inch thick.

The Victoria and Albert Museum has an extensive collection of peep show cards. The cards are accordion folded and attached to a slipcase.  Here is a link to their collection. https://www.vam.ac.uk/articles/paper-peepshows  My version has a ribbon tied slipcase that is not attached to the accordion card.

I used the same scenery from my two previous blog posts as I wanted to experiment with this interesting presentation style.  The scenery is a sea captain giving his sweetheart some flowers before he leaves for foreign shores. They are standing on one of two bridges in town with two swans swimming under the bridge.  His schooner can be seen in the background waiting for him to sail the seas. 

Here is a view of the accordion fold.

Front of accordion fold card

Back of accordion fold card

I  used Neenah brand 65 lb Champagne Pearl metallic cardstock from Office Depot, a sheet of American Craft  paper from a paper pad named Lucky Us from Tuesday Morning. I recommend using a new blade and overcut to cut out this design as the intricate pieces might not cut out correctly.   I do not recommend a brand new mat because the reeds by the swan will stick to the mat (I had to glue them on after cutting). 

Here is the PDF.

Here is the .Studio file.

Here is the SVG.

Glue the circle of pretty paper to the back of the rectangular piece of pretty paper.

Glue the accordion folds to either side of the pretty paper back as shown above.

Apply glue as shown and to the back of the schooner slice. Adhere the schooner slice to the circle piece.

Bend the tabs backward on the lighthouse slice. Apply glue to the tab and adhere as shown.

Repeat for the town and swan slices.

Glue the pretty paper to the center of the couple slice.

Glue the mat to the center of the pretty paper.

Bend the tab backward. Apply glue to the back of the tab and adhere to the last accordion fold.

Glue the scalloped mat to the back of the card.  Glue and align the love word to the center of the card.

Completed back of card.

Bend the sides of the scalloped piece to make a U shape. Glue the tab to the front of the rectangular piece of paper. Repeat for the other scalloped piece.


Cut an 18 inch piece of ribbon.  Place the accordion card on top of the slipcase. Thread the ribbon though the center holes of the slipcase and tie a bow.

Happy Valentine's Day!

Monday, January 11, 2021

A Valentine Diorama To Give To Your Sweetheart

A Valentine Diorama would make a beautiful gift to give to your sweetheart with its romantic scenery inside. A sea captain is giving his sweetheart some flowers before he leaves for foreign shores. They are standing on one of two bridges in town with two swans swimming under the bridge.  His schooner can be seen in the background waiting for him to sail the seas. 

The scenery is identical to the previous posting. Photo for size comparison. https://papercraftetc.blogspot.com/2021/01/a-valentine-slice-form-sphere-that.html

This Diorama is put together with eight tabs which slide into the side of the slices. 

A Side View

I  used Neenah brand 65 lb Champagne Pearl metallic cardstock from Office Depot, a sheet of American Craft  paper from a paper pad named Lucky Us from Tuesday Morning. I recommend using a new blade and overcut to cut out this design as the intricate pieces might not cut out correctly.   I do not recommend a brand new mat because the reeds by the swan will stick to the mat (I had to glue them on after cutting). 

Here is the PDF.

Here is the .Studio file.

Here is the SVG.


Pretty paper is glued on top of the first slice and a circular mat is glued on top of the pretty paper.  Two tabs are glued together to make a sturdy tab that will not warp when inserted into the slices. The eight tabs are then slid into the sides of the diorama. 


Happy Valentine's Day!

A Valentine Slice Form Sphere That Rotates with a Gear


A Valentine Slice Form Sphere That Rotates with a Gear

This Valentine Slice Form Sphere would make a beautiful gift for your Valentine with its romantic scenery inside. A sea captain is giving his sweetheart some flowers before he leaves for foreign shores. They are standing on one of two bridges in town with two swans swimming under the bridge.  His schooner can be seen in the background waiting for him to sail the seas. There is a gear mechanism in its base which allows the sphere to rotate.

I used Neenah brand 65 lb WhiteGold metallic cardstock from Office Depot, a sheet of American Craft  paper from a paper pad named Lucky Us from Tuesday Morning. I recommend using a new blade and overcut to cut out this design as the intricate pieces might not cut out correctly.  I do not recommend a brand new mat because the reeds by the swan will stick to the mat (I had to glue them on after cutting). 

Here is the PDF.

Here is the .Studio file.

Here is the SVG.

 It has the same gear mechanism as the Birthday Slice Form sphere and it rotates in the same manner.  https://papercraftetc.blogspot.com/2020/10/a-birthday-slice-form-sphere-that.html To make this slice form, follow the directions from the Birthday Slice Form sphere as it is the same construction. 

Please note: I made this design several times and I realized that the internal slice form base pieces are not needed because the size of the sphere is smaller in this design than the previous Birthday Slice Form Sphere.  This smaller sphere size does not need the additional support when the gear is rotated.  I left the pieces in the design if you would like to use them.

The Valentine Slice Form Sphere is 4 inches in diameter compared to the Birthday Slice Form Sphere which is 4 1/2 inches.  The slice form base pieces that I eliminated in this design are shown.  If you use the pieces, it will not effect the movement of the gear as it has been sized correctly.  These pieces were needed in the larger design because of the larger sized sphere.

Wednesday, January 6, 2021

Valentine Heart Rubber Band Pop-Up

This Heart Rubber Band Pop-Up will pop-up out of an A4 envelope to surprise your Valentine. 

Here is the PDF. I used 65 lb foil cardstock from Michaels for the gold and red foil.  I used Neenah brand WhiteGold metallic cardstock from Office Depot.

Here is the .Studio file.

Here is the SVG.


Cut out the two halves of the heart and crease as shown above including the spacer.

Glue the spacer to one side of the heart.

Glue the rubber band tab and insert a 1.5 inch rubber band into the hole in the tab.

Glue the five upper tabs and the other side of the spacer as shown in the above photo.

Attach the rubber band to the hole in the tab.

Make sure the rubber and pops up correctly before gluing the bottom two tabs.

Glue the heart embellishment together and adhere to the top of the pop-up heart.

Make sure that the heart is centered by pushing down on the heart.

Notice the spacer covers the gap in the top of the heart.

The heart rubber band pop-up fits inside an A4 envelope.