Sunday, February 9, 2014

Happiness is a Little Blue Box Pop-Up Card

Every woman would love to have this little blue box...even if it doesn't have some diamonds in it. You can put a charm in it which I have included in the design.

Little Blue Box of Happiness with two different heart designs for the envelope.

Here is the PDF of the pop-up box.
https://drive.google.com/file/d/0B7oGIyVDbRGYLTBMZEFxb3lhOHM/view?usp=sharing&resourcekey=0-SxP-ARmzK3bTjN3x_iVPMw

Here is the .Studio file.  I used cardstock for both the card and the envelope.
https://drive.google.com/file/d/0B7oGIyVDbRGYLWdyaDdVc1RvcGs/view?usp=sharing&resourcekey=0-ykZiGNvG6aXnMwgHvcasHw


Glue the smallest box together and attach the ring insert to the tabs as shown.

Glue the top together as shown on the left.  The ring insert is on the right. 

Make the bottom of the box...shown on the left. 

Insert the bottom of the box with the tabs INWARD...this is needed for the ribbon to be threaded on the bottom.
 
Here is what the inside of the box looks like after the ring insert has been placed inside the box.
 
A ring can be placed inside the box.
Or a charm...glue two designs together. The box cover is shown at the bottom of the above photo.  Notice that the top is folded outwards.  When this card is folded closed, please make sure all of the pieces fold outwards for the box to close correctly.
 
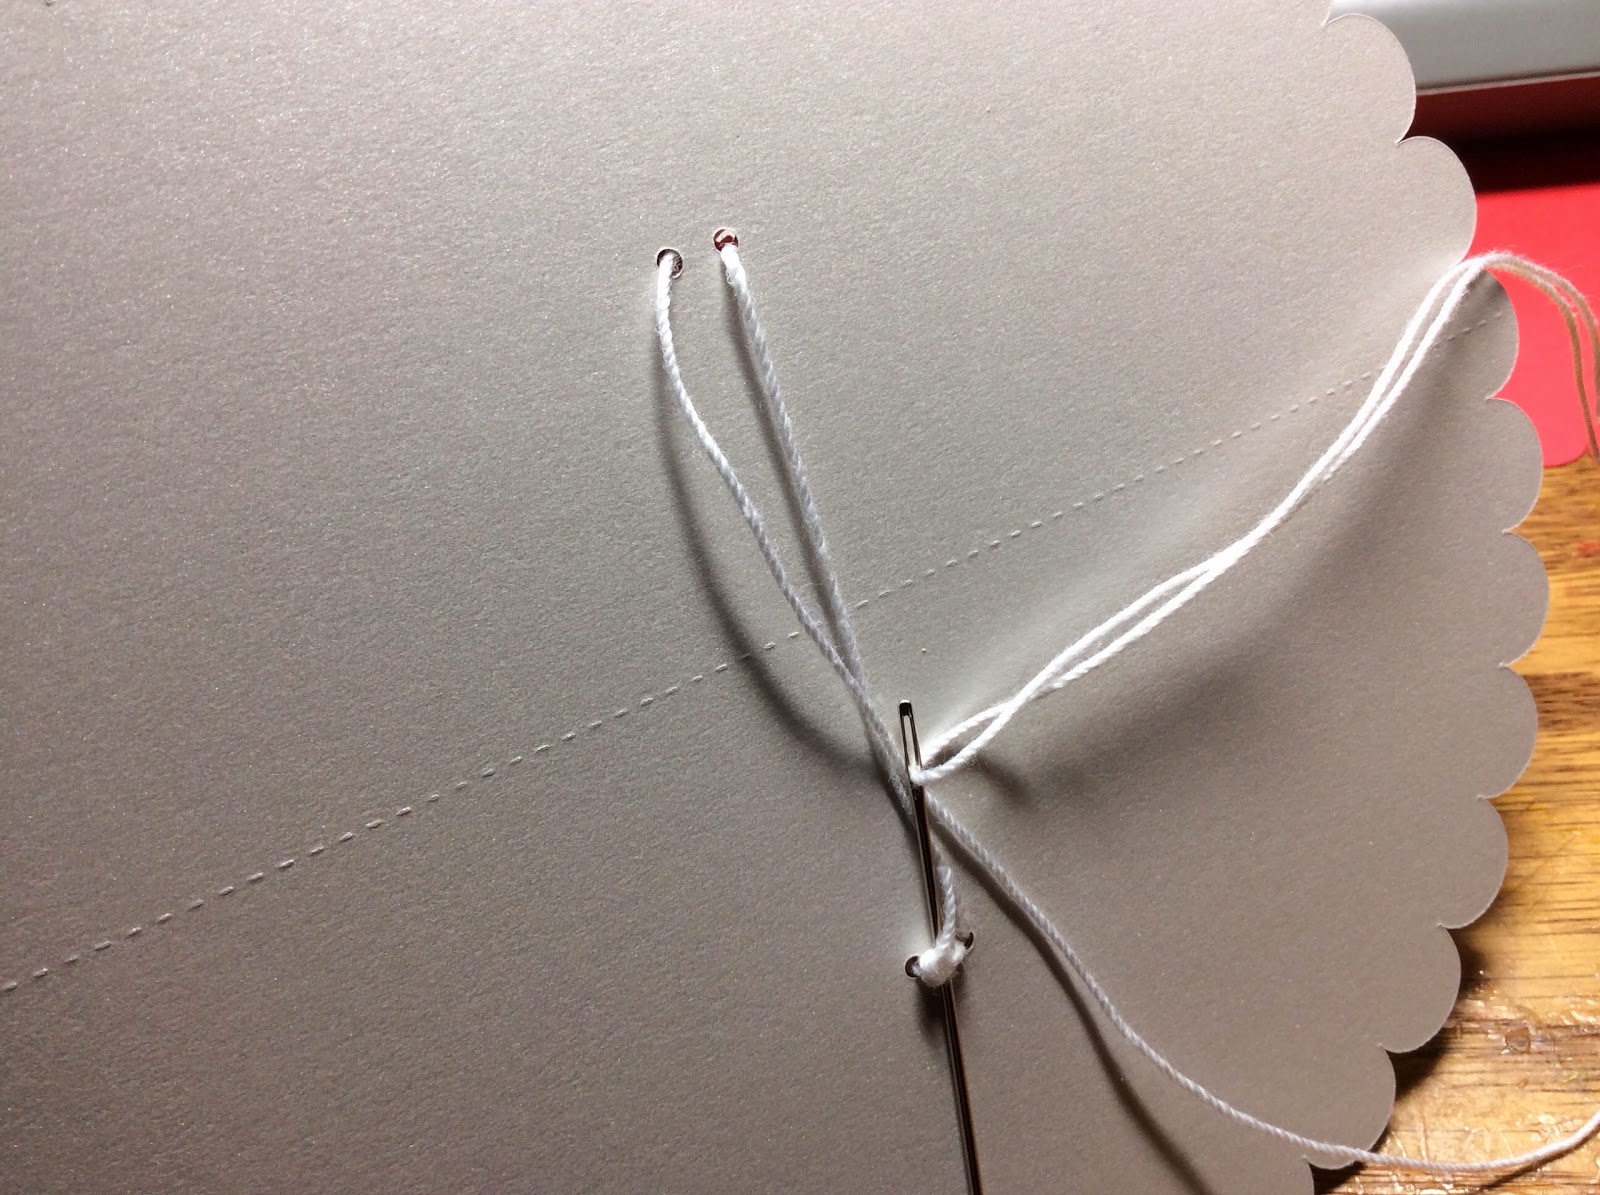
 Thread an 18 inch length of ribbon through the bottom of the card and back.
 Here is what it looks like after it has been threaded through the bottom. 
Put the top on the box and close the card partially. Tie the ribbon as shown.
Use a glue tick to glue the contrasting color to the bottom.  The glue stick will not warp the paper as much as other types of glue.
Completed pop-up box card. 
To make the envelope, fold the sides as shown.

Fold the top and bottom as shown above.  I used a ruler to help fold the paper in a straight line.
Envelopes with two different heart designs.
Here is what the box looks like when opened with a cubic zirconia ring in it.
The box looks great next to the real thing!


Pretty Kitty Pop-Up Card

I love my kitties so I made a pop-up card for them.

Pretty Kitty Pop-Up Card
 
Here is the PDF file.


Here is the .Studio file.  I used cardstock for the card and plain copier paper for the envelope.
 
I love my kitties.  Here is the picture that inspired this card.

 Marley and Melvin looking at their bird friends.   I love the way that their tails are entwined.
It looks like a heart!


Love Birds Pop-Up Card

Love Birds Pop-Up Card

Here is a pop-up card for the one you love...two love birds sitting on a branch. 

We feed the birds in the winter and I love looking out the window to watch all of the birds coming to my bird feeder.  We have bluebirds, cardinals, yellow finches, juncos, woodpeckers and an assortment of other birds.  We feed the birds so that our kitties can watch from their perch in the house.  We call it bird television.  It keeps them occupied for hours looking at their friends.

My kitties watching their bird friends eating sunflower seeds.

Here is the PDF of the design.
https://drive.google.com/file/d/0B7oGIyVDbRGYSjdNTHJNbEdDNlE/view?usp=sharing&resourcekey=0-tVYVIcnZAzBnrBvu_oUmEg

Here is the .Studio file.  I used cardstock for the card and plain colored copier paper for the envelope.
https://drive.google.com/file/d/0B7oGIyVDbRGYa0Y5THRxV3JydlU/view?usp=sharing&resourcekey=0-n5ZxzYFHhQLlC49-itCLBg

Wednesday, February 5, 2014

A Pretty Cupid Pop-Up Card With An Envelope for Valentine's Day

 
A  pop-up card for Valentine's Day.  This card and envelope can be cut out of a standard 8 1/2 x 11 paper. 

A Cupid with an Entwined Heart Pop-Up Card

Here is the PDF.
https://drive.google.com/file/d/0B7oGIyVDbRGYSGVBU0tXTFA5aU0/view?usp=sharing&resourcekey=0-eutko7QFafIa_mD9LBKZ8g

Here is the .Studio file.  I used cardstock for both the card and the envelope
 
https://drive.google.com/file/d/0B7oGIyVDbRGYeGNPSDQyNDlWQWc/view?usp=sharing&resourcekey=0-AtUz4IdWYkL3UZVnmUpvUA

Before cutting the file, remove the center line in the piece where there are two cupids. The piece will then need to be folded in half to create the center crease. 


  Bend the cupids upward and slide the contrasting color to the inside of the card.  Before gluing, test the placement of the contrasting paper so that the slit goes in the correct direction. I recommend using a glue stick because it does not warp the paper.

 There are no fold lines on the envelope.  Fold over the sides about 1/4 inch and glue as shown. Add the contrasting paper to the flap of the envelope by offsetting the paper a little bit so that the color shows on the sides of the flap.
                                      
 Glue the white paper to the card.

The outside face of the card.
The card looks gorgeous when folded!
 
Happy Valentine's Day!
 

Wednesday, January 22, 2014

A Valentine Pop-up Card for Someone You Love

A Valentine Pop-up.  
This will fold flat for mailing.

 
 My Valentine pop-up looks pretty in the snow.  I used iridescent white paper and it blends in well with the 5 inches of snow and 7 degree temperatures...second day of no school...more time for crafts!

This is my first attempt at making a real pop-up card.  I didn't use a program...just brute force.  I would love to have the new Pop-up computer program from Make the Cut (it is on my wish list...maybe for my birthday) but I don't think I could have made this design with it because there are there are too many pieces that slide together.

I love the birds sitting on the branch and the heart symbol above with the I and U.  It is supposed to represent "I love you" or "I heart you".  My husband did not see it...he thought it was just scroll work until I pointed it out. This design is similar to my previous design but I removed one of the slices.  When the heart lays flat, the heart symbol is prominent in the center.

Here is the PDF of this pop-up card.
https://drive.google.com/file/d/0B7oGIyVDbRGYQkJHRWNncVpuSkE/view?usp=sharing&resourcekey=0-TmaR-IQ8OgMZd7RMig4Fcw

Here is the .Studio file.
https://drive.google.com/file/d/0B7oGIyVDbRGYSE83SVJ3YXhOcHc/view?usp=sharing&resourcekey=0-hBdsOVVzp8_nPn_k5PWw7A

Here is the SVG.  The file extends outside of the viewable area. Zoom out to see the entire file.
https://drive.google.com/file/d/1HC4uiEsU6FdrscFuUCQTCssxOIK6sbpV/view?usp=sharing

 I recommend using a good quality cardstock as the slits are very tight.  I find that some cardstock does not work as well as others.  It is strange...sometimes certain colors in the same stack of cardstock are better than others.  I buy my cardstock at Target and Michaels in case you were wondering.

Follow the directions to make the sliceform heart from a previous post.
http://papercraftetc.blogspot.com/2014/01/a-paper-sliceform-heart-table-decoration.html
Make the sliceform base using these directions from a previous post.
http://papercraftetc.blogspot.com/2013/12/paper-snow-globe-sliceform-for.html


 Sliceform Heart and Base
 Loop the tab over the point.
 Loop the tab through the base as shown.  The tabs are split between the two sides.
Glue the tabs to the side and tear away the excess paper.
 
The Valentine Pop-Up looks nice even without the scalloped base.  You can stop here if you do not want to sew the design to another base.

 Knot the thread onto the scalloped base.
 Loop the thread through the base at the lowest point as shown in the picture.
 Thread it through the base.  It is now attached at one point.  Repeat for the other side.
 Thread it to the other side.
 Loop it over.
 And knot the thread on the back side of the base.
 

 Here is what it looks like lying flat.
 Fold the second base (red) in half.
 Put glue on the side that was sewn and combine both halves at the crease so that it will fold properly.
 Completed Valentine Pop-Up
Here is what the pop-up looks like when folded flat...very pretty!

Saturday, January 18, 2014

Cupid's Torus Heart for Valentine's Day

A Torus Heart Valentine Decoration

A torus heart and cupids are the epitome of Valentine's Day.  I love the way that the cupids are holding the heart.  The red torus heart is floating in the center of the structure.  The weight of the torus heart was a factor in using five layers of cardstock glued together.  I think that you might be able to obtain the same thickness by sandwiching chipboard between two layers of cardstock.  However, I have not tried this because I cut the cupids a few times and did not have to resort to chipboard.  If you do use chipboard, please leave a comment and I will update this post with your recommendation.

Here is the PDF of the torus heart valentine.
https://drive.google.com/file/d/0B7oGIyVDbRGYX2ZJUmdkcmM0RDA/view?usp=sharing&resourcekey=0-IAaJJVWG29hDxZwkA7H08w

Here is the .Studio file.  I used cardstock.
https://drive.google.com/file/d/0B7oGIyVDbRGYbGlFMHFCa1ZYZXc/view?usp=sharing&resourcekey=0-tbYbZw6a9C8yWPCl22RviA

I put a drop of glue at the top and bottom of the heart torus to keep the heart from expanding in the middle. Use the directions from the pumpkin torus to make the torus heart  http://papercraftetc.blogspot.com/2013/10/a-honeycomb-pumpkin-decoration-for-fall.html
and the directions from the previous post to make the base.
http://papercraftetc.blogspot.com/2014/01/a-paper-sliceform-heart-table-decoration.html

A View from above. 

Melvin admiring my Valentine's decoration.

The framed pictures in the photo above represent the beginning of my paper fascination. I created them over 25 years ago.

Saturday, January 11, 2014

Sliceform Heart Table Decoration


Sliceform Heart Party Decoration

It's time to have a party.  This sliceform heart decoration is so pretty, that I want to show it off. It is large enough to make a statement but not too large to overwhelm. This centerpiece could be used for a variety of parties...a birthday party, a Valentine's Day party, a shower party or even a wedding.
 
Here is the PDF of the sliceform heart.
 
Here is the .Studio file.  I used cardstock.
 
 Cut two of the same angel pieces and glue them back to back.  This is needed to give the cardstock support to hold up the sliceform heart.


 Slide the angel pieces together and place in the base but do not glue to the base until you have completely put the slices of the heart together.


Do all of the upward facing slices first in one direction...as shown in the above picture.
 
 
 And then the other direction to complete the sliceform heart.
 

Attach and glue the base as shown.  Next, glue the contrasting base to the bottom. (not shown)


Marley always has to get in the picture. As soon as I put the new placemats on the table, he came running to see what was happening.  Of course, he had to sit on the clean placemat.  He got up a few minutes later and there was a clump of cat fur stuck to the placemat.

 
I would love to see a picture of your party decoration if you make this design.  Please share a picture of it with me.  Thanks!