Tuesday, December 10, 2013

When It Snows...Make Christmas Ornaments


Wow...another snow day...two days in a row. What better way to make use of a snow day then to make some Christmas ornaments. I made a snowman, a pair of gloves and my favorite...a snowflake ballerina.


Here is the PDF file of these ornaments.
https://drive.google.com/file/d/0B7oGIyVDbRGYNl9kNE5ZVTR1dG8/view?usp=sharing&resourcekey=0-IOtqJTj3kKEAm-f8XW7Z9g

Here is the .Studio file of the ornaments.  I used cardstock for everything except for the ballerina's tutu(snowflake) where I used regular white copy paper.
https://drive.google.com/file/d/0B7oGIyVDbRGYdl92eHhMbEl4aVE/view?usp=sharing&resourcekey=0-0SDWOkPcwQZ89LLscZmR1A

The snowman duplicates the same design as Mr. Torus Snowman from yesterday's post.  http://papercraftetc.blogspot.com/2013/12/mr-torus-snowman.html Cut the front and back of the snowman and sandwich in some colored paper between the two so that there is color for the eyes, nose, mouth and buttons.  The alternative is to use markers to add details to the snowman. To make the scarf, train the paper to go into a circle and then bend it in half lengthwise so that it will fit around the snowman's neck.

Work with the paper to make it more pliable so that you can bend it in half and wrap it around the snowman's neck.  Add a drop of glue where the scarf overlaps at his neck.
 

 I made two copies of each hat and hat band so that the snowman will look good on either side so that you could hang it on a tree. I also added a snowflake to his hat for some interest.


Here are my very handsome snowmen

For the glove ornament, cut two of the gloves with the design on white cardstock and one plain glove on colored paper so that when you sandwich the paper together, the inside color shows through. Use a needle and thread to add a hangar to the glove ornament.

I added a hole in the top left corner of this glove for the hangar.
 

The snowflake ballerina is made by folding the hexagon shaped piece of paper into six triangles.

Fold the hexagon into a triangle.  I have opened it a bit so that you can see where you need to cut out the point of the triangle.

Cut the angle where all of the triangles meet...this will be where the ballerina's body will be attached. I suggest cutting a half inch triangle. 

Here is what it looks like after you cut out the point of the triangle.  This is the ballerina's waist.

.
Cut the edges of the triangle to make the snowflake.
 
I folded the triangle in half to cut the center.
 
Completed snowflake.
 
 Attach the snowflake to the ballerina by bending the ballerina so that the snowflake will sit on her waist.


I hung my ornaments on the chandelier to add some Christmas cheer to the dining room.


#Christmas Ornaments


Monday, December 9, 2013

Mr. Torus Snowman - Happy Snow Day!


Mr. Torus Snowman

I created a snowman today...what a wonderful thing to do on a snow day from school.  I didn't even have to put my coat on to make my snowman!

The trees are glistening outside from the snow and ice...a winter wonderland.  As I was making this snowman, I heard a crack outside and down came a huge branch from a pine tree.  Luckily the tree was no where near my house and no one was underneath the tree because certainly the tree branch would have caused some damage because of its size.  It makes me thankful to be home doing my crafts.

Here is the PDF file for the snowman.
https://drive.google.com/file/d/0B7oGIyVDbRGYXzd2eFZsQ3JzSnM/view?usp=sharing&resourcekey=0-2T3_W5_ltVW2GRlM9WzNiA


Here is the .Studio file for the snowman.  I used cardstock
https://drive.google.com/file/d/0B7oGIyVDbRGYUjNSM096NXRycWs/view?usp=sharing&resourcekey=0-77pyanmefHgs95mAdx_NcQ

Cut 24 of each torus piece (half moon circles).  They are graduated in size...use the smallest torus for the top and so on until all three are made. The directions for making the torus are in a previous post. http://papercraftetc.blogspot.com/2013/10/a-honeycomb-pumpkin-decoration-for-fall.html


I cut the arms twice and glued them back to back because the paper I was using was white on the back and also I wanted the arms to be sturdier.  The carrot nose is rolled into a cone like the witch's/wizard's hat from a previous post. Add the eyes, mouth and nose.  The directions for the bow tie are at the end of a previous post http://papercraftetc.blogspot.com/2013/11/holly-wreath-torus.html

 Glue the hat piece into circle and attach the brim to the outside of the hat piece.  Bend the top of the hat as shown
 I used a pair of scissors to make sure that the glue adhered correctly to the top of the hat.
 
Attach the hat band and the holly to the hat.


The directions for the broom are in a previous post...scroll down to the bottom for the .Studio file. http://papercraftetc.blogspot.com/2013/10/halloween-witchs-or-wizards-hats.html
 
 
Happy Snow Day!
 
 
#Torus #Christmas Ornament


Saturday, November 30, 2013

Ancient Knot

As a math teacher, I am always looking for something interesting for my students to do in class.  I came across the following resource. 
http://www.math.nmsu.edu/breakingaway/Lessons/ancientknot1/ancientknot.html

I am intrigued by this ancient knot and I am happy to find this design has roots in mathematics. I used their instructions and created the following ancient knot.

 Ancient Knot Design on a 12 x 12 piece of paper

 I have seen this same design at the Textile Museum in Washington, DC in Kuba textiles at the Woven Art of Central Africa exhibit in 2011.  The Africans used different color plant materials to create their designs. The plant material was worked to the point that the fibers softened and they were amazingly able to create velvet. 

I think this design would look beautiful in a quilt because as the math blog says,

 "It has no beginning or end, and according to folklore, it represents longevity and immortality."

What a beautiful thing to put into a quilt which is a labor of love.  You could use the Silhouette fabric blade to cut out all of the pieces which would simplify cutting the intricate pieces.

Here is the PDF of the knot.
https://drive.google.com/file/d/0B7oGIyVDbRGYbEhfRFlKcG16Mnc/view?usp=sharing&resourcekey=0-CCL6EOZgsPGTQAh0EvT8EA

Here is the .Studio file of the knot.
https://drive.google.com/file/d/0B7oGIyVDbRGYTGdic0RjUVhRcHM/view?usp=sharing&resourcekey=0-2GfF9NuF8LWHs-7p0hBEVQ

Holly Wreath Torus


 Holly Wreath Torus


Side view of the torus...notice the swirling pattern...lovely!


I love the torus shape.  It is a sliceform that swirls around and is fascinating to look at.  I modified my original torus and created this holly wreath design.  This torus shape has been discovered by a fellow papercrafter, Carol at http://extremecards.blogspot.com/2013/11/preview-holly-wreath.html from my blog.  She created a leaf torus and then created a holly wreath torus.  She posted her holly wreath torus a few weeks ago.  I think her holly leaf design is a little bit more shapely than mine but the holly leaf shape is still the same...great minds think alike!  Please note...I did not copy her.  I have had this design for quite a while and I just didn't have the time to publish it...too many designs and not enough time as my sleep can attest to.

 
Here is the PDF file of the holly leaf torus and the bow.
https://drive.google.com/file/d/0B7oGIyVDbRGYU3dOMXJqVnQyZTQ/view?usp=sharing&resourcekey=0-_VCyTl1hdFZPVyzoczKY8w

The bow is not the same exact size as the one in the photograph and there is one extra ribbon...I decided I wanted a little more intricate design for the Bow ornament.  The Silhouette software had an error and the original design was lost in restarting the program...back to square one.  Oh well..lessoned learned...always save your design...software errors abound! However, something good came out of it, I created another ornament which I would not have done originally.

Here is the .Studio file for the holly leaf torus and the bow.  I used cardstock.
https://drive.google.com/file/d/0B7oGIyVDbRGYc2tTU3I0d1lFMU0/view?usp=sharing&resourcekey=0-jl2F5G1phcMYlPgF0Un77w


To make the holly leaf torus, there are two pages of toruses.  One page has the slit on top and the other has the slit on the bottom.  Always start in the middle and end in the middle.  It makes everything easier.  Be very slow and methodical when doing this torus.  The points of the holly like to get stuck to one another but everything works nicely if you are patient.  If you ever get frustrated, just walk away and take a breather. It will be very satisfying when it is completed.  The directions for the torus are on a previous post. http://papercraftetc.blogspot.com/2013/10/a-honeycomb-pumpkin-decoration-for-fall.html

To make the bow.  Curl the bow tie piece into an oval as shown below.

 Put a dab of glue under the bow tie.
 
 Put glue on the rectangular piece which wraps around the bow tie.


 Put glue on the bow tie and ribbon pieces and attach to the back of the bow.


 I added a square piece of paper to the hangar (not given...just cut a little square with scissors) to give the bow more strength as an bow ornament.  This does not need to be done if you are making the holly wreath torus.
 
 
Bow Ornament


I added a string to the Holly wreath so that I could hang it on the Christmas tree.
 
 
Merry Christmas!
 
 
#torus #Christmas Ornament

Monday, November 25, 2013

The Perfect Desktop Christmas Tree


This Christmas tree has all the elements of a big tree but in a desktop version.  I love the paper doll garland and the gold spiral garland.  The ornaments can be resized for your room size tree.

The Christmas tree is assembled by sliding the pieces together.  Two of the pieces are exactly the same.  Spread them apart and place them in the base so that the are all equally spaced.  This is  similar to the witch's hat base in another post.  http://papercraftetc.blogspot.com/2013/10/halloween-witchs-or-wizards-hats.html 

Here is the PDF of the Christmas tree.
https://drive.google.com/file/d/0B7oGIyVDbRGYTUIzNmQweTJNZlU/view?usp=sharing&resourcekey=0-soe-zCEL-XLgwQrZAy_wJw

Here is the .Studio file.  I used cardstock on the tree and ornaments.  The spiral gold garland and the star on top of the tree is good quality wrapping paper.  The paper doll garland is white copy paper.
https://drive.google.com/file/d/0B7oGIyVDbRGYZ1AxMjQ0SldVNms/view?usp=sharing&resourcekey=0-sE7l-4SZK-7upUg1keduOg


Merry Christmas!

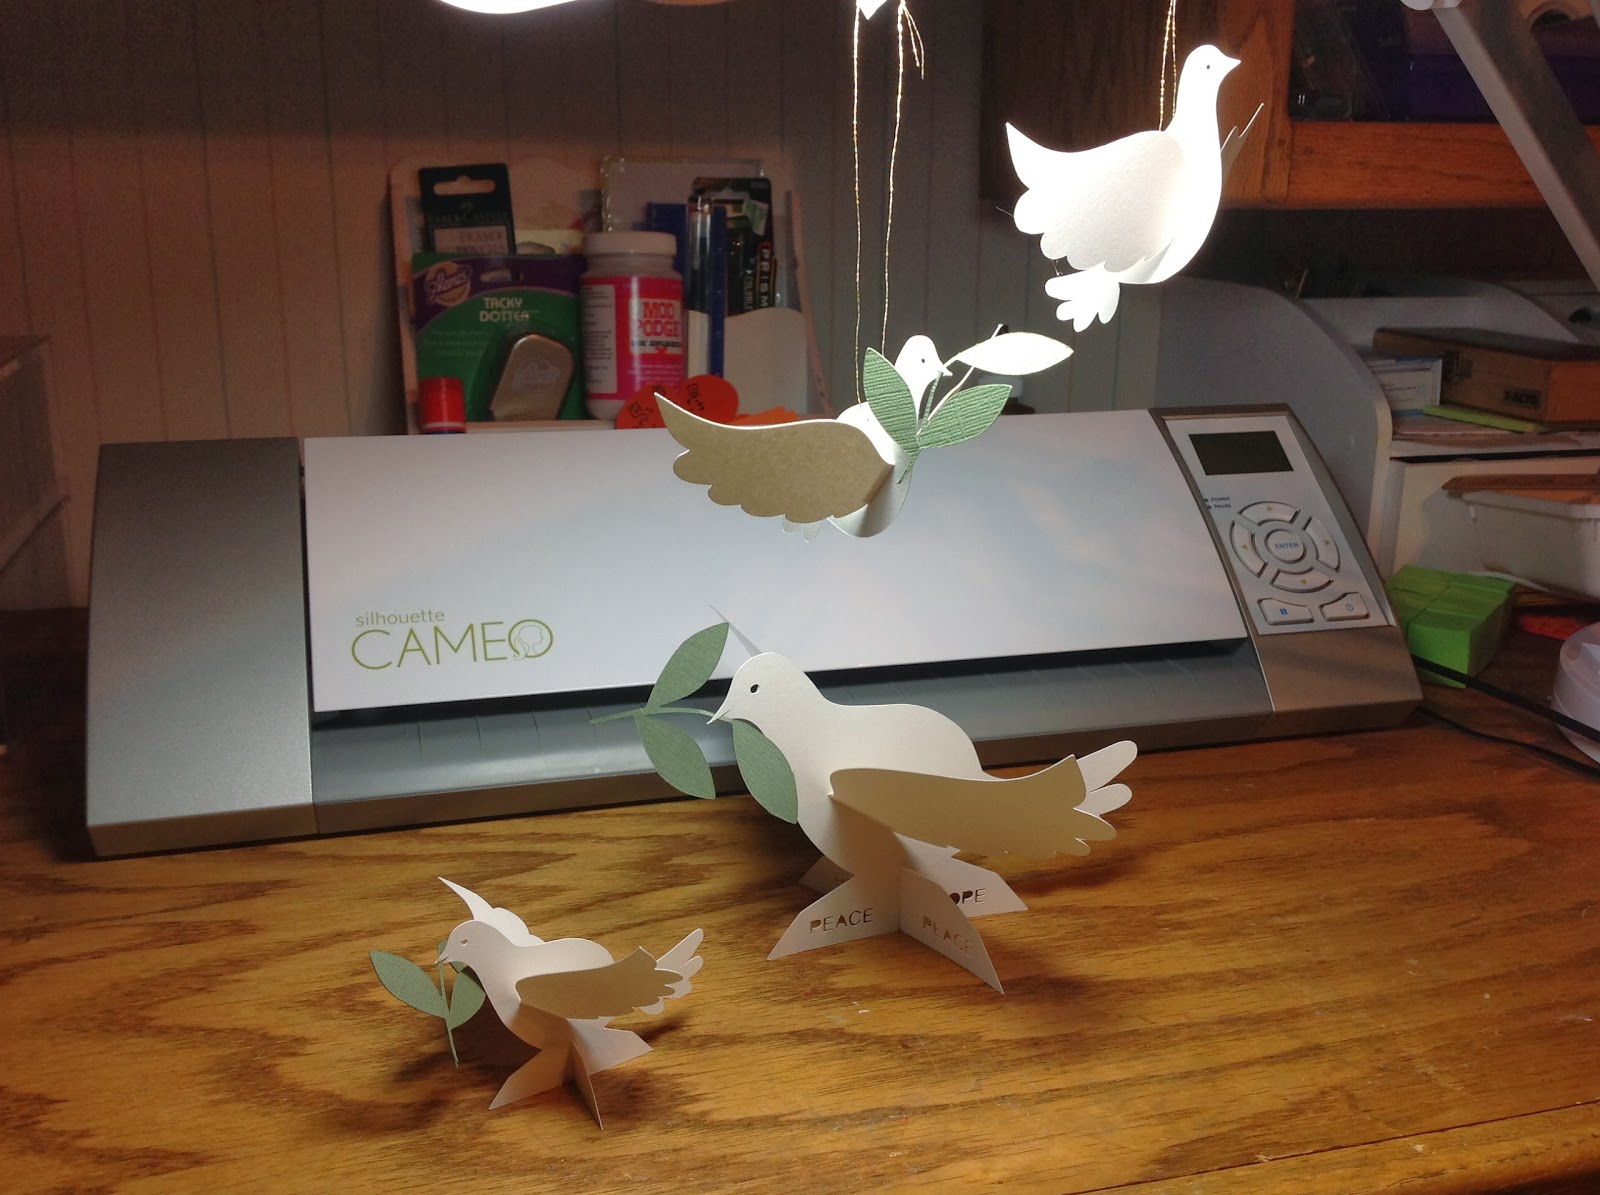
Peace Dove Ornament


 Desk model of peace dove ornament


I love this ornament.  The dove is so pretty with the olive branch in its mouth.

Here is the PDF of the dove.  There are three versions...two desktop models and a hanging ornament.
https://drive.google.com/file/d/0B7oGIyVDbRGYOHlfOU9tR3FLQ1E/view?usp=sharing&resourcekey=0-k0hRQmcvY2GZ_Hl8qsi67g

Here is .Studio file.  I used cardstock.  There is a shim piece to place in the center of the wing so that there is no movement after gluing.
https://drive.google.com/file/d/0B7oGIyVDbRGYZkEtTFhPR1UxbXM/view?usp=sharing&resourcekey=0-lTg4GTVdXJouiCzwK-FeNg


There is a fourth version here.  I eliminated the olive branch in one of the hanging ornaments.

Star of David Spinner

I created two versions of this star.  One is a hanging ornament and the other is a desk model.

 Here is the PDF.  It is not a very good PDF as it does not show the lines correctly.  All of the lines are connected except for the center points have a small gap.  This small gap is where the paper is  attached as a whole which allows for the spin to occur.
https://drive.google.com/file/d/0B7oGIyVDbRGYMjdtZm8xdHd4eUE/view?usp=sharing&resourcekey=0-SIQ2MHVr_8BZI18YpVfGXw

Here is the .Studio file. I used cardstock.  Assemble the star as shown in the picture below. Each star goes in the opposite direction to create the spinning effect.
https://drive.google.com/file/d/0B7oGIyVDbRGYRHZlV3IySWRyRUE/view?usp=sharing&resourcekey=0-wcl8UD3zxA60P37aRfN0hw


Happy Hanukkah to all my Jewish friends!


P.S.  Check back later as I have quite a few more spinners to post but not enough time.

Sunday, November 24, 2013

How can you make a cone with analytical geometry? Or Pretty Cone Trees!

Cone Sliceform from derived equation
 
  
My husband wrote this blog post  with the mathematical analysis and now I am updating it with the PDF's and .Studio files.  Let me explain...my husband is taking an analytical geometry course and he gave me the graphs to create this cone. I think he did a fabulous job!
 
 I love the reflection of the trees in the glossy surface.


I think the cones look terrific as trees with my paper house from a previous post. http://papercraftetc.blogspot.com/2013/09/i-love-making-houses.html Don't you agree?

 
Using the distance formula r^2 = sqrt(x^2+y^2) and the formula for the line in x-z space z=h/a(x) and knowing that the radius r must equal the x value in x-z space, you combine both equations.  This gives you the equation for the surface z = h/a(sqrt(x^2+y^2).  You can change the height to radius using the parameters h and a. 

To create the sliceform, you need three slices in each direction.  Using the golden ratio height/base = 1.6, so height/radius = 3.2. Next, find equations for each slice in z-y space by setting x.  For a six inch height, radius = 6/3.2 = 1.875.  Divide this into four increments of 0.469 inches each to set x.  This gives these four equations in z-y space:

For x=0:           z=3.2sqrt(y^2)
For x=0.469:    z=3.2sqrt(0.469^2+y^2)
For x=0.938:    z=3.2sqrt(0.938^2+y^2)
For x=1.406:    z=3.2sqrt(1.406^2+y^2)
 
The PDF and .Studio files were created for just one of the trees.  The files will need to be resized if you would like to create a forest of trees like I did in the pictures above.
 
Here is the PDF of the cone sliceform.
 
Here is the .Studio file of the cone sliceform.  I used cardstock.


Saturday, November 23, 2013

Planning a Holiday Meal Project


I love to apply math to real life situations. I created the following math project for my fourth grade students. I have included all materials necessary to implement this project in the following PDF except for the grocery advertisements. (This information is also available online because most grocery stores post their advertisements online).  I also created a .Studio file of a turkey silhouette.  I cut out one turkey per student for their project.

Here is the PDF files for the math project.
https://drive.google.com/file/d/0B7oGIyVDbRGYWG5tMjFIeFVVdGs/view?usp=sharing&resourcekey=0-yGbedgeC8xpIm2g6ixfx3Q

Here is the PDF file for the silhouette turkey. 
https://drive.google.com/file/d/0B7oGIyVDbRGYMWxOb05UM3NGQTg/view?usp=sharing&resourcekey=0-Tmp8K7sZtdVHY0av6_qB7w

Here is the .Studio file for the silhouette turkey.
https://drive.google.com/file/d/0B7oGIyVDbRGYczluYkNxdXdUUjg/view?usp=sharing&resourcekey=0-CAoakyIPaMsrwLXTnk63rw


Planning a Holiday Meal
 
Thanksgiving dinner will be served at your home this year for ten people.  Using the local supermarket advertisements, plan the meal’s cost using the following menu and serving recommendations. Calculate the quantity needed.  Remember you need to round up to the next amount since you need enough food for everyone.  Calculate the cost of each item by multiplying the quantity by the cost. Do all of your calculations in the space provided and circle your answer.

Serving recommendations:

— Turkey:  1 pound per person
— Gravy:  3 oz. per person 
— Stuffing:  1 oz. per person 
— Green Beans:  3 oz. per person
— Potatoes:  1/2 lb. per person 
— Corn:  3 oz. per person 
— Rolls:  1 per person 
— Butter:  1 tsp. per person   (96 tsp. in 1 lb. of butter)
— Cranberry sauce:  14 oz. can has 5 servings 
— Pumpkin Pie:  a 9-inch pie can be cut into 8 slices 


Transfer your quantity and cost calculations to the “Planning a Holiday Dinner” table.

Calculate the total cost of the meal by adding up all of the items to be purchased in the “Planning a Holiday Dinner” table.  Write the total cost in the table.

Write a check for the total cost of the meal.

Cut out a picture of each item, if available, with the price from your grocery advertisement.  Using a piece of construction paper, decorate your project with these pictures. Cut out the check and attach it your project along with the “Planning a Holiday Dinner” table. You may create this project in a book format or as a poster. When writing the check, the dollar amount is in word form, the cents are written as a number of cents over a hundred.  For example. $135.45, is written as One Hundred Thirty Five 45/100 with a line going through the rest of the space.


 Happy Thanksgiving!


Sunday, November 17, 2013

Thanksgiving Headdresses

Headdresses made by students

I remember as a child in first grade making Thanksgiving headdresses.  I made a few versions. I have made two types of turkeys with different feathers, a pilgrim hat, and an Indian headdress.

Here is the .Studio file. I used cardstock.

https://drive.google.com/file/d/0B7oGIyVDbRGYWF9tVF8wV1FOTlU/view?usp=sharing&resourcekey=0-S-W2gu5Ht4mZLuPTy3UqtA

Here is the .PDF file.

https://drive.google.com/file/d/0B7oGIyVDbRGYYlpiSF9JLVpJYkU/view?usp=sharing&resourcekey=0-RbP9lAEnzcihjD3j6Z3Y9g

Slide buckle through the smaller band and attach to the larger band

I used a glue stick to glue the buckle on.  Bend the paper a little to conform
to the curvature of your head.

I used a glue stick to glue all of the parts.  It makes the paper
pliable so that you can bend it a little.

The little turkey on the Happy Thanksgiving headband is 3D. 
The head protrudes a little. There are perforations to where it bends. The different colors were made by cutting different feathers and interchanging the parts.

I added feathers to the Indian headdress.
 
 I used the decorations as a Thanksgiving window dressing at school.


Saturday, November 16, 2013

Who Plucked The Turkey?

This post is just a reflection...no instructions included for the turkey...see the previous post "Plucking Turkey Feathers" for directions.

I have two very mischievous kitties, Marley and Melvin and they both love paper.  I generate a lot of paper scraps in designing my paper models.   Instead of throwing the scraps away, I put them on the floor and scatter it in a pile so that I can see all of the pieces of paper that could possibly be reused. Yesterday, Marley came into the craft room crying that he was bored, he took one look at the pile of paper, kicked a few around and found the perfect victim, a round disc with a hole cut out in the middle. It fit perfectly in his mouth and he ran happily out of the room and down the stairs yowling all the way.  Marley dropped the paper eventually when he was done. Melvin came along and finished the job of destroying the enemy.  He chewed on it until it didn't look like its former self.

Today, I walked into the kitchen and there on the floor was my turkey decoration with a turkey feather sitting a few feet away.  "Who plucked the turkey?", I said out loud and two kitties came running.

"Who plucked the turkey?"
Melvin says "What is this on the floor?"
Marley says, "It wasn't me...I'm innocent...look how pretty I look."
Melvin says, "Hmmm...this smells pretty good."
Melvin says, "Yup, this is really tasty!"
Love this animation of what actually happened.