A Paper Ferris Wheel That Really Spins because there is an axle built inside the wheel. This Ferris Wheel makes a perfect gift. The base is a box so you can put a present inside.
The school year is over and summer is finally here. I can't believe I have been blogging for one year. It has been an unbelievable blogging year with 50,000 hits. I had no idea that my blog would generate so much response. Thank you to all who have stopped by to read my blog.
What better way to start the summer, then to make a Ferris wheel. It takes about 4 hours to make. One hour of cutting and about three hours of gluing. I would suggest doing this project over the course of a few days. Take it slow and let the glue dry. It will make everything easier.
Here is the PDF.
https://drive.google.com/file/d/0B7oGIyVDbRGYa1laWnFPUDVSeFE/view?usp=sharing&resourcekey=0-vWmvparF_cqqO6pGXmQvwg
Here is the .Studio file.
https://drive.google.com/file/d/0B7oGIyVDbRGYakg3LTR2OXdXMlU/view?usp=sharing&resourcekey=0-RYEO6bbzEx-O3aL8oYmzgQ
Here is the SVG. Once downloaded, zoom out to see the entire file.
https://drive.google.com/file/d/17G1uJRUEEAi_ELJJ-h7z6SIegHK6_hyQ/view?usp=sharing
I used cardstock and chipboard (for crossbeam support) for this project. The directions are for the yellow, red and blue design. Helpful tip...use a shoe box to store all of the pieces that are cut from this project. The stars from the chair are used on the round portion of the Ferris wheel. I lost them and I had to recut them.
Glue the boxes together at the corner. The top box has the slits.
Sandwich two support pieces together with the chipboard in the middle using a glue stick so that the paper does not warp. Repeat for the other side.
Slide the support pieces into the top of the box as shown. Glue on the side with a glue stick. Repeat for the other side.
Make 8 Ferris Wheel chairs by gluing the sides together with a glue stick and attached the W shaped seat to the sides. The slit on the red side piece is the guide for the seat portion of the chair.
Glue the yellow axle to the Ferris Wheel...first on one side.
And then to the other side. MAKE SURE the spokes are aligned as shown.
Make the eight small axles by gluing in a circle as shown above. Thread the chair through the axle and attach the spacers on each side. The spacers are needed so that the chair does not move around on the axle when the Ferris Wheel is turned.
Completed Assembly with Chairs. Make sure all of the chairs are going in the same direction.
Glue the center red wheel and the little blue stars from the cutout of the chair to both sides of the wheel as shown.
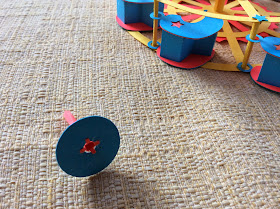
Make the red axle and glue it to the blue circle as shown. Do NOT proceed until the glue has dried thoroughly! (The picture above does not show the spacers on the axles in this model because I learned from this model that when the Ferris wheel turned some of the chairs got stuck on the sides of the wheel. The spacers took care of this problem.)
Thread the blue circle through the blue crossbeam on one side of the box, through the center of the Ferris Wheel and out through the other blue crossbeam on the other side of the box. It needs to lie flat so that you can apply pressure to get everything aligned correctly to glue.
Glue the tabs down and WAIT for the glue to dry before moving it.
Side view.
Glue the center star to the center of the wheel.
Happy Summer!


