Thursday, June 20, 2013

Pentominoes are Five Perfect Squares


Pentominoes are five squares that are arranged in various ways. After putting up the banner saying "Pentominoes are five perfect squares", I fretted that the students would think pentominoes were perfect squares.  I was just trying to be cute with the wording.  So, I decided to put up a disclaimer on the bulletin board.  This is what I wrote.


*Disclaimer I was just trying to be cute with the wording of the bulletin board. I got you to look though!

 Pentominoes are a shape made by joining five squares together side-to-side. There are 12 of them.


A pentomino is not really a perfect square in the mathematical world.  Yes, squares are perfect in the sense that they have equal side lengths and four right angles. However, perfect squares are numbers that are created when you take a whole number times itself.  For example, 1 x 1 = 1, 2 x 2 = 4, 3 x 3 = 9, 4 x 4 = 16.  So, the following numbers are perfect squares… 1, 4, 9, 16, 25, 36, 49, 64, 81, 100, 121, 144, 169, 196, 225, 256, 289, 324, 361, 400...
Here, the number 4 is squared and the result is 16 squares. 


Here is the . Studio file if you would like to cut out some Pentominoes with your Cameo Silhouette.


Tuesday, June 18, 2013

How to Make a Square from an Irregular Shaped Piece of Paper

This activity could be an opening problem for a math class.  You can challenge the students to cut an irregular shaped paper into a square without measuring and just one straight cut.  (They could use a pencil to mark the same spot on both sides of the triangle instead of making a notch.)

Friedrich Froebel, the founder of the kindergarten system, devised this way to make a square piece of paper with just one straight cut of a scissor from an irregular shaped paper. Here is his method.


Fold the paper in half.


Fold the paper in half again.


Fold one side of the quarter to the other and form a triangular flap.
Make a notch with scissors on the outer edge of the flap and move the triangular flap back to the other side.  These notches will help you draw a straight line.


There will be two notches...one on either side of the outer edge.
Draw a straight line from one notch to the other and cut on the line.
You now have a perfectly square piece of paper.


Saturday, June 15, 2013

Plain Envelope and Plain Card Pattern to Make with 8 1/2 x 11 paper

Plain Cards with Envelopes

Did you ever want to make a quick plain card?  Well, here is your answer using the Cameo Silhouette.  I have attached the Silhouette cutting file for two plain envelopes and cards. There are no fold lines on the envelopes. Cut the envelope. I used plain white copy paper. Next, cut out the plain card from cardstock. Fold the card in half. In the picture below, the card is yellow. Place the card on the envelope cutout and fold the envelope around the card.  Glue the two sides of the envelope with a glue stick so that the paper does not warp. Voila! You now have a simple card.


The envelope on the left needs to be glued shut or put a sticker on the envelope to close.
The tabbed envelope on the right, can be closed by threading the tab through the slits.


Here are the .Studio files for both cards.

https://drive.google.com/file/d/0B7oGIyVDbRGYTnVjalFpU3k4STg/view?usp=sharing&resourcekey=0-ylUpENRh7ei0ZDjzmjtHnQ


Here are the PDF's for both of the cards.


#cameosilhouette #silhouette


Tuesday, June 11, 2013

Welcome to my new blog!

Summer is fast approaching and I have decided to create a blog as a depository of all of my past and future papercrafts.

I love to integrate art, architecture and engineering into math.  I have a Cameo Silhouette which I use to cut out a lot of my creations.  It is an amazing machine that can cut just about any image.


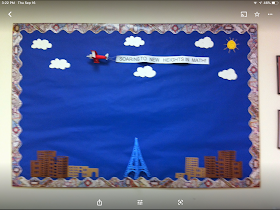
Here is a bulletin board which says "Soaring To New Heights In Math".  I cut out a 3D biplane pattern which was purchased from the Silhouette online store and attached the banner with white embroidery thread.  The eiffel tower is 3D and the pattern was also purchased at the Silhouette online store. The 3D buildings were made using the Cameo Silhouette Designer software.  The software is unbelieveable...I love the fact that you can copy an image and do point editing to make an entirely new design.

Please check back often as I have many ideas that I would like to explore and discoveries to share.